Yamaha DTX-PROX DTX-PROX Owners Manual - Page 15
PAD SELECT] button, Click Tempo Display
 |
View all Yamaha DTX-PROX manuals
Add to My Manuals
Save this manual to your list of manuals |
Page 15 highlights
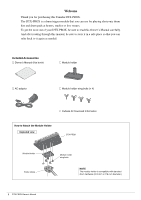
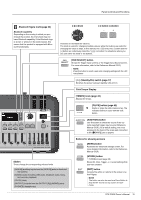
Panel Controls and Functions Bluetooth figure mark (page 24) Bluetooth capability Depending on the country in which you purchased the product, the instrument may not have Bluetooth capability. If the Bluetooth logo is shown or printed on the control panel, this means that the product is equipped with Bluetooth functionality. [-][+] knob [-] button [+] button Increases or decrease the value(s). The knob is useful for changing multiple values, while the buttons are useful for changing the value in steps. In this manual, the [-][+] knob, the [-] button and the [+] button are collectively called the "[-][+] controllers" for situations where you can use either the knob or the buttons. [PAD SELECT] button Shows the Trigger Input screens or the Trigger Input Source screen. For more information, refer to the Reference Manual (PDF). NOTE Press this button to select a pad while changing settings with the LED rotary faders. [ ] (Standby/On) switch (page 17) Switches the power between standby (off) and on. Click Tempo Display [TEMPO] knob (page 42) Adjusts the tempo. 120 [CLICK] button (page 42) Starts or stops the click (metronome). The indicator flashes in sync with the click tempo. [AUDITION] button Use this button to check the sound of the currently selected trigger input source (Reference Manual (PDF)). As a default setting, the voice assigned to the head of the snare pad connected to the [qSNARE] jack is played. Sliders These change the corresponding volume levels. [AUX IN] (auxiliary inputs from the [AUX IN] jacks on front and rear panels) [AUDIO] (audio including USB audio, Bluetooth audio, Song, and recorder playback) [CLICK] (click) [OUTPUT] (outputs from the OUTPUT [R]/[L/MONO] jacks) [PHONES] (headphones) Buttons for showing screens [MENU] button Accesses the advanced settings screen. For more detailed information, refer to the Reference Manual (PDF). [STORE] button STORE screen (page 40) Stores Kit, Click, Trigger, or, Live set settings that you have created. [EXIT] button Cancels the action or returns to the screen one level higher. NOTE This button can also be used as a Panic Button to stop the KIT sounds (on top screen for each mode). DTX-PROX Owner's Manual 11
-
 1
1 -
2
-
3
-
4
-
5
-
6
-
7
-
8
-
9
-
 10
10 -
 11
11 -
 12
12 -
 13
13 -
 14
14 -
 15
15 -
 16
16 -
 17
17 -
 18
18 -
 19
19 -
 20
20 -
21
-
22
-
23
-
24
-
25
-
26
-
27
-
28
-
29
-
30
-
31
-
32
-
33
-
34
-
35
-
36
-
37
-
38
-
39
-
40
-
41
-
42
-
43
-
44
-
45
-
46
-
47
-
48
-
49
-
50
-
51
-
52
-
53
-
54
-
55
-
56
-
57
-
58
-
59
-
60
-
61
-
62
-
63
-
64
-
65
-
66
-
67
-
68
 |
 |
