Yamaha DTX-PROX DTX-PROX Owners Manual - Page 50
Recording Your Performance, Recording to the DTX-PROX when no USB flash drive is connected
 |
View all Yamaha DTX-PROX manuals
Add to My Manuals
Save this manual to your list of manuals |
Page 50 highlights
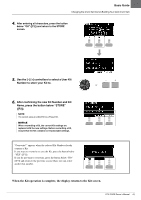
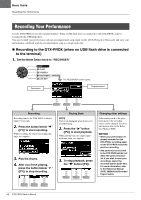
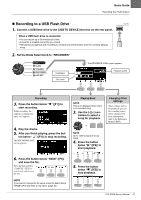
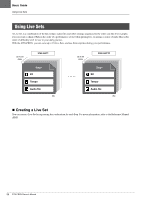
Basic Guide Recording Your Performance Recording Your Performance Use the DTX-PROX to record your performance. When a USB flash drive is connected to the DTX-PROX, audio is recorded to the USB flash drive. You can overdub your performance onto an accompaniment song (input via the [AUX IN] jack or Bluetooth) and save your performance combined with the accompaniment song as a single audio file. Recording to the DTX-PROX (when no USB flash drive is connected to the terminal) 1. Set the Mode Select knob to "RECORDER." Destination The RECORDER screen opens. Playback speed Recording Recording time to the DTX-PROX is about 1 minute 30 seconds. 2. Press the button below "" ([F1]) to start recording. While recording, the elapsed recording time (min: sec) appears. 3. Play the drums. 4. After you finish playing, press the button below " " ([F1]) to stop recording. Playing Back NOTE This is not displayed when there is no recorded song. 2. Press the ">" button ([F2]) to start playback. While playing back, the elapsed playback time (min: sec) appears. 3. To stop playback, press the "" button ([F2]). Changing other settings Other settings such as the playback speed or the recording source can be changed. For more information, refer to the Reference Manual (PDF). NOTICE • When your performance is already recorded on the DTX-PROX, recording again on the DTX-PROX erases the previous recording. • Any performance recorded to the DTX-PROX will be lost when the power is turned off. If you wish to save your recordings, export the recorded data as audio files. For more information, refer to the Reference Manual (PDF). (MENU/Job/Recorder/ Export Audio) 46 DTX-PROX Owner's Manual
-
 1
1 -
2
-
3
-
4
-
5
-
6
-
7
-
8
-
9
-
10
-
11
-
12
-
13
-
14
-
15
-
16
-
17
-
18
-
19
-
20
-
21
-
22
-
23
-
24
-
25
-
26
-
27
-
28
-
29
-
30
-
31
-
32
-
33
-
34
-
35
-
36
-
37
-
38
-
39
-
40
-
41
-
42
-
43
-
44
-
 45
45 -
 46
46 -
 47
47 -
 48
48 -
 49
49 -
 50
50 -
 51
51 -
 52
52 -
 53
53 -
 54
54 -
 55
55 -
56
-
57
-
58
-
59
-
60
-
61
-
62
-
63
-
64
-
65
-
66
-
67
-
68
 |
 |
