Yamaha DTX450K Owner's Manual - Page 18
Step 15, Fine-tuning the positions of the pads and the drum module - drum kit
 |
View all Yamaha DTX450K manuals
Add to My Manuals
Save this manual to your list of manuals |
Page 18 highlights
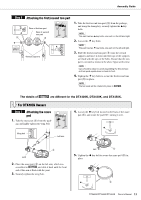
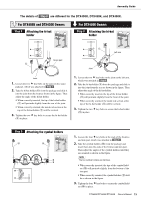
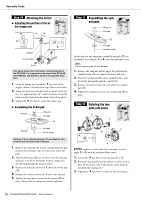
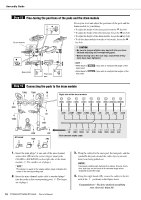
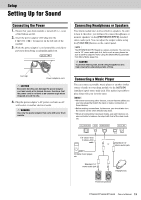
Assembly Guide Step 15 Fine-tuning the positions of the pads and the drum module Drum module Sit on your stool and adjust the positions of the pads and the drum module to your liking. • To adjust the height of the snare pad, loosen the key bolt. • To adjust the height of the third tom pad, loosen the key bolt. • To adjust the height of the drum module, loosen the s key bolt. • To tilt the drum module forwards or backwards, loosen the key bolt. CAUTION • Be sure to always retighten any key bolt after you have finished adjusting the corresponding part. • Before moving on to the next step, ensure that all key bolts have been tightened. Snare pad Third tom pad NOTE • Refer back to Step 7 if you wish to readjust the angle of the snare pad. • Refer back to Step 12 if you wish to readjust the angles of the tom pads. Step 16 Connecting the pads to the drum module TOM2 TOM1 CR Right side of the drum module RIDE TOM3 HH SNR DTX400K KICK KICK HHC HHC SNR TOM1 TOM2 TOM3 RIDE CR HH HHC KICK CR TOM1 TOM2 HH Nine-channel snake cable SNR RIDE TOM3 KICK HHC 1. Insert the mini plugs* at one end of the nine-channel snake cable (!6) into the correct trigger input jacks (SNARE to KICK/PAD) on the right side of the drum module. (*: The smaller set of plugs.) NOTE The sticker on each of the snake cable's plugs indicates the name of the corresponding pad. 2. Insert the nine-channel snake cable's standard plugs* into the jacks in the corresponding pads. (*: The larger set of plugs.) 18 DTX400K/DTX430K/DTX450K Owner's Manual 3. Wrap the cables for the snare pad, the tom pads, and the cymbal/hi-hat pads around the cable clips to prevent them from being pulled out. NOTICE Excessive bending can damage the cables. Ensure, therefore, that they are not bent at an extreme angle when wrapped around the clips. 4. Using the cable bands (!8), secure the cables to the kit rack at the positions in the figure above. Congratulations-You have finished assembling your electronic drum kit!
-
 1
1 -
2
-
3
-
4
-
5
-
6
-
7
-
8
-
9
-
10
-
11
-
12
-
 13
13 -
 14
14 -
 15
15 -
 16
16 -
 17
17 -
 18
18 -
 19
19 -
 20
20 -
 21
21 -
 22
22 -
 23
23 -
24
-
25
-
26
-
27
-
28
-
29
-
30
-
31
-
32
-
33
-
34
-
35
-
36
-
37
-
38
-
39
-
40
-
41
-
42
-
43
-
44
-
45
-
46
-
47
-
48
-
49
-
50
-
51
-
52
-
53
-
54
-
55
-
56
-
57
-
58
-
59
-
60
-
61
-
62
-
63
-
64
-
65
-
66
-
67
-
68
 |
 |
