Yamaha DTX450K Owner's Manual - Page 19
Setting Up for Sound, Connecting the Power, Connecting Headphones or Speakers, Connecting a Music
 |
View all Yamaha DTX450K manuals
Add to My Manuals
Save this manual to your list of manuals |
Page 19 highlights
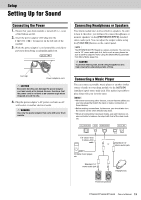
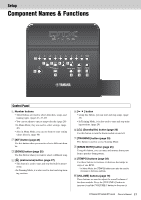
Setup Setting Up for Sound Connecting the Power 1. Ensure that your drum module is turned off (i.e., none of the buttons are lit). 2. Insert the power adaptor's DC plug into the [ ] connector on the left side of the module. 3. Hook the power adaptor's cord around the cord clip to prevent it from being accidentally pulled out. Connecting Headphones or Speakers Your drum module does not have built-in speakers. In order to hear it, therefore, you will need to connect headphones or monitor speakers via the [PHONES/OUTPUT] standard stereo-audio jack. You can adjust the output volume using the [VOLUME] buttons on the control panel. NOTE The [PHONES/OUTPUT] jack is a stereo connector. You can connect a 1/4" mono-audio jack to it, but in such a case, please be sure to set the output to mono using the Stereo/Mono parameter from Menu Mode (page 53). CAUTION To prevent hearing loss, avoid using headphones at a high volume for extended periods of time. Cord clip Power adaptor's cord CAUTION Excessive bending can damage the power adaptor cord and create a fire hazard. Ensure, therefore, that the power cord is not bent at an extreme angle when wrapped around the clip. 4. Plug the power adaptor's AC power cord into an AC wall socket or another electrical outlet. WARNING Use only the power adaptor that came with your drum module. Connecting a Music Player You can connect a portable music player or another similar source of audio to your drum module via the [AUX IN] (auxiliary input) stereo mini-jack. This makes it possible to play along with your favorite tunes. NOTICE • Whenever connecting other devices, ensure that the cables you use have plugs that match the input or output connectors on those devices. • Before making connections, furthermore, you should also turn the volume on the other devices fully down. • When all connections have been made, use each device's volume controller to balance its output with that of the drum module. 1/8" stereo-mini to stereo-mini cable Portable music player, etc. Standard 1/4" mono-audio jack or Standard 1/4" stereo-audio jack Headphones Powered speakers DTX400K/DTX430K/DTX450K Owner's Manual 19
-
 1
1 -
2
-
3
-
4
-
5
-
6
-
7
-
8
-
9
-
10
-
11
-
12
-
13
-
 14
14 -
 15
15 -
 16
16 -
 17
17 -
 18
18 -
 19
19 -
 20
20 -
 21
21 -
 22
22 -
 23
23 -
 24
24 -
25
-
26
-
27
-
28
-
29
-
30
-
31
-
32
-
33
-
34
-
35
-
36
-
37
-
38
-
39
-
40
-
41
-
42
-
43
-
44
-
45
-
46
-
47
-
48
-
49
-
50
-
51
-
52
-
53
-
54
-
55
-
56
-
57
-
58
-
59
-
60
-
61
-
62
-
63
-
64
-
65
-
66
-
67
-
68
 |
 |
