Yamaha DTX450K Owner's Manual - Page 40
Advanced Techniques, Setting Parameters using Menu Mode, Basic Menu Mode Procedure - double bass
 |
View all Yamaha DTX450K manuals
Add to My Manuals
Save this manual to your list of manuals |
Page 40 highlights
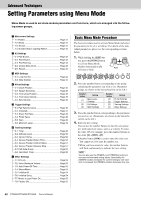
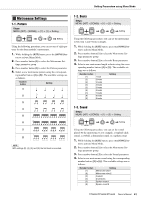
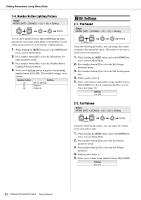
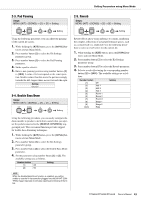
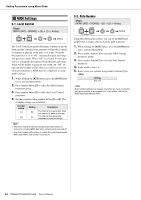
Advanced Techniques Setting Parameters using Menu Mode Advanced Techniques Menu Mode is used to set drum-module parameters and functions, which are arranged into the following seven groups. z Metronome Settings 1-1. Pattern Page 41 1-2. Beats Page 41 1-3. Sound Page 41 1-4. Number Button Lighting Pattern Page 42 x Kit Settings 2-1. Pad Sound Page 42 2-2. Pad Volume Page 42 2-3. Pad Panning Page 43 2-4. Double Bass Drum Page 43 2-5. Reverb Page 43 c MIDI Settings 3-1. Local Control Page 44 3-2. Note Number Page 44 v Hi-hat Settings 4-1. Clutch Position Page 45 4-2. Splash Sensitivity Page 45 4-3. Foot Close Position Page 45 4-4. Foot Close Velocity Page 45 4-5. Kick Velocity Page 46 b Trigger Settings 5-1. Pad Velocity Curve Page 46 5-2. Crosstalk Page 47 5-3. Snare Pad Type Page 48 5-4. Pedal Types Page 48 5-5. Gain Page 49 5-6. Minimum Level Page 49 n Training Settings 6-1. Timer Page 49 6-2. Difficulty Level Page 50 6-3. Ignore Timing Page 50 6-4. Groove Tracker Return Time Page 50 6-5. Groove Tracker Control Pad(s Page 51 6-6. Groove Tracker Advance Step Page 51 6-7. Pad Gate Group Page 52 6-8. Fast Blast Timer Page 52 m Other Settings 7-1. Kit Lock Page 53 7-2. Voice Guidance Volume Page 53 7-3. Auto Power-Off Time Page 53 7-4. Stereo/Mono Page 53 7-5. Initialize Kit Page 54 7-6. Initialize Song Page 54 7-7. Revert to Last Power On Page 55 7-8. Factory Set Page 55 Basic Menu Mode Procedure The basic procedure used to activate Menu Mode and select the parameter to be set is as follows. For details of the individual parameters, please see the corresponding sections below. 1. While holding the [KIT] but- ton, press the [SONG] button to activate Menu Mode. Number buttons [1] to [7] Hold will start to flash. 2. Press the number button corresponding to the group containing the parameter you wish to set. (Parameter groups are shown in the hierarchical list on the left.) Number button [1] [2] [3] Group Metronome Settings Kit Settings MIDI Settings Number button [4] [5] [6] [7] Group Hi-hat Settings Trigger Settings Training Settings Other Settings 3. Press the number button corresponding to the parameter you wish to set. (Parameters are shown in the hierarchical list on the left.) 4. Enter the new setting. You can use the number buttons to directly set parameters with numerical values, such as a velocity. To enter the value 105, for example, press the number buttons in the order [1][10/0][5]. • Number button [10/0] is used to enter the value zero. You cannot use it to enter the number ten. • When you have entered a value, the number buttons will flash continuously to indicate the new setting. NOTE You can also use the [TEMPO+] and [TEMPO-] buttons to increase and decrease setting values. Specifically, the [TEMPO+] button increases the current setting by one each time it is pressed; the [TEMPO-] button decreases it by one. 40 DTX400K/DTX430K/DTX450K Owner's Manual
-
 1
1 -
2
-
3
-
4
-
5
-
6
-
7
-
8
-
9
-
10
-
11
-
12
-
13
-
14
-
15
-
16
-
17
-
18
-
19
-
20
-
21
-
22
-
23
-
24
-
25
-
26
-
27
-
28
-
29
-
30
-
31
-
32
-
33
-
34
-
 35
35 -
 36
36 -
 37
37 -
 38
38 -
 39
39 -
 40
40 -
 41
41 -
 42
42 -
 43
43 -
 44
44 -
 45
45 -
46
-
47
-
48
-
49
-
50
-
51
-
52
-
53
-
54
-
55
-
56
-
57
-
58
-
59
-
60
-
61
-
62
-
63
-
64
-
65
-
66
-
67
-
68
 |
 |
