Yamaha DTX450K Owner's Manual - Page 46
Trigger Settings, 5. Kick Velocity, 1. Pad Velocity Curve
 |
View all Yamaha DTX450K manuals
Add to My Manuals
Save this manual to your list of manuals |
Page 46 highlights
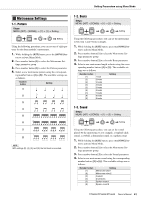
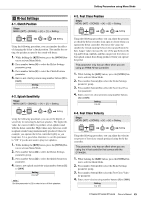
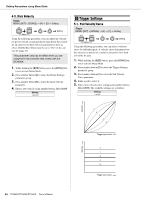
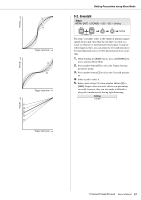
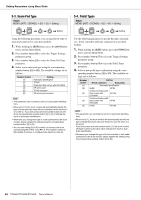
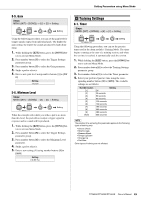
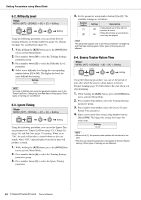
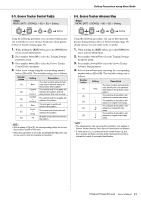
Setting Parameters using Menu Mode 4-5. Kick Velocity Steps: MENU ([KIT] + [SONG]) [4] [5] Setting Setting b Trigger Settings 5-1. Pad Velocity Curve Steps: MENU ([KIT] + [SONG]) [5] [1] Setting Using the following procedure, you can adjust the velocity (or power) of kick sounds produced using the hi-hat controller. In order for the Kick Velocity parameter to have an effect, Double Bass Drum must be set to "On" for the current kit (page 43). This parameter only has an effect when you are using the hi-hat controller that comes with the DTX400K. 1. While holding the [KIT] button, press the [SONG] but- ton to activate Menu Mode. 2. Press number button [4] to select the Hi-hat Settings parameter group. 3. Press number button [5] to select the Kick Velocity parameter. 4. Enter a new velocity using number buttons [1] to [10/0]. Setting 1 to 127 Setting Using the following procedure, you can select a velocity curve for individual pads. A velocity curve determines how the velocity (or power) of a sound is affected by how hard you strike the pad. 1. While holding the [KIT] button, press the [SONG] but- ton to activate Menu Mode. 2. Press number button [5] to select the Trigger Settings parameter group. 3. Press number button [1] to select the Pad Velocity Curve parameter. 4. Strike a pad to select it. 5. Enter a new velocity curve setting using number buttons [1] to [10/0]. The available settings are as follows. Setting 1 to 25 Velocity 1 2 3 4 5 Trigger input level Velocity 6 7 8 9 10 Trigger input level 46 DTX400K/DTX430K/DTX450K Owner's Manual
-
 1
1 -
2
-
3
-
4
-
5
-
6
-
7
-
8
-
9
-
10
-
11
-
12
-
13
-
14
-
15
-
16
-
17
-
18
-
19
-
20
-
21
-
22
-
23
-
24
-
25
-
26
-
27
-
28
-
29
-
30
-
31
-
32
-
33
-
34
-
35
-
36
-
37
-
38
-
39
-
40
-
 41
41 -
 42
42 -
 43
43 -
 44
44 -
 45
45 -
 46
46 -
 47
47 -
 48
48 -
 49
49 -
 50
50 -
 51
51 -
52
-
53
-
54
-
55
-
56
-
57
-
58
-
59
-
60
-
61
-
62
-
63
-
64
-
65
-
66
-
67
-
68
 |
 |
