Yamaha EAD10 EAD10 Owners Manual - Page 17
Panel Controls and Functions, Main Unit
 |
View all Yamaha EAD10 manuals
Add to My Manuals
Save this manual to your list of manuals |
Page 17 highlights
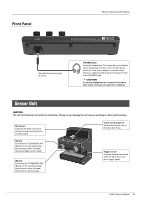
Panel Controls and Functions Main Unit Top Panel [SCENE] knob (page 33) Switches between the different sound sets. Or, returns to the Scene screen from other screens. NOTE The knob can be used in the same manner as the [-] and [+] buttons. For more information, refer to the Reference Manual (Advanced) (PDF) (MENU/Utility/ General). [MASTER VOLUME] knob Adjusts the overall volume. Display (page 33) Displays a variety of information. [AUDIO/CLICK VOLUME] knob Adjusts the volume for AUX IN (auxiliary input) and Click functions-any sound or audio you play along to. Function Buttons 1-3 (page 33) ([F1], [F2], [F3]) Selects the functions that appear at the bottom of each screen. [ ] (Standby/On) switch (page 25) Switches the power between standby (off) and on. [MENU] button Accesses the advanced settings screen. For more detailed information, refer to the Reference Manual (Advanced) (PDF). [ ] (Sensor Unit) button (page 27) Accesses the Sensor Unit screen. Set the mic sensor level so that the button occasionally flashes when hitting the drums strongly. [REVERB] knob (page 33) Adjusts the reverb level. [EFFECT] knob (page 33) Adjusts the amount of Effect applied to the audio signal from the mic sensor. [TRIGGER] knob (page 33) Adjusts the Trigger Sound volume. [STORE] button (page 37) Opens the Store screen. Stores Scenes that you have created. [-] button, [+] button Increases or decreases the value by one (1). [ ] (Click) button (page 39) Accesses the Click (Metronome) screen. The button flashes in sync with the Click tempo. [RECORDER] button (page 41) Accesses the Recorder (record/playback) screen. The button lights while recording or during playback. [EXIT] button Cancels the action, or returns to the screen one level higher. Press several times to return to the Scene screen. NOTE When in the Scene Screen, this button can also be used as a Panic Button to stop any sounds. EAD10 Owner's Manual 13
-
 1
1 -
2
-
3
-
4
-
5
-
6
-
7
-
8
-
9
-
10
-
11
-
 12
12 -
 13
13 -
 14
14 -
 15
15 -
 16
16 -
 17
17 -
 18
18 -
 19
19 -
 20
20 -
 21
21 -
 22
22 -
23
-
24
-
25
-
26
-
27
-
28
-
29
-
30
-
31
-
32
-
33
-
34
-
35
-
36
-
37
-
38
-
39
-
40
-
41
-
42
-
43
-
44
-
45
-
46
-
47
-
48
-
49
-
50
-
51
-
52
-
53
-
54
-
55
-
56
-
57
-
58
-
59
-
60
-
61
-
62
-
63
-
64
-
65
-
66
-
67
-
68
-
69
-
70
-
71
-
72
 |
 |
