Yamaha EAD10 EAD10 Owners Manual - Page 37
Basic Scene Operation, How to Read the Scene Screen, Adjusts the volume, Changes the type
 |
View all Yamaha EAD10 manuals
Add to My Manuals
Save this manual to your list of manuals |
Page 37 highlights
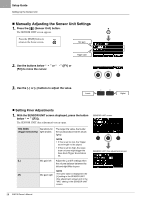
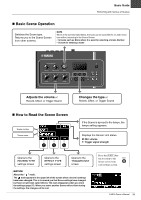
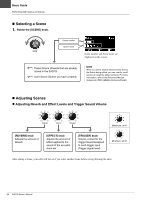
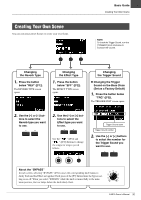
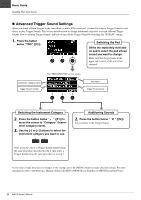
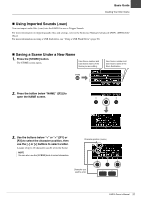
Basic Guide Performing with Various of Scenes Basic Scene Operation Switches the Scene type. Returns you to the Scene Screen from other screens. NOTE When in the screens listed below, the knob can be used like the [-] and [+] buttons without returning to the Scene Screen. • Screens such as Store where it is used for selecting a Scene Number • Screen for entering a name Adjusts the volume of Reverb, Effect, or Trigger Sound Changes the type of Reverb, Effect, or Trigger Sound How to Read the Scene Screen Scene number Scene name If the Scene is synced to the tempo, the tempo setting appears. Displays the Sensor Unit status. M: Mic volume T: Trigger signal strength Opens to the REVERB TYPE settings screen Opens to the EFFECT TYPE settings screen Opens to the TRIGGER INST screen NOTICE About the " " mark: The mark appears in the upper left of the screen when a Scene's settings have been changed. This is to remind you that Scene settings have changed but have not yet been saved (Store). The mark disappears when you store the settings (page 37). When you select another Scene without first storing the settings, the changes will be lost. Press the [EXIT] button to return to the Scene screen from each settings screen. EAD10 Owner's Manual 33
-
 1
1 -
2
-
3
-
4
-
5
-
6
-
7
-
8
-
9
-
10
-
11
-
12
-
13
-
14
-
15
-
16
-
17
-
18
-
19
-
20
-
21
-
22
-
23
-
24
-
25
-
26
-
27
-
28
-
29
-
30
-
31
-
 32
32 -
 33
33 -
 34
34 -
 35
35 -
 36
36 -
 37
37 -
 38
38 -
 39
39 -
 40
40 -
 41
41 -
 42
42 -
43
-
44
-
45
-
46
-
47
-
48
-
49
-
50
-
51
-
52
-
53
-
54
-
55
-
56
-
57
-
58
-
59
-
60
-
61
-
62
-
63
-
64
-
65
-
66
-
67
-
68
-
69
-
70
-
71
-
72
 |
 |
