Yamaha EAD10 EAD10 Owners Manual - Page 24
Connecting the Cables, About the Module Holder - drum module
 |
View all Yamaha EAD10 manuals
Add to My Manuals
Save this manual to your list of manuals |
Page 24 highlights
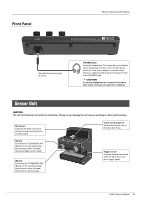
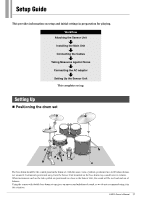
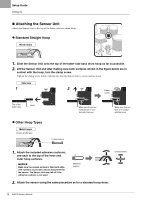
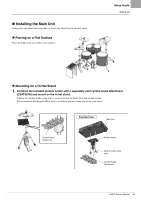
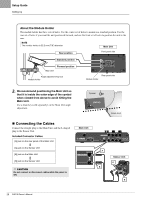
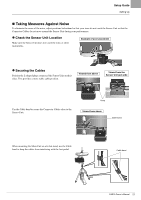
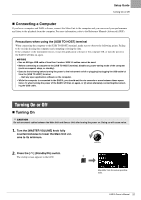
Setup Guide Setting Up About the Module Holder The module holder has three sets of holes. Use the center set of holes to mount in a standard position. Use the rear set of holes if you want the unit positioned forward, and use the front set of holes to position the unit to the rear. NOTE The module holder is 22.2 mm (7/8") diameter. Main Unit Rear position Front panel side Standard position Main Unit Forward position Angle adjustment key bolt Module holder Module holder Rear panel side 2. We recommend positioning the Main Unit so that it is inside the outer edge of the cymbal when viewed from above to avoid hitting the Main Unit. Use a drum key (sold separately) on the Main Unit angle adjustment. Cymbal (EAD10) Connecting the Cables Connect the straight plug to the Main Unit, and the L-shaped plug to the Sensor Unit. Included Connector Cables [A] jack on the rear panel of the Main Unit [A] jack on the Sensor Unit [B] jack on the Main Unit [B] jack on the Sensor Unit CAUTION Do not connect or disconnect cables while the power is ON. Main Unit Snare drum Sensor Unit 20 EAD10 Owner's Manual
-
 1
1 -
2
-
3
-
4
-
5
-
6
-
7
-
8
-
9
-
10
-
11
-
12
-
13
-
14
-
15
-
16
-
17
-
18
-
 19
19 -
 20
20 -
 21
21 -
 22
22 -
 23
23 -
 24
24 -
 25
25 -
 26
26 -
 27
27 -
 28
28 -
 29
29 -
30
-
31
-
32
-
33
-
34
-
35
-
36
-
37
-
38
-
39
-
40
-
41
-
42
-
43
-
44
-
45
-
46
-
47
-
48
-
49
-
50
-
51
-
52
-
53
-
54
-
55
-
56
-
57
-
58
-
59
-
60
-
61
-
62
-
63
-
64
-
65
-
66
-
67
-
68
-
69
-
70
-
71
-
72
 |
 |
