Yamaha EAD10 EAD10 Owners Manual - Page 42
When the Store operation is complete, the display returns to the Scene screen., STORE [F3].
 |
View all Yamaha EAD10 manuals
Add to My Manuals
Save this manual to your list of manuals |
Page 42 highlights
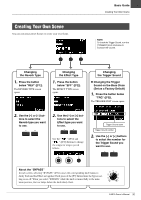
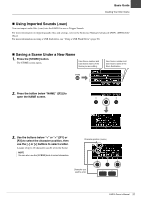
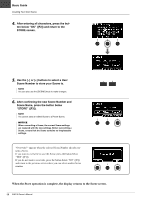
Basic Guide Creating Your Own Scene 4. After entering all characters, press the but- ton below "OK" ([F2]) and return to the STORE screen. 5. Use the [-] or [+] buttons to select a User Scene Number to store your Scene to. NOTE You can also use the [SCENE] knob to make changes. 6. After confirming the new Scene Number and Scene Name, press the button below "STORE" ([F3]). NOTE You cannot save an edited Scene to a Preset Scene. NOTICE When overwriting a Scene, the current Scene settings are replaced with the new settings. Before overwriting a Scene, ensure that the Scene contains no irreplaceable settings. "Overwrite?" appears when the selected Scene Number already contains a Scene. If you want to overwrite to save the Scene, press the button below "YES" ([F1]). If you do not want to overwrite, press the button below "NO" ([F3]) and return to the previous screen where you can select another Scene number. When the Store operation is complete, the display returns to the Scene screen. 38 EAD10 Owner's Manual
-
 1
1 -
2
-
3
-
4
-
5
-
6
-
7
-
8
-
9
-
10
-
11
-
12
-
13
-
14
-
15
-
16
-
17
-
18
-
19
-
20
-
21
-
22
-
23
-
24
-
25
-
26
-
27
-
28
-
29
-
30
-
31
-
32
-
33
-
34
-
35
-
36
-
 37
37 -
 38
38 -
 39
39 -
 40
40 -
 41
41 -
 42
42 -
 43
43 -
 44
44 -
 45
45 -
 46
46 -
 47
47 -
48
-
49
-
50
-
51
-
52
-
53
-
54
-
55
-
56
-
57
-
58
-
59
-
60
-
61
-
62
-
63
-
64
-
65
-
66
-
67
-
68
-
69
-
70
-
71
-
72
 |
 |
