Yamaha LPX510 MCXSP10 Manual - Page 49
Interference or distortion appear in images, Image is truncated large or small, Have the Sync.
 |
View all Yamaha LPX510 manuals
Add to My Manuals
Save this manual to your list of manuals |
Page 49 highlights
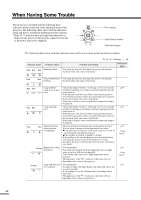
When the Indicators Provide No Help Interference or distortion appear in images Are the image signal format settings correct? Are the cables connected correctly? Is an extension cable being used? IHave the "Sync. " and "Tracking " settings been adjusted correctly? Only when projecting computer images Has the correct resolution been selected? Only when projecting computer images When a composite video or S-Video signal is being input. If images cannot be projected even when the "Video Signal" menu command is set to "Auto", change the setting to the signal format for the connected equipment. "Setup" - "Input Signal" - "Video Signal" (p.36) If connected to the INPUT A or INPUT B port Check that the connectors of the connection cable are inserted into the correct ports. (Setup Guide) Check that all of the cables required for projection are securely connected. (Setup Guide) If an extension cable is used, interference may increase. Try connecting a signal amplifier. The projector has an automatic adjustment function for projecting images at optimum quality. However, some types of signal may not be adjusted correctly even when the automatic adjustment function is applied. In such cases, use the "Tracking" and "Sync." menu commands to adjust the signals. "Image" - "Picture Quality" - "Tracking", "Sync." (p.30) Set the computer so that the output signals are compatible with this projector. "List of Supported Signal Resolutions" (p.59), Computer documentation Image is truncated (large) or small Has the correct aspect been selected? Has the "Position" setting been adjusted correctly? Has the computer been set for dual display? Only when projecting computer images Press the button on the remote control or the [ASPECT] ASPECT button on the projector's control panel to select the aspect that matches the input signals. (p.19) If images with subtitles are being projected using the "Zoom" command, use the "Zoom Caption" menu command to adjust. (p.33) Use the "Position" menu command to adjust. "Setup" - "Screen" - "Position" (p.33) If dual display has been activated in the Display Properties of the computer's Control Panel, the projector will only project about half of the image on the computer screen. To display the whole of the image on the computer screen, turn off the dual display setting. Computer video driver documentation Has the correct resolution been selected? Only when projecting computer images Set the computer so that the signals that are output are compatible with this projector. "List of Supported Signal Resolutions" (p.59), Computer documentation 46
-
 1
1 -
2
-
3
-
4
-
5
-
6
-
7
-
8
-
9
-
10
-
11
-
12
-
13
-
14
-
15
-
16
-
17
-
18
-
19
-
20
-
21
-
22
-
23
-
24
-
25
-
26
-
27
-
28
-
29
-
30
-
31
-
32
-
33
-
34
-
35
-
36
-
37
-
38
-
39
-
40
-
41
-
42
-
43
-
 44
44 -
 45
45 -
 46
46 -
 47
47 -
 48
48 -
 49
49 -
 50
50 -
 51
51 -
 52
52 -
 53
53 -
 54
54 -
55
-
56
-
57
-
58
-
59
-
60
-
61
-
62
-
63
-
64
-
65
-
66
-
67
-
68
-
69
-
70
-
71
-
72
-
73
-
74
-
75
-
76
-
77
-
78
-
79
-
80
-
81
 |
 |
