Yamaha MD4 Owner's Manual - Page 22
Listening to the First Track, Press the LAST REC SEARCH [IN] button.
 |
View all Yamaha MD4 manuals
Add to My Manuals
Save this manual to your list of manuals |
Page 22 highlights
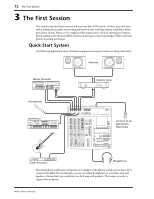
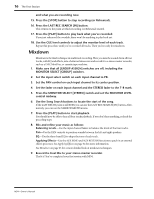
14 The First Session The following table show the relationship between the PAN control and Group/Tracks. GROUP ASSIGN PAN Destination Group/Track 1 2 Group/Track 1 3 4 1 2 L ODD R EVEN Group/Track 3 Group/Track 2 3 4 L ODD R EVEN Group/Track 4 6. Press the MONITOR SELECT [1-3] switch. This sets the monitor source to Track 1. 7. Set the MONITOR LEVEL control midway. 8. Raise Channel 1 fader to the 7-8 mark. You should now be able to hear the sound source. If you don't hear anything, recheck the preceding steps. 9. Press REC SELECT button [1]. A circle flashes around track indicator 1. 10. Press the [REC] button. The REC indicators flash, indicating Record Pause mode. Track 1 meter shows the signal level. 11. Adjust the GAIN control on Channel 1 so that the loudest sounds cause the meter to reach the -3 position. If the meter goes beyond the -3 position into CLIP, back off the GAIN control a little. It is important that you set this level correctly to achieve the best sound. Too low a level does not make full use of the sonic capabilities of your MD4. Too high a level may cause distortion. Tip: If the level of the sound source varies greatly, making it difficult to find an optimum setting for the GAIN control, you can use an external compressor to even out the signal level. MD4 is now ready to record. All you have to do to start recording is press the [PLAY] button. So make sure that your music source is ready to go. If you want to cancel Record Pause mode, press the [STOP] button. 12. Press the [PLAY] button to start recording. Recording starts and the time counter shows the recording time. 13. Press the [STOP] button to stop recording. You've now recorded your first track. Listening to the First Track 1. Press the LAST REC SEARCH [IN] button. This returns to the point at which recording started. For the first recording, this is always 00:00.00. MD4-Owner's Manual
-
 1
1 -
2
-
3
-
4
-
5
-
6
-
7
-
8
-
9
-
10
-
11
-
12
-
13
-
14
-
15
-
16
-
 17
17 -
 18
18 -
 19
19 -
 20
20 -
 21
21 -
 22
22 -
 23
23 -
 24
24 -
 25
25 -
 26
26 -
 27
27 -
28
-
29
-
30
-
31
-
32
-
33
-
34
-
35
-
36
-
37
-
38
-
39
-
40
-
41
-
42
-
43
-
44
-
45
-
46
-
47
-
48
-
49
-
50
-
51
-
52
-
53
-
54
-
55
-
56
-
57
-
58
-
59
-
60
-
61
-
62
-
63
-
64
-
65
-
66
-
67
-
68
-
69
-
70
-
71
-
72
-
73
-
74
-
75
-
76
-
77
-
78
-
79
-
80
-
81
-
82
-
83
-
84
-
85
-
86
-
87
-
88
 |
 |
