Yamaha MD4 Owner's Manual - Page 47
Erasing Markers, Press the [CLEAR] button.
 |
View all Yamaha MD4 manuals
Add to My Manuals
Save this manual to your list of manuals |
Page 47 highlights
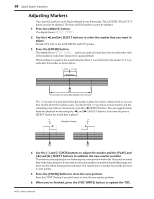
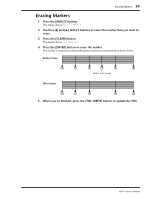
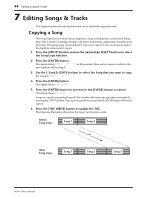
Erasing Markers 39 Erasing Markers 1. Press the [ADJUST] button. The display shows ADJST: MARK 1 2. Use the [√] and [®] SELECT buttons to select the marker that you want to erase. 3. Press the [CLEAR] button. The display shows CLR MARK 1? 4. Press the [ENTER] button to erase the marker. The marker is erased and existing subsequent markers are renumbered, as shown below. Before Erase [S] [1] [2] [3] [4] [E] Marker to be erased After Erase [S] [1] [2] [3] [E] 5. When you've finished, press the [TOC WRITE] button to update the TOC. MD4-Owner's Manual
-
 1
1 -
2
-
3
-
4
-
5
-
6
-
7
-
8
-
9
-
10
-
11
-
12
-
13
-
14
-
15
-
16
-
17
-
18
-
19
-
20
-
21
-
22
-
23
-
24
-
25
-
26
-
27
-
28
-
29
-
30
-
31
-
32
-
33
-
34
-
35
-
36
-
37
-
38
-
39
-
40
-
41
-
 42
42 -
 43
43 -
 44
44 -
 45
45 -
 46
46 -
 47
47 -
 48
48 -
 49
49 -
 50
50 -
 51
51 -
 52
52 -
53
-
54
-
55
-
56
-
57
-
58
-
59
-
60
-
61
-
62
-
63
-
64
-
65
-
66
-
67
-
68
-
69
-
70
-
71
-
72
-
73
-
74
-
75
-
76
-
77
-
78
-
79
-
80
-
81
-
82
-
83
-
84
-
85
-
86
-
87
-
88
 |
 |

Erasing Markers
39
MD4—Owner’s Manual
Erasing Markers
1.
Press the [ADJUST] button.
The display shows
ADJST: MARK 1
2.
Use the [
√
] and [
®
] SELECT buttons to select the marker that you want to
erase.
3.
Press the [CLEAR] button.
The display shows
CLR MARK 1?
4.
Press the [ENTER] button to erase the marker.
The marker is erased and existing subsequent markers are renumbered, as shown below.
5.
When you
’
ve
fi
nished, press the [TOC WRITE] button to update the TOC.
[S]
[1]
[2]
[3]
[E]
After Erase
Marker to be erased
[S]
[1]
[2]
[4]
[E]
[3]
Before Erase