Yamaha MD4 Owner's Manual - Page 30
Using the REC SELECT buttons, Press the [REC] button.
 |
View all Yamaha MD4 manuals
Add to My Manuals
Save this manual to your list of manuals |
Page 30 highlights
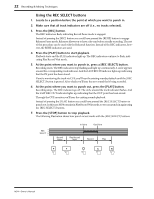
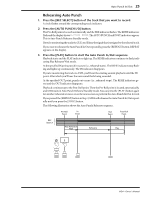
22 Recording & Mixing Techniques Using the REC SELECT buttons 1. Locate to a position before the point at which you want to punch in. 2. Make sure that all track indicators are off (i.e., no tracks selected). 3. Press the [REC] button. The REC indicators flash, indicating Record Pause mode is engaged. Instead of pressing the [REC] button you could have pressed the [REHE] button to engage Rehearse Pause mode. Rehearse allows you to have a dry run before actually recording. The rest of this procedure can be used with the Rehearsal function. Instead of the REC indicators, however, the REHE indicators are used. 4. Press the [PLAY] button to start playback. Playback starts and the PLAY indicators light up. The REC indicators continue to flash, indicating Play Record Wait mode. 5. At the point where you want to punch in, press a [REC SELECT] button. Recording starts. The REC indicators stop flashing and light up continuously. A circle appears around the corresponding track indicator. And the LAST REC IN indicator lights up, indicating that the IN point has been stored. If you're monitoring the track via CUE, you'll hear the existing sounds playback until the [REC SELECT] button is pressed. After which you'll hear the new sound that's being recorded. 6. At the point where you want to punch out, press the [PLAY] button. Recording stops. The REC indicators go off. The circle around the track indicator flashes. And the LAST REC OUT indicator lights up, indicating that the OUT point has been stored. Through the CUE monitor you'll hear the existing sounds playback. Instead of pressing the [PLAY] button you could have pressed the [REC SELECT] button to punch out. In this case MD4 remains in Play Record Wait mode, so you can punch in again using the [REC SELECT] buttons. 7. Press the [STOP] button to stop playback. The following illustration shows how punch in/out works with the [REC SELECT] buttons. 4 REC 3 SELECT 2 1 In Point Out Point Record Pause Play Record Wait Record Play REC PLAY REC SELECT 3 PLAY STOP MD4-Owner's Manual
-
 1
1 -
2
-
3
-
4
-
5
-
6
-
7
-
8
-
9
-
10
-
11
-
12
-
13
-
14
-
15
-
16
-
17
-
18
-
19
-
20
-
21
-
22
-
23
-
24
-
 25
25 -
 26
26 -
 27
27 -
 28
28 -
 29
29 -
 30
30 -
 31
31 -
 32
32 -
 33
33 -
 34
34 -
 35
35 -
36
-
37
-
38
-
39
-
40
-
41
-
42
-
43
-
44
-
45
-
46
-
47
-
48
-
49
-
50
-
51
-
52
-
53
-
54
-
55
-
56
-
57
-
58
-
59
-
60
-
61
-
62
-
63
-
64
-
65
-
66
-
67
-
68
-
69
-
70
-
71
-
72
-
73
-
74
-
75
-
76
-
77
-
78
-
79
-
80
-
81
-
82
-
83
-
84
-
85
-
86
-
87
-
88
 |
 |
