Yamaha P-515 P-515 Owners Manual - Page 14
Getting Started — Playing the Keyboard, Turning the Power On or Off
 |
View all Yamaha P-515 manuals
Add to My Manuals
Save this manual to your list of manuals |
Page 14 highlights
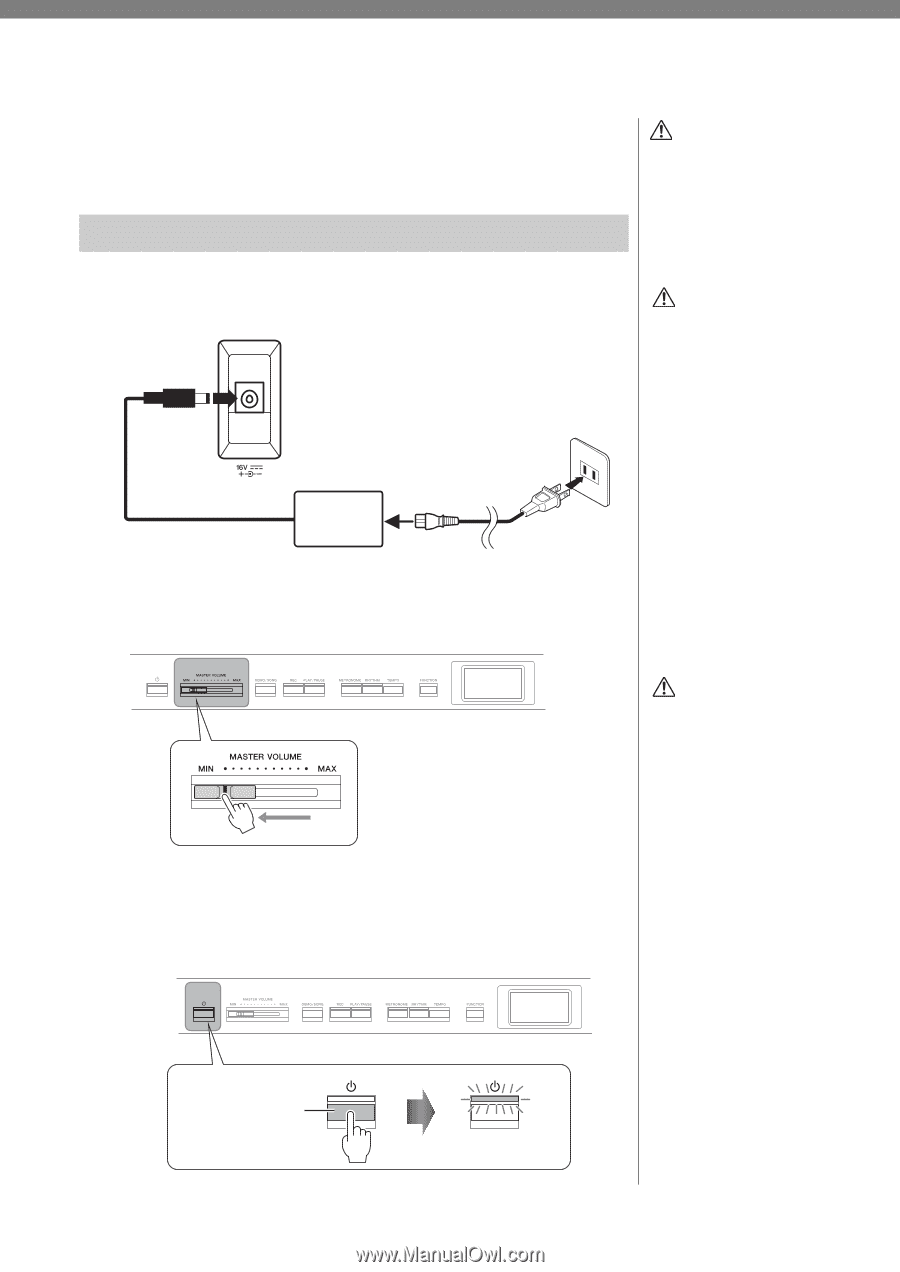
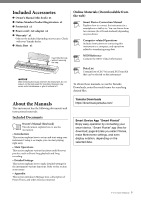
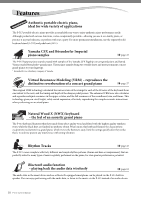
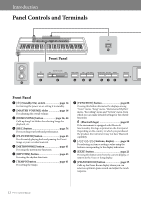
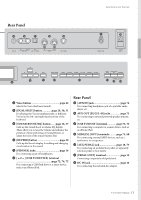
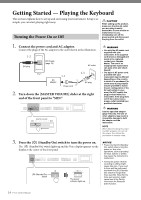
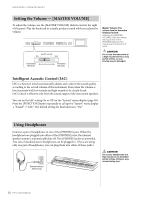
Getting Started - Playing the Keyboard This section explains how to set up and start using your instrument. Setup is so simple, you can start playing right away. Turning the Power On or Off CAUTION When setting up the product, make sure that the AC outlet you are using is easily accessible. If some trouble or malfunction occurs, immediately turn off the power switch and disconnect the plug from the outlet. 1. Connect the power cord and AC adaptor. Connect the plugs of the AC adaptor in the order shown in the illustration. 1-2 DC plug DC IN jack (page 13) AC outlet AC adaptor 1-1 Power cord 1-3 AC plug 2. Turn down the [MASTER VOLUME] slider at the right end of the front panel to "MIN." WARNING • Use only the AC power cord supplied with your instrument. If the supplied cord is lost or damaged and needs to be replaced, contact your Yamaha dealer. The use of an inappropriate replacement can pose a fire and shock hazard! • The type of AC power cord provided with your instrument may be different depending on the country in which it is purchased. (In some areas a plug adaptor may be provided to match the pin configuration of the AC wall outlets in your area.) Do NOT modify the plug provided with your instrument. If the plug does not fit the outlet, have a proper outlet installed by a qualified electrician. 3. Press the [1] (Standby/On) switch to turn the power on. The [1] (Standby/On) switch lights up and the Voice display appears on the display at the center of the front panel. [1] (Standby/On) switch The power indicator lights up. WARNING Use the specified adaptor (page 115) only. The use of other adaptors may result in irreparable damage to both the adaptor and the instrument. NOTE When disconnecting the power cord/AC adaptor, first turn off the power, then follow this procedure in reverse order. NOTICE • Press only the [1] (Standby/ On) switch when turning the power on. Any other operations, such as pressing the keys, buttons or pedals may cause the instrument to malfunction. • Turning the power off while recording or editing might cause data loss. If you need to force-quit the instrument, hold down the [1] (Standby/ On) switch for longer than three seconds. Note that the force-quit operation might cause loss of the Paring information for Bluetooth audio function. 14 P-515 Owner's Manual
-
 1
1 -
2
-
3
-
4
-
5
-
6
-
7
-
8
-
 9
9 -
 10
10 -
 11
11 -
 12
12 -
 13
13 -
 14
14 -
 15
15 -
 16
16 -
 17
17 -
 18
18 -
 19
19 -
20
-
21
-
22
-
23
-
24
-
25
-
26
-
27
-
28
-
29
-
30
-
31
-
32
-
33
-
34
-
35
-
36
-
37
-
38
-
39
-
40
-
41
-
42
-
43
-
44
-
45
-
46
-
47
-
48
-
49
-
50
-
51
-
52
-
53
-
54
-
55
-
56
-
57
-
58
-
59
-
60
-
61
-
62
-
63
-
64
-
65
-
66
-
67
-
68
-
69
-
70
-
71
-
72
-
73
-
74
-
75
-
76
-
77
-
78
-
79
-
80
-
81
-
82
-
83
-
84
-
85
-
86
-
87
-
88
-
89
-
90
-
91
-
92
-
93
-
94
-
95
-
96
-
97
-
98
-
99
-
100
-
101
-
102
-
103
-
104
-
105
-
106
-
107
-
108
-
109
-
110
-
111
-
112
-
113
-
114
-
115
-
116
-
117
-
118
-
119
-
120
-
121
-
122
-
123
-
124
 |
 |