Yamaha PSR-540 Owner's Manual - Page 75
Voice Change, RhM=216 StndKit1
 |
View all Yamaha PSR-540 manuals
Add to My Manuals
Save this manual to your list of manuals |
Page 75 highlights
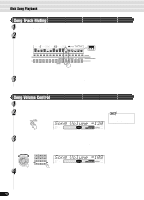
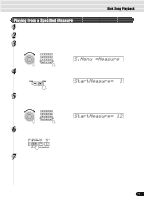
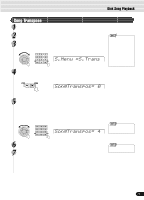
Part Settings q Voice R1, R2, L • When one of the DSP types belonging to the Insertion Effect (page 50) is selected, the effect will be exclusively applied to the Voice R1 and not to the Voice R2/L. Therefore the DSP depth for the Voice R2/ L cannot be changed. Also, the DSP depth for the Voice R1 cannot be altered depending on the selected Insertion Effect type. • Save any part settings you want to keep to the PSR-540 Registration Memory (page 54). The voice part settings are temporary and will be lost if the power is turned off, a different R1 panel voice is selected while the Voice Set function (page 120) is on, or a Registration Memory is recalled. q Song • Make sure to first select the appropriate song for which you wish to set the part before calling up the relevant display. • Any part settings made for the song will be lost if you turn off the power, select another song, or select the Style mode (after finishing the part settings). To prevent this, make sure to select the Recording mode and save the song data to disk (page 78). q Auto Accompaniment • Only drum kit voices (page 31) can be selected for the RHYTHM MAIN track. • When using auto accompaniment part settings for the RHYTHM SUB track, any of the voices can be selected but no chord changes will occur when using Auto Accompaniment. • Make sure to first select the appropriate style for which you wish to set the part before calling up the relevant display. • Auto accompaniment part settings can even be set while an accompaniment is playing. • Auto accompaniment part settings affects all sections of the selected style. • Save any part settings you want to keep to the PSR-540 Registration Memory (page 54). The Auto accompaniment part setting are temporary and will be lost if the power is turned off, a different style is selected while the Voice Set function (page 120) is on, or a Registration Memory is recalled. Voice Change In addition to being able to change the voices played from the keyboard (R1, R2, L), you can also change the voices for each track of the auto accompaniment and songs. 1 Press the [VOICE CHANGE] button. The [VOICE CHANGE] lamp lights. 2 Select the part for which you want to change voices. Parts can be selected from the following buttons (depending on the selected mode: Style or Song): q Voice PART ON/OFF [VOICE R1], [VOICE R2], [VOICE L] buttons q Accompaniment track ....... [TRACK9]-[TRACK16] buttons (Style mode) q Song track TRACK1]-[TRACK16] button (Song mode) 3 Select a voice. Use the data dial, the [+/YES] button, the [-/NO] button or the number buttons [1]-[0]. Refer to the Voice List (page 123). RhM=216 StndKit1 4 Repeat steps #2 and #3 as often as needed for other parts/ tracks. 5 Press the [EXIT] button to exit from the Voice Change screen. 75 73
-
 1
1 -
2
-
3
-
4
-
5
-
6
-
7
-
8
-
9
-
10
-
11
-
12
-
13
-
14
-
15
-
16
-
17
-
18
-
19
-
20
-
21
-
22
-
23
-
24
-
25
-
26
-
27
-
28
-
29
-
30
-
31
-
32
-
33
-
34
-
35
-
36
-
37
-
38
-
39
-
40
-
41
-
42
-
43
-
44
-
45
-
46
-
47
-
48
-
49
-
50
-
51
-
52
-
53
-
54
-
55
-
56
-
57
-
58
-
59
-
60
-
61
-
62
-
63
-
64
-
65
-
66
-
67
-
68
-
69
-
 70
70 -
 71
71 -
 72
72 -
 73
73 -
 74
74 -
 75
75 -
 76
76 -
 77
77 -
 78
78 -
 79
79 -
 80
80 -
81
-
82
-
83
-
84
-
85
-
86
-
87
-
88
-
89
-
90
-
91
-
92
-
93
-
94
-
95
-
96
-
97
-
98
-
99
-
100
-
101
-
102
-
103
-
104
-
105
-
106
-
107
-
108
-
109
-
110
-
111
-
112
-
113
-
114
-
115
-
116
-
117
-
118
-
119
-
120
-
121
-
122
-
123
-
124
-
125
-
126
-
127
-
128
-
129
-
130
-
131
-
132
-
133
-
134
-
135
-
136
-
137
-
138
-
139
-
140
-
141
-
142
-
143
-
144
-
145
-
146
-
147
-
148
-
149
-
150
-
151
-
152
-
153
-
154
-
155
-
156
-
157
-
158
-
159
-
160
 |
 |