Yamaha PSR-540 Owner's Manual - Page 81
Executing, Completed
 |
View all Yamaha PSR-540 manuals
Add to My Manuals
Save this manual to your list of manuals |
Page 81 highlights
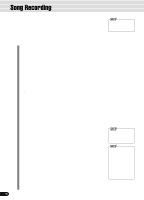
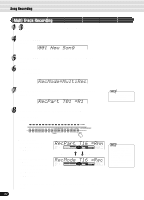
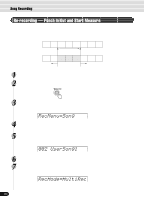
9 Press the [NEXT] button to display the Record ready screen. The beat indicator dots will flash at the currently set tempo, indicating that the record ready (Synchro Start) mode is engaged. Song Recording BEAT 10 Start recording. • If you've selected [Melody] or [Mel + Acmp] in step #8 above, recording starts as soon as you play a key. • If you've selected [Acmp] in step #8 above, the auto accompaniment and recording start simultaneously as soon as a chord is played in the auto accompaniment section of the keyboard (the left side of the split point). • Recording can also be started by pressing the [START/STOP] button. Song Recording 11 Stop recording. • If you've selected [Melody] in step #8 above, press the [START/STOP] button. • If you've selected [Acmp] or [Mel + Acmp] in step #8 above, press the [START/STOP] button or the [ENDING] button. If you press the [ENDING] button while recording the auto accompaniment track, recording will stop automatically after the ending section has finished. Sv? SONG -001.MID 12 Select whether to save the newly recorded data to disk or not. • To cancel the save operation (for example, when you wish to redo the recording), press the [-/NO] button and re-record starting with step #8 above, after the display returns to the Track selection screen. • To save the data to disk, press the [+/YES] button. • Auto accompaniment cannot be turned on or off during recording. Executing 72% The Save operation is completed... Completed 13 Press the [RECORD] button to exit from the Record mode. CAUTION • While the file is being saved, never eject the floppy disk or turn the power off. 81 79
-
 1
1 -
2
-
3
-
4
-
5
-
6
-
7
-
8
-
9
-
10
-
11
-
12
-
13
-
14
-
15
-
16
-
17
-
18
-
19
-
20
-
21
-
22
-
23
-
24
-
25
-
26
-
27
-
28
-
29
-
30
-
31
-
32
-
33
-
34
-
35
-
36
-
37
-
38
-
39
-
40
-
41
-
42
-
43
-
44
-
45
-
46
-
47
-
48
-
49
-
50
-
51
-
52
-
53
-
54
-
55
-
56
-
57
-
58
-
59
-
60
-
61
-
62
-
63
-
64
-
65
-
66
-
67
-
68
-
69
-
70
-
71
-
72
-
73
-
74
-
75
-
 76
76 -
 77
77 -
 78
78 -
 79
79 -
 80
80 -
 81
81 -
 82
82 -
 83
83 -
 84
84 -
 85
85 -
 86
86 -
87
-
88
-
89
-
90
-
91
-
92
-
93
-
94
-
95
-
96
-
97
-
98
-
99
-
100
-
101
-
102
-
103
-
104
-
105
-
106
-
107
-
108
-
109
-
110
-
111
-
112
-
113
-
114
-
115
-
116
-
117
-
118
-
119
-
120
-
121
-
122
-
123
-
124
-
125
-
126
-
127
-
128
-
129
-
130
-
131
-
132
-
133
-
134
-
135
-
136
-
137
-
138
-
139
-
140
-
141
-
142
-
143
-
144
-
145
-
146
-
147
-
148
-
149
-
150
-
151
-
152
-
153
-
154
-
155
-
156
-
157
-
158
-
159
-
160
 |
 |
