Yamaha PSR-540 Owner's Manual - Page 88
Editing Setup Data, UserSong1, RecMode=Edit, Ed Menu=Setup Dt
 |
View all Yamaha PSR-540 manuals
Add to My Manuals
Save this manual to your list of manuals |
Page 88 highlights
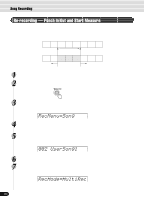
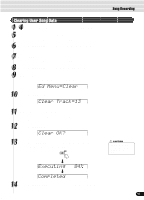
Song Recording Editing Setup Data This function lets you make changes to various voice-related parameters (setup data) for each track of a recorded song. The following parameters can be edited: q Voice Assigns a voice number to the specified track. q Volume Sets the volume of the specified track. q Octave Shifts the pitch of the specified track up or down by one or two octaves. A setting of "0" produces normal pitch. q Pan Positions the sound of the specified track from left to right in the stereo sound field. A setting of "-7" is full left, "7" is full right, "0" is center, and all other settings are corresponding positions in between. q Reverb depth Sets the reverb depth for the specified track, and thus the amount of reverb effect applied to that voice or track. q Chorus depth Sets the chorus depth for the specified track, and thus the amount of chorus effect applied to that voice or track. q DSP depth Sets the DSP depth for the specified track, and thus the amount of DSP effect applied to that voice or track. 1 4- Use the same operation as in "Re-recording" (page 84). 5 Select the file (song) for which you wish to change the setup data. Use the data dial, the [+/YES] button or the [-/NO] button. 002 UserSong1 6 Press the [NEXT] button again to display the RecMode screen. 7 Select "Edit". Use the data dial, the [+/YES] button or the [-/NO] button . • Only one of the Setup parameters can be recorded to each track, and any parameter changes made in the middle of the song will be cancelled. However, in the case of Volume data, any Volume changes in the middle of the song are applied as an offset to the initial Setup Data setting. RecMode=Edit 8 Press the [NEXT] button to display the Edit Menu screen. 9 Select "Setup Dt". Use the data dial, the [+/YES] button or the [-/NO] button. Ed Menu=Setup Dt 10 Press the [NEXT] button to display the setup data screen. 88 86
-
 1
1 -
2
-
3
-
4
-
5
-
6
-
7
-
8
-
9
-
10
-
11
-
12
-
13
-
14
-
15
-
16
-
17
-
18
-
19
-
20
-
21
-
22
-
23
-
24
-
25
-
26
-
27
-
28
-
29
-
30
-
31
-
32
-
33
-
34
-
35
-
36
-
37
-
38
-
39
-
40
-
41
-
42
-
43
-
44
-
45
-
46
-
47
-
48
-
49
-
50
-
51
-
52
-
53
-
54
-
55
-
56
-
57
-
58
-
59
-
60
-
61
-
62
-
63
-
64
-
65
-
66
-
67
-
68
-
69
-
70
-
71
-
72
-
73
-
74
-
75
-
76
-
77
-
78
-
79
-
80
-
81
-
82
-
 83
83 -
 84
84 -
 85
85 -
 86
86 -
 87
87 -
 88
88 -
 89
89 -
 90
90 -
 91
91 -
 92
92 -
 93
93 -
94
-
95
-
96
-
97
-
98
-
99
-
100
-
101
-
102
-
103
-
104
-
105
-
106
-
107
-
108
-
109
-
110
-
111
-
112
-
113
-
114
-
115
-
116
-
117
-
118
-
119
-
120
-
121
-
122
-
123
-
124
-
125
-
126
-
127
-
128
-
129
-
130
-
131
-
132
-
133
-
134
-
135
-
136
-
137
-
138
-
139
-
140
-
141
-
142
-
143
-
144
-
145
-
146
-
147
-
148
-
149
-
150
-
151
-
152
-
153
-
154
-
155
-
156
-
157
-
158
-
159
-
160
 |
 |
