Yamaha PSR-SX600 PSR-SX600 Owners Manual - Page 52
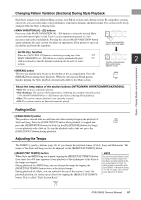
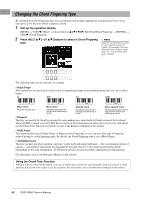
Changing the Chord Fingering Type, Call up the operation display., Press the [2
 |
View all Yamaha PSR-SX600 manuals
Add to My Manuals
Save this manual to your list of manuals |
Page 52 highlights
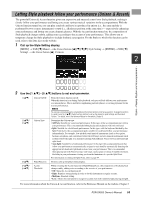
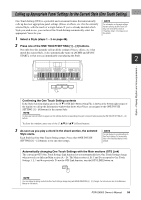
Changing the Chord Fingering Type By changing the Chord Fingering type, you can automatically produce appropriate accompaniment even if you don't press all of the notes which comprise a chord. 1 Call up the operation display. [MENU] → TAB [E] Menu1 → Cursor buttons [][][E][F] Split Point/Chord Fingering → [ENTER] → TAB [F] Chord Fingering 2 Press the [2 ] - [4 ] buttons to select a Chord Fingering type. NOTE When the chord detection area is set to "Upper" (page 58), only the "Fingered*" type is available. This type is basically same as "Fingered," except that "1+5," "1+8" and Chord Cancel are not available. The following types can be selected, for example. • Single Finger This method lets you easily play chords in the accompaniment range of the keyboard using only one, two or three fingers. Major chord Press the root key only. Minor chord Simultaneously press the root key and a black key to its left. Seventh chord Simultaneously press the root key and a white key to its left. Minor seventh chord Simultaneously press the root key and both a white and black key to its left. • Fingered This lets you specify the chord by pressing the notes making up a chord in the left hand section of the keyboard when [ACMP] is turned on or the LEFT part is turned on. For information on which notes to press for each chord, use the Chord Tutor function (see below) or refer to the Reference Manual on the website. • Multi Finger This automatically detects Single Finger or Fingered chord fingerings, so you can use either type of fingering without having to switch fingering types. By default, the Chord Fingering type is set to Multi Finger. • AI Full Keyboard This lets you play just about anything, anywhere on the keyboard using both hands - like conventional playing of a piano - and still have appropriate accompaniment. You don't have to worry about specifying the chords. (Depending on the song arrangement, AI Full Keyboard may not always produce appropriate accompaniment.) For other types, refer to the Reference Manual on the website. Using the Chord Tutor Function With this function shown in the display, you can see which notes to press for specifying the chord. If you know a chord name but don't know how to play it, use this function. For instructions, refer to the Reference Manual on the website. 52 PSR-SX600 Owner's Manual
-
 1
1 -
2
-
3
-
4
-
5
-
6
-
7
-
8
-
9
-
10
-
11
-
12
-
13
-
14
-
15
-
16
-
17
-
18
-
19
-
20
-
21
-
22
-
23
-
24
-
25
-
26
-
27
-
28
-
29
-
30
-
31
-
32
-
33
-
34
-
35
-
36
-
37
-
38
-
39
-
40
-
41
-
42
-
43
-
44
-
45
-
46
-
 47
47 -
 48
48 -
 49
49 -
 50
50 -
 51
51 -
 52
52 -
 53
53 -
 54
54 -
 55
55 -
 56
56 -
 57
57 -
58
-
59
-
60
-
61
-
62
-
63
-
64
-
65
-
66
-
67
-
68
-
69
-
70
-
71
-
72
-
73
-
74
-
75
-
76
-
77
-
78
-
79
-
80
-
81
-
82
-
83
-
84
-
85
-
86
-
87
-
88
-
89
-
90
-
91
-
92
-
93
-
94
-
95
-
96
-
97
-
98
-
99
-
100
-
101
-
102
-
103
-
104
-
105
-
106
-
107
-
108
-
109
-
110
-
111
-
112
-
113
-
114
-
115
-
116
-
117
-
118
-
119
-
120
 |
 |
