Yamaha PSR-SX600 PSR-SX600 Owners Manual - Page 54
Turning Each Part of the Style On/Off, Press the [EXIT] button to close the Channel On/Off Style
 |
View all Yamaha PSR-SX600 manuals
Add to My Manuals
Save this manual to your list of manuals |
Page 54 highlights
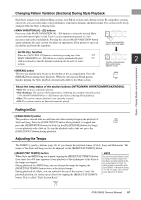
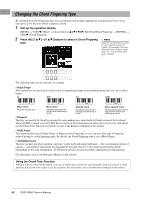
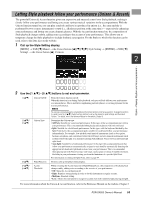
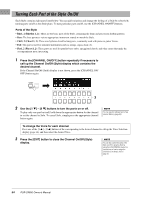
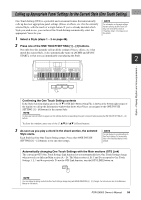
Turning Each Part of the Style On/Off Each Style contains eight parts listed below. You can add variations and change the feeling of a Style by selectively turning parts on/off as the Style plays. To turn particular parts on/off, use the [CHANNEL ON/OFF] buttons. Parts of the Style • Rhy1, 2 (Rhythm 1, 2): These are the basic parts of the Style, containing the drum and percussion rhythm patterns. • Bass: The bass part uses various appropriate instrument sounds to match the Style. • Chd1, 2 (Chord 1, 2): These are rhythmic chord backing parts, commonly used with piano or guitar Voices. • Pad: This part is used for sustained instruments such as strings, organ, choir, etc. • Phr1, 2 (Phrase1, 2): These parts are used for punchy brass stabs, arpeggiated chords, and other extras that make the accompaniment more interesting. 1 Press the [CHANNEL ON/OFF] button repeatedly if necessary to call up the Channel On/Off (Style) display which contains the desired channel. If the Channel On/Off (Style) display is not shown, press the [CHANNEL ON/ OFF] button again. 2 2 Use the [1 ] - [8 ] buttons to turn the parts on or off. To play only one part by itself, hold down the appropriate button for the channel to set the channel to Solo. To cancel Solo, simply press the appropriate channel button again. NOTE You can save the settings here to Registration Memory (page 85). To change the Voice for each channel Press one of the [1 ] - [8 ] buttons of the corresponding to the desired channel to call up the Voice Selection display (page 34), and then select the desired Voice. 3 Press the [EXIT] button to close the Channel On/Off (Style) display. NOTE You can also control the parts of the Style on/off for dynamic effect by using the LIVE CONTROL knobs. For instructions on how to assign the functions to the knobs, refer to page 41. 54 PSR-SX600 Owner's Manual
-
 1
1 -
2
-
3
-
4
-
5
-
6
-
7
-
8
-
9
-
10
-
11
-
12
-
13
-
14
-
15
-
16
-
17
-
18
-
19
-
20
-
21
-
22
-
23
-
24
-
25
-
26
-
27
-
28
-
29
-
30
-
31
-
32
-
33
-
34
-
35
-
36
-
37
-
38
-
39
-
40
-
41
-
42
-
43
-
44
-
45
-
46
-
47
-
48
-
 49
49 -
 50
50 -
 51
51 -
 52
52 -
 53
53 -
 54
54 -
 55
55 -
 56
56 -
 57
57 -
 58
58 -
 59
59 -
60
-
61
-
62
-
63
-
64
-
65
-
66
-
67
-
68
-
69
-
70
-
71
-
72
-
73
-
74
-
75
-
76
-
77
-
78
-
79
-
80
-
81
-
82
-
83
-
84
-
85
-
86
-
87
-
88
-
89
-
90
-
91
-
92
-
93
-
94
-
95
-
96
-
97
-
98
-
99
-
100
-
101
-
102
-
103
-
104
-
105
-
106
-
107
-
108
-
109
-
110
-
111
-
112
-
113
-
114
-
115
-
116
-
117
-
118
-
119
-
120
 |
 |
