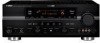
Yamaha RX V663 Owner's Manual - Page 109
Controlling Zone 2 with the remote, control, Turning on Zone 2
 |
UPC - 027108930121
View all Yamaha RX V663 manuals
Add to My Manuals
Save this manual to your list of manuals |
Page 109 highlights
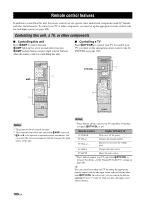
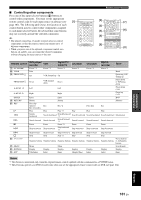
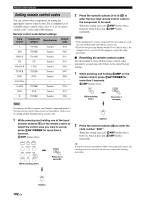
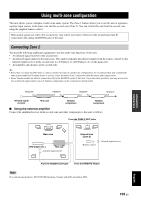
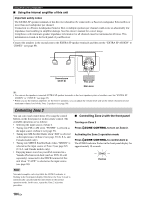
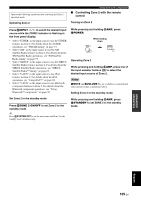
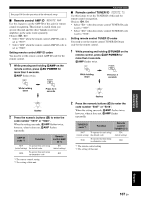
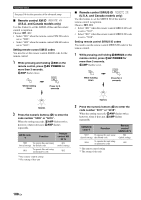
Operate the following operations after activating the Zone 2 operation mode. Operating Zone 2 Using multi-zone configuration ■ Controlling Zone 2 with the remote control Turning on Zone 2 Press RINPUT l / h to select the desired input source while the ZONE2 indicator is flashing in the front panel display. • Select "TUNER" as the input source to use the TUNER features in Zone 2. For details about the TUNER operations, see "FM/AM tuning" on page 53. • Select "XM" as the input source to use the XM Satellite Radio features in Zone 2. For details about the XM Satellite Radio operations, see "XM Satellite Radio tuning" on page 57. • Select "SIRIUS" as the input source to use the SIRIUS Satellite Radio features in Zone 2. For details about the SIRIUS Satellite Radio operations, see "SIRIUS Satellite Radio™ tuning" on page 62. • Select "V-AUX" as the input source to use iPod features in Zone 2. For details about the iPod operations, see "Using iPod™" on page 68. • Select "V-AUX" as the input source to use Bluetooth component features in Zone 2. For details about the Bluetooth component operations, see "Using Bluetooth™ components" on page 70. Set Zone 2 to the standby mode Press HZONE 2 ON/OFF to set Zone 2 to the standby mode. y Press LSYSTEM OFF to set the main zone and Zone 2 to the standby mode simultaneously. While pressing and holding 5AMP, press H POWER. While holding down AMP POWER Operating Zone 2 While pressing and holding 5AMP, press one of the input selector buttons (4) to select the desired input source of Zone 2. Notes JMUTE and EVOLUME +/- are available to control Zone2 with same procedure as mentioned above. Setting Zone 2 to the standby mode While pressing and holding 5AMP, press ISTANDBY to set ZONE 2 to the standby mode. ADVANCED OPERATION English 105 En
-
 1
1 -
2
-
3
-
4
-
5
-
6
-
7
-
8
-
9
-
10
-
11
-
12
-
13
-
14
-
15
-
16
-
17
-
18
-
19
-
20
-
21
-
22
-
23
-
24
-
25
-
26
-
27
-
28
-
29
-
30
-
31
-
32
-
33
-
34
-
35
-
36
-
37
-
38
-
39
-
40
-
41
-
42
-
43
-
44
-
45
-
46
-
47
-
48
-
49
-
50
-
51
-
52
-
53
-
54
-
55
-
56
-
57
-
58
-
59
-
60
-
61
-
62
-
63
-
64
-
65
-
66
-
67
-
68
-
69
-
70
-
71
-
72
-
73
-
74
-
75
-
76
-
77
-
78
-
79
-
80
-
81
-
82
-
83
-
84
-
85
-
86
-
87
-
88
-
89
-
90
-
91
-
92
-
93
-
94
-
95
-
96
-
97
-
98
-
99
-
100
-
101
-
102
-
103
-
 104
104 -
 105
105 -
 106
106 -
 107
107 -
 108
108 -
 109
109 -
 110
110 -
 111
111 -
 112
112 -
 113
113 -
 114
114 -
115
-
116
-
117
-
118
-
119
-
120
-
121
-
122
-
123
-
124
-
125
-
126
-
127
-
128
-
129
-
130
-
131
-
132
-
133
-
134
-
135
-
136
-
137
-
138
-
139
-
140
-
141
-
142
-
143
-
144
 |
 |
