Yamaha RX V663 Owner's Manual - Page 97
INPUT MENU, Input source, Parameter - hdmi control
 |
UPC - 027108930121
View all Yamaha RX V663 manuals
Add to My Manuals
Save this manual to your list of manuals |
Page 97 highlights
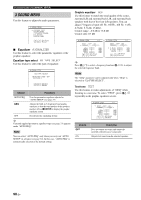
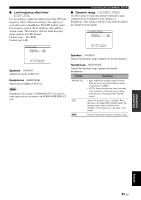
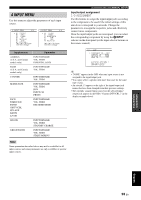
4 INPUT MENU Use this menu to adjust the parameters of each input source. [ p [ p 4 INPUT MENU 1/2 . A) SIRIUS B) XM C) TUNER D) CD E) MD/CD-R F) DVD G) DTV/CBL [ ]/[ ]: Up/Down [ENTER]: Enter 4 INPUT MENU 2/2 . H) V-AUX I) DOCK J) BLUETOOTH K) DVR L) VCR M) MULTI CH [ ]/[ ]: Up/Down [ENTER]: Enter Input source A)SIRIUS (U.S.A. and Canada models only) B)XM (U.S.A. and Canada models only) C)TUNER M)MULTI CH D)CD E)MD/CD-R F)DVD G)DTV/CBL H)V-AUX K)DVR L)VCR I)DOCK J)BLUETOOTH Parameter INPUT RENAME VOL. TRIM PARENTAL LOCK INPUT RENAME VOL. TRIM INPUT RENAME VOL. TRIM INPUT RENAME VOL. TRIM BGV INPUT CH FRONT INPUT RENAME VOL. TRIM DECODER MODE INPUT RENAME VOL. TRIM STANDBY CHARGE INPUT RENAME VOL. TRIM START PAIRING Customizing this unit (MANUAL SETUP) Input/output assignment I/O ASSIGNMENT Use this feature to assign the input/output jacks according to the component to be used if the initial settings of this unit do not correspond to your needs. Change the parameter to reassign the respective jacks and effectively connect more components. Once the input/output jacks are reassigned, you can select the corresponding component by using the RINPUT selector on the front panel (or the input selector buttons on the remote control). K) DVR . COMPONENT IN;;;[B]* COAXIAL IN;;;;NONE OPTICAL IN;;;;NONE HDMI IN;;;;;;;;[3] Current( DTV/CBL ) [p]/[[]: Select [ENTER]: Enter y • "NONE" appears in the OSD when any input source is not assigned to the input/output jack. • You cannot select a specific item more than once for the same type of jack. • An asterisk (*) appears to the right of the input/output jack names that have been changed from their previous settings. • The currently assigned input source for the selected input/ output jack appears in the OSD ("Current( DTV/CBL )" in the display example above). Note Some parameters described above may not be available for all input sources and some parameters are only available for specific input sources. ADVANCED OPERATION English 93 En
-
 1
1 -
2
-
3
-
4
-
5
-
6
-
7
-
8
-
9
-
10
-
11
-
12
-
13
-
14
-
15
-
16
-
17
-
18
-
19
-
20
-
21
-
22
-
23
-
24
-
25
-
26
-
27
-
28
-
29
-
30
-
31
-
32
-
33
-
34
-
35
-
36
-
37
-
38
-
39
-
40
-
41
-
42
-
43
-
44
-
45
-
46
-
47
-
48
-
49
-
50
-
51
-
52
-
53
-
54
-
55
-
56
-
57
-
58
-
59
-
60
-
61
-
62
-
63
-
64
-
65
-
66
-
67
-
68
-
69
-
70
-
71
-
72
-
73
-
74
-
75
-
76
-
77
-
78
-
79
-
80
-
81
-
82
-
83
-
84
-
85
-
86
-
87
-
88
-
89
-
90
-
91
-
 92
92 -
 93
93 -
 94
94 -
 95
95 -
 96
96 -
 97
97 -
 98
98 -
 99
99 -
 100
100 -
 101
101 -
 102
102 -
103
-
104
-
105
-
106
-
107
-
108
-
109
-
110
-
111
-
112
-
113
-
114
-
115
-
116
-
117
-
118
-
119
-
120
-
121
-
122
-
123
-
124
-
125
-
126
-
127
-
128
-
129
-
130
-
131
-
132
-
133
-
134
-
135
-
136
-
137
-
138
-
139
-
140
-
141
-
142
-
143
-
144
 |
 |
