2006 Subaru B9 Tribeca Owner's Manual - Page 191
2006 Subaru B9 Tribeca Manual
Page 191 highlights
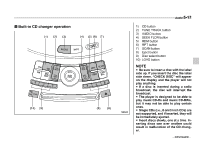
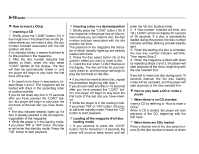
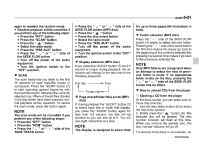
Audio 5-21 again to reselect the random mode. Random playback will be cancelled if you perform any of the following steps: Press the "RPT" button Press the "SCAN" button Press the " " button Select the radio mode Press the "RSE AUX" button Press the " " or " " side of the SEEK FLDR button Turn off the power of the audio equipment. Turn the ignition switch to the "OFF" position. SCAN The scan mode lets you listen to the first 10 seconds of each track/file (track) in succession. Press the "SCAN" button (7) to start scanning upward beginning with the track/file (track) following the currently selected one. When all tracks/files (tracks) in the disc/folder have been scanned, normal playback will be resumed. To cancel the scan mode, press the button again. Press the " " or " " side of the SEEK FLDR button (MP3 disc) Press the " " button Press the disc select button Select the radio mode Press the "RSE AUX" button Turn off the power of the audio equipment. Turn the ignition switch to the "OFF" position. Display selection (MP3 disc) If you press the "AUDIO" button (3) for 0.5 second or longer during playback, the indication will change to the next one in the following sequence. for up to three pages (64 characters in total). Folder selection (MP3 disc) Press the " " side of the SEEK FLDR button (4) briefly to select the next folder. Pressing the " " side of the same button the first time makes the player go back to the beginning of the currently selected file; pressing it a second time makes it go back to the previously selected file. NOTE Only MP3 folders are recognized when an attempt to select the next or previous folder is made. If no appropriate folder exists on the disc, pressing the " " or " " side of the SEEK FLDR button has no effect. How to unload CDs from the player Ejecting a CD from the player Of the discs loaded, you can select and remove only one disc. 1. Use the disc select button (9) to select the disc to be ejected. 2. Briefly press the " " button (8). The selected disc will be ejected. The disc number indicator will flash at this time. When you remove the ejected disc, the disc number indicator will go off. To remove more discs in succession, re- CONTINUED - File title Folder title Time NOTE The scan mode will be cancelled if you perform any of the following steps: Press the "RPT" button Press the "RDM" button Press the " " or " " side of the TUNE TRACK button Page (track/folder title) scroll (MP3 disc) If, having pressed the "AUDIO" button (3) to select track title or folder title display, you press the "AUDIO" button again for less than 0.5 second, the title will be scrolled so you can see all of it. You will see eight characters at a time. NOTE The display is designed to show titles
-
 1
1 -
2
-
3
-
4
-
5
-
6
-
7
-
8
-
9
-
10
-
11
-
12
-
13
-
14
-
15
-
16
-
17
-
18
-
19
-
20
-
21
-
22
-
23
-
24
-
25
-
26
-
27
-
28
-
29
-
30
-
31
-
32
-
33
-
34
-
35
-
36
-
37
-
38
-
39
-
40
-
41
-
42
-
43
-
44
-
45
-
46
-
47
-
48
-
49
-
50
-
51
-
52
-
53
-
54
-
55
-
56
-
57
-
58
-
59
-
60
-
61
-
62
-
63
-
64
-
65
-
66
-
67
-
68
-
69
-
70
-
71
-
72
-
73
-
74
-
75
-
76
-
77
-
78
-
79
-
80
-
81
-
82
-
83
-
84
-
85
-
86
-
87
-
88
-
89
-
90
-
91
-
92
-
93
-
94
-
95
-
96
-
97
-
98
-
99
-
100
-
101
-
102
-
103
-
104
-
105
-
106
-
107
-
108
-
109
-
110
-
111
-
112
-
113
-
114
-
115
-
116
-
117
-
118
-
119
-
120
-
121
-
122
-
123
-
124
-
125
-
126
-
127
-
128
-
129
-
130
-
131
-
132
-
133
-
134
-
135
-
136
-
137
-
138
-
139
-
140
-
141
-
142
-
143
-
144
-
145
-
146
-
147
-
148
-
149
-
150
-
151
-
152
-
153
-
154
-
155
-
156
-
157
-
158
-
159
-
160
-
161
-
162
-
163
-
164
-
165
-
166
-
167
-
168
-
169
-
170
-
171
-
172
-
173
-
174
-
175
-
176
-
177
-
178
-
179
-
180
-
181
-
182
-
183
-
184
-
185
-
 186
186 -
 187
187 -
 188
188 -
 189
189 -
 190
190 -
 191
191 -
 192
192 -
 193
193 -
 194
194 -
 195
195 -
 196
196 -
197
-
198
-
199
-
200
-
201
-
202
-
203
-
204
-
205
-
206
-
207
-
208
-
209
-
210
-
211
-
212
-
213
-
214
-
215
-
216
-
217
-
218
-
219
-
220
-
221
-
222
-
223
-
224
-
225
-
226
-
227
-
228
-
229
-
230
-
231
-
232
-
233
-
234
-
235
-
236
-
237
-
238
-
239
-
240
-
241
-
242
-
243
-
244
-
245
-
246
-
247
-
248
-
249
-
250
-
251
-
252
-
253
-
254
-
255
-
256
-
257
-
258
-
259
-
260
-
261
-
262
-
263
-
264
-
265
-
266
-
267
-
268
-
269
-
270
-
271
-
272
-
273
-
274
-
275
-
276
-
277
-
278
-
279
-
280
-
281
-
282
-
283
-
284
-
285
-
286
-
287
-
288
-
289
-
290
-
291
-
292
-
293
-
294
-
295
-
296
-
297
-
298
-
299
-
300
-
301
-
302
-
303
-
304
-
305
-
306
-
307
-
308
-
309
-
310
-
311
-
312
-
313
-
314
-
315
-
316
-
317
-
318
-
319
-
320
-
321
-
322
-
323
-
324
-
325
-
326
-
327
-
328
-
329
-
330
-
331
-
332
-
333
-
334
-
335
-
336
-
337
-
338
-
339
-
340
-
341
-
342
-
343
-
344
-
345
-
346
-
347
-
348
-
349
-
350
-
351
-
352
-
353
-
354
-
355
-
356
-
357
-
358
-
359
-
360
-
361
-
362
-
363
-
364
-
365
-
366
-
367
-
368
-
369
-
370
-
371
-
372
-
373
-
374
-
375
-
376
 |
 |