2006 Subaru Forester Owner's Manual - Page 171
2006 Subaru Forester Manual

Page 171 highlights
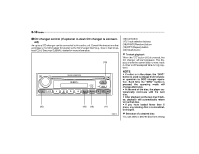
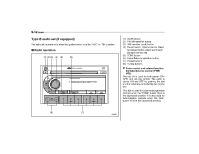
5-14 Audio starting from bass control mode. (When the radio is first turned on, the control mode is in the volume control.) Display illumination dimness cancellation (BRIGHT) The brightness of the radio display dims when the light switch is in the " " or " " positions. If this makes the display difficult to read, press the volume dial for more than 1.5 seconds to return the display to original brightness. Subsequently pressing the volume dial again for more than 1.5 seconds or if you can safely do so, turning the light switch to the OFF position and back to the " " or" " position makes the radio display dim again. FM/AM selection button (FM/AM) Push the "FM/AM" button when the radio is on to select FM1, FM2 or AM reception. Each time this button is pressed, the band will change in the following order: Weather band button (WB) Press the "WB" button when the radio is on to select the weather band. Manual tuning (TUNE) Manual tuning for AM and FM waveband Push the " " side of the tuning button (8) to increase the tuning frequency and press the " " side of the button to decrease it. Each time the button is pressed, the frequency changes 10 KHz in the AM waveband and 0.2 MHz in the FM waveband. Manual tuning for weather band When weather band mode is selected, press the " " side of the tuning button (8) to change the WB channel up and press the " " side of the button to change the WB channel down. Each time the button is pressed, the WB channel changes to the next channel. Seek tuning If the tuning button (8) is pressed for longer than half of a second, the radio will begin to automatically search for receivable frequencies and will stop at the first one found. This function may not be available, however, when radio signals are weak. In such a situation, perform manual tuning to BASS MIDDLE VOLUME TREBLE Fader and balance control The volume control dial (4) normally function as volume control. The dial become the controls for Fader or Balance when you select the appropriate fader and balance control mode. Choose desired setting for each mode by turning the volume control dial. The control function returns to volume control mode after approximately 5 seconds. To change control modes: Each brief press of the "BAL" button (6) changes control modes in the following sequence starting from fader control mode. (When the radio is turned on, the control mode is in the volume control.) FM1 FM2 AM FADER BALANCE VOLUME The display indicates which one is currently selected. Stereo indicator The stereo indicator "ST" will come on when an FM stereo broadcast is received.
-
 1
1 -
2
-
3
-
4
-
5
-
6
-
7
-
8
-
9
-
10
-
11
-
12
-
13
-
14
-
15
-
16
-
17
-
18
-
19
-
20
-
21
-
22
-
23
-
24
-
25
-
26
-
27
-
28
-
29
-
30
-
31
-
32
-
33
-
34
-
35
-
36
-
37
-
38
-
39
-
40
-
41
-
42
-
43
-
44
-
45
-
46
-
47
-
48
-
49
-
50
-
51
-
52
-
53
-
54
-
55
-
56
-
57
-
58
-
59
-
60
-
61
-
62
-
63
-
64
-
65
-
66
-
67
-
68
-
69
-
70
-
71
-
72
-
73
-
74
-
75
-
76
-
77
-
78
-
79
-
80
-
81
-
82
-
83
-
84
-
85
-
86
-
87
-
88
-
89
-
90
-
91
-
92
-
93
-
94
-
95
-
96
-
97
-
98
-
99
-
100
-
101
-
102
-
103
-
104
-
105
-
106
-
107
-
108
-
109
-
110
-
111
-
112
-
113
-
114
-
115
-
116
-
117
-
118
-
119
-
120
-
121
-
122
-
123
-
124
-
125
-
126
-
127
-
128
-
129
-
130
-
131
-
132
-
133
-
134
-
135
-
136
-
137
-
138
-
139
-
140
-
141
-
142
-
143
-
144
-
145
-
146
-
147
-
148
-
149
-
150
-
151
-
152
-
153
-
154
-
155
-
156
-
157
-
158
-
159
-
160
-
161
-
162
-
163
-
164
-
165
-
 166
166 -
 167
167 -
 168
168 -
 169
169 -
 170
170 -
 171
171 -
 172
172 -
 173
173 -
 174
174 -
 175
175 -
 176
176 -
177
-
178
-
179
-
180
-
181
-
182
-
183
-
184
-
185
-
186
-
187
-
188
-
189
-
190
-
191
-
192
-
193
-
194
-
195
-
196
-
197
-
198
-
199
-
200
-
201
-
202
-
203
-
204
-
205
-
206
-
207
-
208
-
209
-
210
-
211
-
212
-
213
-
214
-
215
-
216
-
217
-
218
-
219
-
220
-
221
-
222
-
223
-
224
-
225
-
226
-
227
-
228
-
229
-
230
-
231
-
232
-
233
-
234
-
235
-
236
-
237
-
238
-
239
-
240
-
241
-
242
-
243
-
244
-
245
-
246
-
247
-
248
-
249
-
250
-
251
-
252
-
253
-
254
-
255
-
256
-
257
-
258
-
259
-
260
-
261
-
262
-
263
-
264
-
265
-
266
-
267
-
268
-
269
-
270
-
271
-
272
-
273
-
274
-
275
-
276
-
277
-
278
-
279
-
280
-
281
-
282
-
283
-
284
-
285
-
286
-
287
-
288
-
289
-
290
-
291
-
292
-
293
-
294
-
295
-
296
-
297
-
298
-
299
-
300
-
301
-
302
-
303
-
304
-
305
-
306
-
307
-
308
-
309
-
310
-
311
-
312
-
313
-
314
-
315
-
316
-
317
-
318
-
319
-
320
-
321
-
322
-
323
-
324
-
325
-
326
-
327
-
328
-
329
-
330
-
331
-
332
-
333
-
334
-
335
-
336
-
337
-
338
-
339
-
340
-
341
-
342
-
343
-
344
-
345
-
346
-
347
-
348
-
349
-
350
-
351
-
352
-
353
-
354
-
355
 |
 |