Apple M7710LL User Guide - Page 19
Getting Additional Information onto Your MacBook Air, Sharing Discs with DVD or CD Sharing
 |
View all Apple M7710LL manuals
Add to My Manuals
Save this manual to your list of manuals |
Page 19 highlights
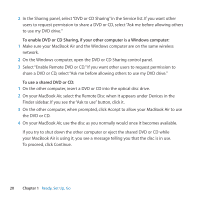
Getting Additional Information onto Your MacBook Air Your MacBook Air comes with several applications installed, including the iLife suite. Many other applications can be downloaded from the Internet. If you want to install third-party applications from a DVD or CD, you can: ÂÂ Install applications onto your MacBook Air or share information using the optical disc drive on another Mac or Windows computer (if DVD or CD Sharing is set up and enabled). For more information, see the next section. ÂÂ Attach the MacBook Air SuperDrive (an external USB optical disc drive available separately at www.apple.com/store) to the USB port on your MacBook Air, and insert your installation disc. Sharing Discs with DVD or CD Sharing You can enable DVD or CD Sharing on a Mac or Windows computer to use the Remote Disc feature of MacBook Air. Remote Disc allows you to share the discs you insert into the optical disc drive of the other computer. Some discs, such as DVD movies and game discs, may be copy-protected and therefore unusable through DVD or CD Sharing. Make sure DVD or CD Sharing is already set up on any Mac or Windows computer you want to partner with. For information, see page 15. To enable DVD or CD Sharing, if your other computer is a Mac: 1 Make sure your MacBook Air and the other Mac are on the same wireless network. Check the AirPort (Z) status icon in the menu bar to see what network you're connected to. On the other Mac, choose Apple () > System Preferences and then open Sharing. Chapter 1 Ready, Set Up, Go 19
-
 1
1 -
2
-
3
-
4
-
5
-
6
-
7
-
8
-
9
-
10
-
11
-
12
-
13
-
 14
14 -
 15
15 -
 16
16 -
 17
17 -
 18
18 -
 19
19 -
 20
20 -
 21
21 -
 22
22 -
 23
23 -
 24
24 -
25
-
26
-
27
-
28
-
29
-
30
-
31
-
32
-
33
-
34
-
35
-
36
-
37
-
38
-
39
-
40
-
41
-
42
-
43
-
44
-
45
-
46
-
47
-
48
-
49
-
50
-
51
-
52
-
53
-
54
-
55
-
56
-
57
-
58
-
59
-
60
-
61
-
62
-
63
-
64
-
65
-
66
-
67
-
68
-
69
-
70
-
71
-
72
 |
 |