Brother International BE-1201B-AC Instruction Manual - English - Page 31
Installation, 2-1 Transportation of Machine
 |
View all Brother International BE-1201B-AC manuals
Add to My Manuals
Save this manual to your list of manuals |
Page 31 highlights
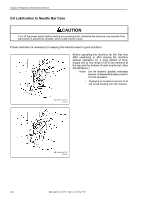
2. Installation Chapter 2 Preparation of Embroidery Machine DANGER Embroidery machines should be installed only by trained engineers. Electric wiring should be laid by your distributor or electric experts. The sewing machine weighs more than 195 kg. The installation should be carried out by two or more people. Do not connect the power source until installation is completed. Doing so may start the machine unintentionally through an accidental activation of the START switch, resulting in bodily injuries. Install a machine in a place away from a highfrequency welding machine or other machines that may generate a strong electric noise. Failure to do so may cause the embroidery machine to malfunction. Be sure to connect the ground. If the ground connection is not secure, you run a high risk of receiving a serious electric shock, and problems with correct operation may also occur. Secure the machine with the nuts when installing it so that it will not move by placing the leveling seat on the sound floor. * After installation is completed, get the power supply from a dedicated outlet. * When connecting multiple machines, exercise care not to exceed the capacity of the outlet. 2-1 Transportation of Machine When relocating the machine, lift it by the steel frame. Note) Never lift the machine by the table or the guard bar. 2-2 Installation of Machine [2] [1] 1 Adjust leveling seats [1] by turning nuts [2] in the direction of the arrow until the table top is placed horizontally. 2 If the table is not stable, loosen nuts [2] and turn leveling seats [1] for adjustment. When relocating the machine, raise leveling [3] seats [1]. The machine can then be moved with casters [3]. W1565 BE-0901E-AC-PC• BE-1201B-AC-PC 2-3
-
 1
1 -
2
-
3
-
4
-
5
-
6
-
7
-
8
-
9
-
10
-
11
-
12
-
13
-
14
-
15
-
16
-
17
-
18
-
19
-
20
-
21
-
22
-
23
-
24
-
25
-
 26
26 -
 27
27 -
 28
28 -
 29
29 -
 30
30 -
 31
31 -
 32
32 -
 33
33 -
 34
34 -
 35
35 -
 36
36 -
37
-
38
-
39
-
40
-
41
-
42
-
43
-
44
-
45
-
46
-
47
-
48
-
49
-
50
-
51
-
52
-
53
-
54
-
55
-
56
-
57
-
58
-
59
-
60
-
61
-
62
-
63
-
64
-
65
-
66
-
67
-
68
-
69
-
70
-
71
-
72
-
73
-
74
-
75
-
76
-
77
-
78
-
79
-
80
-
81
-
82
-
83
-
84
-
85
-
86
-
87
-
88
-
89
-
90
-
91
-
92
-
93
-
94
-
95
-
96
-
97
-
98
-
99
-
100
-
101
-
102
-
103
-
104
-
105
-
106
-
107
-
108
-
109
-
110
-
111
-
112
-
113
-
114
-
115
-
116
-
117
-
118
-
119
-
120
-
121
-
122
-
123
-
124
-
125
-
126
-
127
-
128
-
129
-
130
-
131
-
132
-
133
-
134
-
135
-
136
-
137
-
138
-
139
-
140
-
141
-
142
-
143
-
144
-
145
-
146
-
147
-
148
-
149
-
150
-
151
-
152
-
153
-
154
-
155
-
156
-
157
-
158
-
159
-
160
-
161
-
162
-
163
-
164
-
165
-
166
-
167
-
168
-
169
-
170
-
171
-
172
-
173
-
174
-
175
-
176
-
177
-
178
-
179
-
180
-
181
-
182
-
183
-
184
-
185
-
186
-
187
-
188
-
189
-
190
-
191
-
192
-
193
-
194
-
195
-
196
-
197
-
198
-
199
-
200
-
201
-
202
-
203
-
204
-
205
-
206
-
207
-
208
-
209
-
210
-
211
-
212
-
213
-
214
-
215
-
216
-
217
-
218
-
219
-
220
-
221
-
222
-
223
-
224
-
225
-
226
-
227
-
228
-
229
-
230
-
231
-
232
-
233
-
234
-
235
-
236
-
237
-
238
-
239
-
240
-
241
-
242
-
243
-
244
-
245
-
246
 |
 |