Brother International BE-1201B-AC Instruction Manual - English - Page 99
Thread Color, Changing needle bar allocation, Setting the range
 |
View all Brother International BE-1201B-AC manuals
Add to My Manuals
Save this manual to your list of manuals |
Page 99 highlights
Changing needle bar allocation 1. Drag the embroidering sequence on the needle bar number. Dragged embroidering sequence W1024Q Setting the range 1. Double click the desired needle bar range to change. 2. Click the desired range. Chapter 5 Editing Embroidery Data 3. Click [OK]. W1025Q Click here to put a check mark for pause before starting the designated embroidering sequence. Thread Color The embroidery data is displayed in thread color. ! This functions is available only when the embroidery data edit is started from the machine controller. 1. Select [Thread color] from the View menu or click . Before selecting W1026Q After selecting W1027Q BE-0901E-AC-PC• BE-1201B-AC-PC 5-13
-
 1
1 -
2
-
3
-
4
-
5
-
6
-
7
-
8
-
9
-
10
-
11
-
12
-
13
-
14
-
15
-
16
-
17
-
18
-
19
-
20
-
21
-
22
-
23
-
24
-
25
-
26
-
27
-
28
-
29
-
30
-
31
-
32
-
33
-
34
-
35
-
36
-
37
-
38
-
39
-
40
-
41
-
42
-
43
-
44
-
45
-
46
-
47
-
48
-
49
-
50
-
51
-
52
-
53
-
54
-
55
-
56
-
57
-
58
-
59
-
60
-
61
-
62
-
63
-
64
-
65
-
66
-
67
-
68
-
69
-
70
-
71
-
72
-
73
-
74
-
75
-
76
-
77
-
78
-
79
-
80
-
81
-
82
-
83
-
84
-
85
-
86
-
87
-
88
-
89
-
90
-
91
-
92
-
93
-
 94
94 -
 95
95 -
 96
96 -
 97
97 -
 98
98 -
 99
99 -
 100
100 -
 101
101 -
 102
102 -
 103
103 -
 104
104 -
105
-
106
-
107
-
108
-
109
-
110
-
111
-
112
-
113
-
114
-
115
-
116
-
117
-
118
-
119
-
120
-
121
-
122
-
123
-
124
-
125
-
126
-
127
-
128
-
129
-
130
-
131
-
132
-
133
-
134
-
135
-
136
-
137
-
138
-
139
-
140
-
141
-
142
-
143
-
144
-
145
-
146
-
147
-
148
-
149
-
150
-
151
-
152
-
153
-
154
-
155
-
156
-
157
-
158
-
159
-
160
-
161
-
162
-
163
-
164
-
165
-
166
-
167
-
168
-
169
-
170
-
171
-
172
-
173
-
174
-
175
-
176
-
177
-
178
-
179
-
180
-
181
-
182
-
183
-
184
-
185
-
186
-
187
-
188
-
189
-
190
-
191
-
192
-
193
-
194
-
195
-
196
-
197
-
198
-
199
-
200
-
201
-
202
-
203
-
204
-
205
-
206
-
207
-
208
-
209
-
210
-
211
-
212
-
213
-
214
-
215
-
216
-
217
-
218
-
219
-
220
-
221
-
222
-
223
-
224
-
225
-
226
-
227
-
228
-
229
-
230
-
231
-
232
-
233
-
234
-
235
-
236
-
237
-
238
-
239
-
240
-
241
-
242
-
243
-
244
-
245
-
246
 |
 |

BE-0901E-AC-PC° BE-1201B-AC-PC
5-13
Chapter 5
Editing Embroidery Data
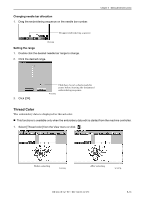
Changing needle bar allocation
1.
Drag the embroidering sequence on the needle bar number.
W1024Q
Setting the range
1.
Double click the desired needle bar range to change.
2.
Click the desired range.
W1025Q
3.
Click [OK].
Thread Color
The embroidery data is displayed in thread color.
!
This functions is available only when the embroidery data edit is started from the machine controller.
1.
Select [Thread color] from the View menu or click
.
Before selecting
After selecting
W1026Q
W1027Q
Dragged embroidering sequence
Click here to put a check mark for
pause before starting the designated
embroidering sequence.