Brother International IntelliFax-1800C Users Manual - English - Page 37
Connections, TAD:ANSWER MACH.
 |
View all Brother International IntelliFax-1800C manuals
Add to My Manuals
Save this manual to your list of manuals |
Page 37 highlights
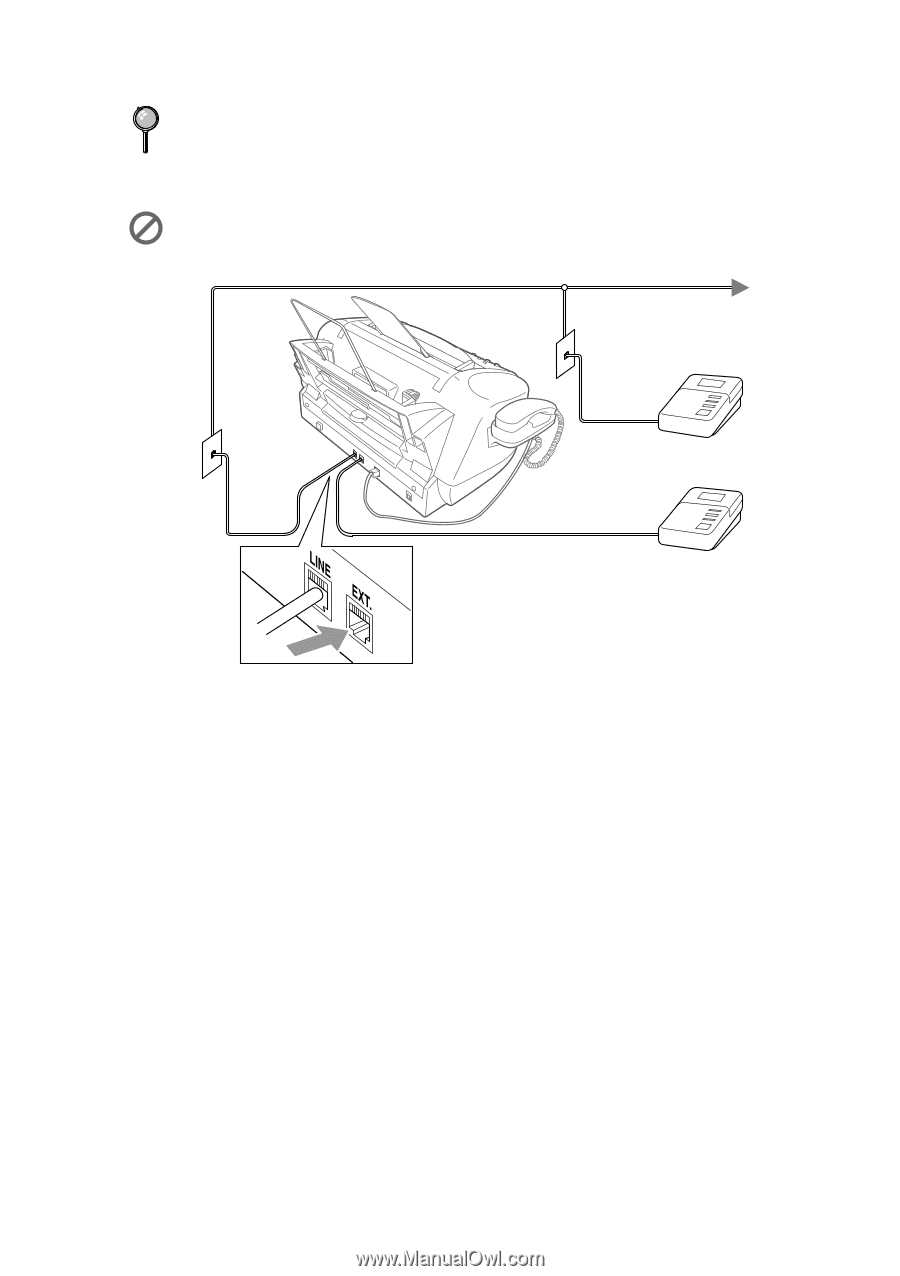
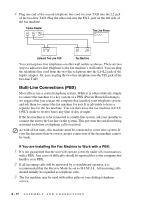
If You Do Not Subscribe to Distinctive Ring Service: You must plug your TAD into the EXT. jack of your fax machine. If your TAD is plugged into a wall jack, both your machine and the TAD will try to control the phone line. (See illustration on page 2-14.) Do not connect a TAD elsewhere on the same phone line (unless you have the Distinctive Ring service). NO ! TAD TAD YES ! Connections The external TAD must be plugged into the back side of the fax machine, in the jack labeled EXT. Your fax machine cannot work properly if you plug the TAD into a wall jack (unless you are using Distinctive Ring). 1 Plug the telephone line cord from the wall jack into the back side of the fax machine, in the jack labeled LINE. 2 Plug the telephone line cord from your external TAD into the back side of the fax machine, in the jack labeled EXT. (Make sure this cord is connected to the TAD at the TAD's telephone line jack, and not its telephone set jack.) 3 Set your external TAD to four rings or less. (The fax machine's Ring Delay setting does not apply.) 4 Record the outgoing message on your external TAD (see page 2-15). 5 Set the TAD to answer calls. 6 Set the Receive Mode to TAD:ANSWER MACH.. (See Choosing the Receive Mode, page 6-1.) A S S E M B L Y A N D C O N N E C T I O N S 2 - 14
-
 1
1 -
2
-
3
-
4
-
5
-
6
-
7
-
8
-
9
-
10
-
11
-
12
-
13
-
14
-
15
-
16
-
17
-
18
-
19
-
20
-
21
-
22
-
23
-
24
-
25
-
26
-
27
-
28
-
29
-
30
-
31
-
 32
32 -
 33
33 -
 34
34 -
 35
35 -
 36
36 -
 37
37 -
 38
38 -
 39
39 -
 40
40 -
 41
41 -
 42
42 -
43
-
44
-
45
-
46
-
47
-
48
-
49
-
50
-
51
-
52
-
53
-
54
-
55
-
56
-
57
-
58
-
59
-
60
-
61
-
62
-
63
-
64
-
65
-
66
-
67
-
68
-
69
-
70
-
71
-
72
-
73
-
74
-
75
-
76
-
77
-
78
-
79
-
80
-
81
-
82
-
83
-
84
-
85
-
86
-
87
-
88
-
89
-
90
-
91
-
92
-
93
-
94
-
95
-
96
-
97
-
98
-
99
-
100
-
101
-
102
-
103
-
104
-
105
-
106
-
107
-
108
-
109
-
110
-
111
-
112
-
113
-
114
-
115
-
116
-
117
-
118
-
119
-
120
-
121
-
122
-
123
-
124
-
125
-
126
-
127
-
128
-
129
-
130
-
131
-
132
-
133
-
134
-
135
-
136
-
137
-
138
-
139
-
140
-
141
-
142
-
143
-
144
-
145
-
146
 |
 |