Brother International PS-1250 Users Manual - Multi - Page 34
Straight, Stitching
 |
View all Brother International PS-1250 manuals
Add to My Manuals
Save this manual to your list of manuals |
Page 34 highlights
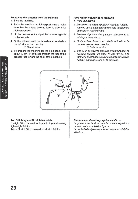
OVZOIZ A SV1.03tI SVOV.LAInd ONIHOMS OVZOIZ ONV IHOIVEIIS Straight Stitching Pattern (Straight Stitch) iiiiiiiii (Triple Stretch Stitch) Stitch Length Stitch Width 1-4 5 Fixed 2.5 Starting Sewing 1. Turn the Pattern Selection Dial to show your desired stitch on the Pattern Indication Window. Set the Pattern Selection Dial to Straight Stitch or Triple Stretch Stitch required. 2. Raise the needlelo its highest position and lift the presser foot lever. 3. Pull the upper thread toward the back of the presser foot. 4. Place the fabric under the presser foot and position the needle 1 cm (3/8") from the edge of the fabric. 5. Lower the presser foot. 6. To backtack, push down the Reverse Sewing Button as far as possible and lightly touch the foot controller. Reverse sewing is used for locking the endofseamsandwhere reinforcementisneeded. 7. Release the Reverse Sewing Button and start sewing in the forward direction by applying pressure to the foot controller. Model° de puntada Largodepuntada Archodepuntada 1 (Puntada recta) 1-4 iiinnii (Triplepuntada pespunto) Fija 2,5 5 Para empezar a coser 1. Gireelselectordepuntadahasta queaparezca el patrOndepuntadadeseadoenla ventana. Ponga dichoselectorenlapuntada recta oenlapuntada de triple pespunte segtin el modelo deseado. 2. Levante la aguja a suposiciOnmas alta ylevante la palanca del prensatelas. 3. lire el hilo superior hacia la parte de atras del prensatelas. 4. Coloque el tejido debajo del prensatelas y posicione la aguja a 1 cm (3/8') de la orilla del tejido. 5. Baje elprensatelas. 6. Para retrocedes, baje a fondo el pulsador de retroceso y presione ligeramente el pedal. La costura hacia atras sirve para terminar una costura o reforzarla. 7 Suelte elpulsador de retroceso y vuelva a coser hacia adelante, presionando elpedal. 27
-
 1
1 -
2
-
3
-
4
-
5
-
6
-
7
-
8
-
9
-
10
-
11
-
12
-
13
-
14
-
15
-
16
-
17
-
18
-
19
-
20
-
21
-
22
-
23
-
24
-
25
-
26
-
27
-
28
-
 29
29 -
 30
30 -
 31
31 -
 32
32 -
 33
33 -
 34
34 -
 35
35 -
 36
36 -
 37
37 -
 38
38 -
 39
39 -
40
-
41
-
42
-
43
-
44
-
45
-
46
-
47
-
48
-
49
-
50
-
51
-
52
-
53
-
54
-
55
-
56
-
57
-
58
-
59
-
60
-
61
-
62
-
63
-
64
-
65
-
66
-
67
-
68
-
69
-
70
-
71
-
72
 |
 |
