Brother International HL-1440 Users Manual - English - Page 87
TROUBLESHOOTING, Identifying Your Problem, Status Monitor Error Message appears
 |
UPC - 689466270150
View all Brother International HL-1440 manuals
Add to My Manuals
Save this manual to your list of manuals |
Page 87 highlights
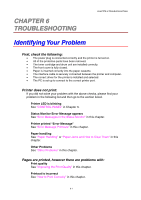
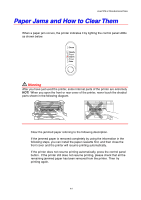
CHAPTER 6 6 TROUBLESHOOTING CHAPTER 6 TROUBLESHOOTING Identifying Your Problem First, check the following: • The power plug is connected correctly and the printer is turned on. • All of the protective parts have been removed. • The toner cartridge and drum unit are installed correctly. • The front cover is fully closed. • Paper is inserted correctly into the paper cassette. • The interface cable is securely connected between the printer and computer. • The correct driver for the printer is installed and selected. • The PC is set up to connect to the correct printer port. Printer does not print: If you did not solve your problem with the above checks, please find your problem in the following list and then go to the section listed. Printer LED is blinking See "CONTROL PANEL" in Chapter 3. Status Monitor Error Message appears See "Error Messages in the Status Monitor" in this chapter. Printer printed "Error Message" See "Error Message Printouts" in this chapter. Paper handling See "Paper Handling" or "Paper Jams and How to Clear Them" in this chapter. Other Problems See "Other Problems" in this chapter. Pages are printed, however there are problems with: Print quality See "Improving the Print Quality" in this chapter. Printout is incorrect See "How to Print Correctly" in this chapter. 6-1
-
 1
1 -
2
-
3
-
4
-
5
-
6
-
7
-
8
-
9
-
10
-
11
-
12
-
13
-
14
-
15
-
16
-
17
-
18
-
19
-
20
-
21
-
22
-
23
-
24
-
25
-
26
-
27
-
28
-
29
-
30
-
31
-
32
-
33
-
34
-
35
-
36
-
37
-
38
-
39
-
40
-
41
-
42
-
43
-
44
-
45
-
46
-
47
-
48
-
49
-
50
-
51
-
52
-
53
-
54
-
55
-
56
-
57
-
58
-
59
-
60
-
61
-
62
-
63
-
64
-
65
-
66
-
67
-
68
-
69
-
70
-
71
-
72
-
73
-
74
-
75
-
76
-
77
-
78
-
79
-
80
-
81
-
 82
82 -
 83
83 -
 84
84 -
 85
85 -
 86
86 -
 87
87 -
 88
88 -
 89
89 -
 90
90 -
 91
91 -
 92
92 -
93
-
94
-
95
-
96
-
97
-
98
-
99
-
100
-
101
-
102
-
103
-
104
-
105
-
106
-
107
-
108
-
109
-
110
-
111
-
112
-
113
-
114
-
115
-
116
 |
 |