Brother International LS 2125 Users Manual - English - Page 20
Enfilage De La Machine
 |
UPC - 012502609773
View all Brother International LS 2125 manuals
Add to My Manuals
Save this manual to your list of manuals |
Page 20 highlights
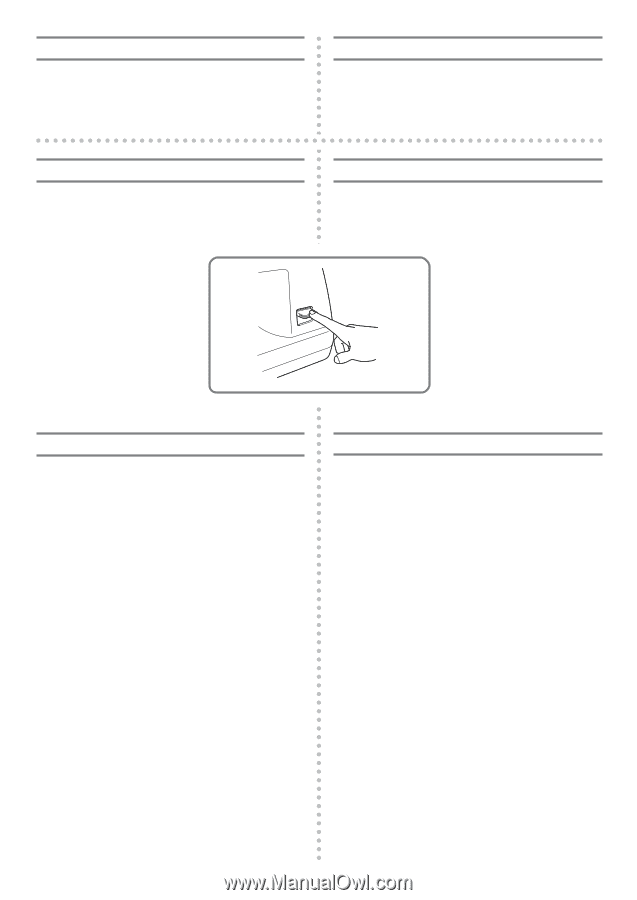
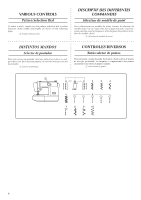
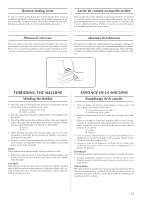
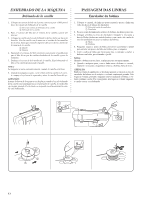
Reverse Sewing Lever Levier de couture en marche arrière To sew in reverse, press down the reverse sewing lever as far as possible and hold it in that position while lightly stepping on the foot controller. To sew forward, release the reverse sewing lever. Reverse sewing is used for locking and reinforcing seams. Pour coudre en arrière, abaisser au maximum le levier de couture en marche arrière, et le maintenir dans cette position tout en appuyant légèrement sur la pédale. Pour coudre à nouveau vers l'avant, relâcher le levier. Utiliser la couture en marche arrière pour arrêter ou renforcer une couture. Palanca de retroceso Para coser hacia atrás, baje completamente la palanca de retroceso y manténgala en esa posición mientras presiona ligeramente el pedal. Para volver a coser hacia adelante, vuelva a subir la palanca de retroceso. La costura hacia atrás se usa para terminar y reforzar costuras. Alavanca de retrocesso Para inverter o sentido da costura, pressione ao máximo a alavanca de retrocesso e retenha-a nessa posição, acionando simultânea e levemente o pedal do motor. Para voltar a costurar para frente, solte a alavanca. A costura em sentido inverso utiliza-se para rematar e reforçar costuras. THREADING THE MACHINE Winding the Bobbin 1. Place the spool of thread on the spool pin and pass the thread around the bobbin winding tension disc. 1 Bobbin winding tension disc 2 Bobbin winding 2. Pass the end of the thread through the hole in the bobbin from the inside. 3. Place the bobbin onto the bobbin winding shaft and slide the shaft to the right. Turn the bobbin clockwise, by hand, until the spring on the shaft slides into the slit on the bobbin. 3 Spring 4 Slit 4. While holding the end of the thread, gently press on the foot controller to wind the thread around the bobbin a few times, then stop the machine. 5. Trim the excess thread sticking out from the top of the bobbin and continue winding the thread onto the bobbin by pressing down on the foot controller. NOTE: The machine stops automatically when the bobbin is full. 6. When the machine stops, cut the thread between bobbin and spool, push the shaft to the left and remove the full bobbin from the shaft. CAUTION: Although the needle bar does not move when the bobbin winding shaft is slid toward the bobbin presser, the balance wheel will continue to turn. Therefore, do not touch the balance wheel while the bobbin is being wound. ENFILAGE DE LA MACHINE Remplissage de la canette 1. Placer la bobine de fil sur le porte-bobine et faire passer le fil par le disque de tension du dévidoir. 1 Disque de tension du dévidoir 2 Remplissage de la canette 2. Passer l'extrémité du fil dans l'orifice de la canette, par l'intérieur. 3. Placer la canette sur le dévidoir et glisser celui-ci vers le droite. Tourner la canette dans le sens des aiguilles d'une montre, à la main, jusqu'à ce que le ressort de la broche se place dans la rainure de la canette. 3 Ressort 4 Rainure 4. Tout en tenant l'extrémité du fil, appuyer doucement sur la pédale pour enrouler le fil autour de la canette. Arrêter la machine au bout de quelques tours. 5. Couper le bout de fil dépassant au-dessus de la canette puis continuer à enrouler le fil sur la canette en appuyant sur la pédale du rhéostat. REMARQUE: La machine s'arrête automatiquement lorsque la canette est pleine. 6. Lorsque la machine s'arrête, couper le fil entre la canette et la bobine, pousser le dévidoir vers la gauche et en retirer la canette pleine. PRECAUTION: Bien que la barre à aiguille ne fonctionne pas lorsque la broche du dévidoir est glissée pour maintenir la canette, le volant à main va continuer à tourner. Dès lors, éviter de toucher le volant lors du remplissage de la canette. 12
-
 1
1 -
2
-
3
-
4
-
5
-
6
-
7
-
8
-
9
-
10
-
11
-
12
-
13
-
14
-
 15
15 -
 16
16 -
 17
17 -
 18
18 -
 19
19 -
 20
20 -
 21
21 -
 22
22 -
 23
23 -
 24
24 -
 25
25 -
26
-
27
-
28
-
29
-
30
-
31
-
32
-
33
-
34
-
35
-
36
-
37
-
38
-
39
-
40
-
41
-
42
-
43
-
44
-
45
-
46
-
47
-
48
-
49
-
50
-
51
-
52
-
53
-
54
-
55
-
56
-
57
-
58
-
59
-
60
-
61
-
62
-
63
-
64
-
65
-
66
-
67
 |
 |