Brother International LS 2125 Users Manual - English - Page 43
Pour coudre un bouton
 |
UPC - 012502609773
View all Brother International LS 2125 manuals
Add to My Manuals
Save this manual to your list of manuals |
Page 43 highlights
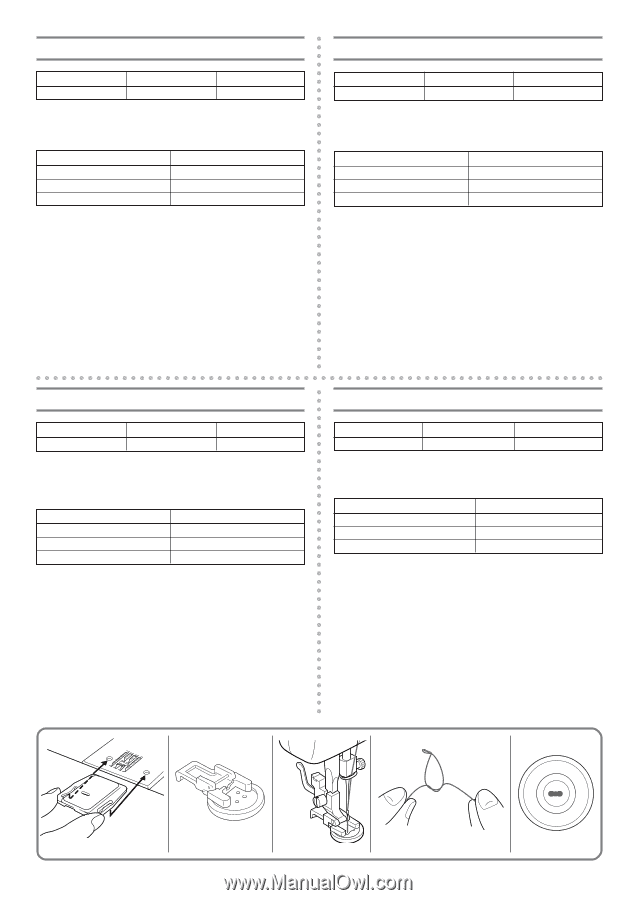
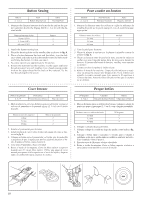
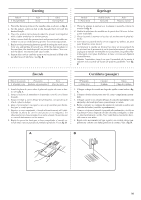
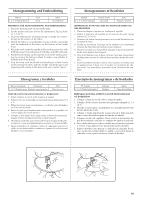
Button Sewing Pour coudre un bouton Pattern 2, 3 or 4 Foot Button Sewing Foot Other Darning Plate 1. Measure the distance between the buttonholes and set the pattern selection dial to the Zigzag Stitch (2, 3 or 4) with the desired width. Modèle 2, 3 ou 4 Pied-de-biche Pied pour boutons Autre Plaque à repriser 1. Mesurer la distance entre les orifices et régler le sélecteur de modèle de point sur le point zigzag (2,3 ou 4) ayant la largeur appropriée. Distance between holes 1.6mm (1/16") 3.2 mm (1/8") 4.8 mm (3/16") Pattern 2 3 4 Distance entre les orifices 1,6 mm 3,2 mm 4,8 mm Modèle 2 3 4 2. Attach the button sewing foot. 3. Place the darning plate on the needle plate as shown in fig. A. 4. Place a button between the foot and the fabric, turn the balance wheel and make sure that the needle enters the holes without hitting the button. If it hits, see step 1. 5. At a slow speed, sew approximately 10 stitches. 6. Remove the material from the machine. Cut the upper and lower threads leaving 15cm (6") lengthes. Use a hand-sewing needle to draw the upper thread to the back of the material. Tie the two threads together to secure. 2. Fixer le pied pour boutons. 3. Placer la plaque à repriser sur la plaque à aiguille comme le montre la fig. A. 4. Placer un bouton entre le pied et le tissu, tourner le volant et veiller à ce que l'aiguille pique dans les trous sans heurter le bouton. Si jamais elle heurte le bouton, veuillez vous reporter au point 1. 5. Coudre environ 10 points à faible vitesse. 6. Retirer le tissu de la machine. Couper les fils inférieur et supérieur en laissant à chacun une longueur de 15 cm. Utiliser une aiguille à coudre normale pour faire passer le fil supérieur à l'envers du tissu. Nouer les deux fils pour éviter que la couture ne se défasse. Coser botones Pregar botões Número de puntada Prensatelas 2, 3 ó 4 Prensatelas para botones Otros Placa de zurcir 1. Mida la distancia entre los distintos agujeros del botón y ponga el selector de puntadas en la puntada zigzag (2, 3 ó 4) con el ancho deseado. Distancia entre los agujeros 1,6mm 3,2 mm 4,8 mm Número de puntada 2 3 4 2. Instalar el prensatelas para botones. 3. Instale la placa de zurcir sobre la placa de agujas tal como se ilustra en la fig. A. 4. Coloque un botón entre el prensatelas y el tejido, gire la ruedecilla y asegúrese de que la aguja pase por los agujeros sin picar el botón. Si golpea el botón, véase el punto 1. 5. Cosa unas 10 puntadas a baja velocidad. 6. Retire el tejido de la máquina. Corte los hilos inferior y superior dejando unos 15 cm de hilos sueltos. Utilice una aguja de coser normal para pasar el hilo superior en el revés del tejido y haga un nudo con ambos hilos para asegurar la costura. Nº de ponto 2, 3 ou 4 Calcador Outros Calcador de pregar botões Chapa para cerzido 1. Meça a distância entre os orifícios dos botões e coloque o seletor de pontos no ponto ziguezague (2, 3 ou 4), com a largura pretendida. Distância entre os orifícios do botão 1,6 mm 3,2 mm 4,8 mm Nº de ponto 2 3 4 2. Coloque o calcador de pregar botões. 3. Coloque a chapa de cerzido na chapa de agulha, como indica a fig. A. 4. Coloque o botão entre o calcador e o tecido, gire o volante e certifique-se de que a agulha entra nos orifícios sem later no botão. Caso contrário, volte ao passo 1. 5. Execute cerca de 10 pontos a baixa velocidade. 6. Retire o tecido da máquina. Corte as linhas superior e inferior e ate-as juntas (com um nó) no avesso do tecido. 35
-
 1
1 -
2
-
3
-
4
-
5
-
6
-
7
-
8
-
9
-
10
-
11
-
12
-
13
-
14
-
15
-
16
-
17
-
18
-
19
-
20
-
21
-
22
-
23
-
24
-
25
-
26
-
27
-
28
-
29
-
30
-
31
-
32
-
33
-
34
-
35
-
36
-
37
-
 38
38 -
 39
39 -
 40
40 -
 41
41 -
 42
42 -
 43
43 -
 44
44 -
 45
45 -
 46
46 -
 47
47 -
 48
48 -
49
-
50
-
51
-
52
-
53
-
54
-
55
-
56
-
57
-
58
-
59
-
60
-
61
-
62
-
63
-
64
-
65
-
66
-
67
 |
 |