Brother International LS 2125 Users Manual - English - Page 49
Monogrammes Fig. A, Broderies Fig. B, Remarque, Precaution
 |
UPC - 012502609773
View all Brother International LS 2125 manuals
Add to My Manuals
Save this manual to your list of manuals |
Page 49 highlights
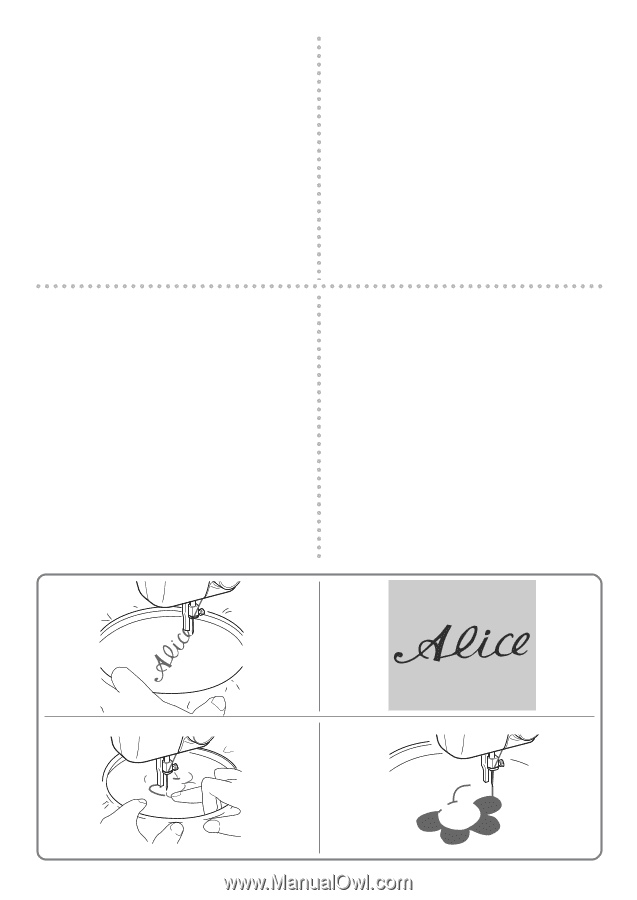
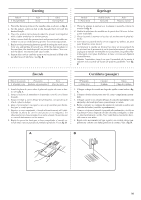
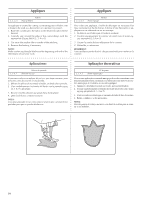
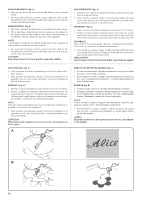
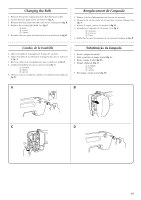
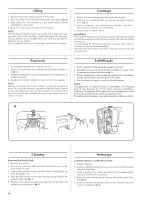
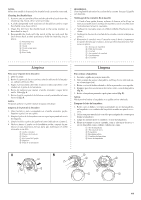
MONOGRAMMING (fig. A) 1. Sew moving the hoop slowly along the lettering at a constant speed. 2. To secure the stitching, set the pattern selection dial to the Straight Stitch (6) with the desired length and sew a few stitches at the end of the last letter. MONOGRAMMES (fig. A) 1. Coudre à une vitesse constante en déplaçant lentement le tambour le long des lettres. 2. Pour arrêter la couture, régler le sélecteur de modèle de point sur le point droit (6) avec la longueur souhaitée et coudre quelques points à la fin de la dernière lettre. EMBROIDERING (fig. B) 1. Stitch the outline of the design by moving the embroidery hoop. 2. Fill in the design alternating from the outline of the design to the inside and from the inside to the outline until the design is completely filled in. Keep the stitching close together. BRODERIES (fig. B) 1. Piquer le contour du motif en déplaçant le tambour au fur et à mesure. 2. Remplir le motif en piquant alternativement à point serrés du contour vers le centre et du centre vers le bord jusqu'à ce que le dessin soit entièrement recouvert de points. Veiller à bien rapprocher les rangées de points. NOTE: A long stitch is made by moving the embroidery hoop rapidly and a short stitch is made by moving it slowly. REMARQUE: Pour obtenir de grands points, déplacer rapidement le tambour. Pour faire un petit point, le déplacer lentement. 3. To secure the stitching, set the pattern selection dial to the Straight Stitch (6) with the desired length and sew a few stitches at the end of the design. CAUTION: Keep fingers away from moving parts, especially needles. 3. Pour arrêter la couture, régler le sélecteur de modèle de point sur le point droit (6) avec la longueur souhaitée et coudre quelques points droits à la fin du motif. PRECAUTION: Tenir les doigts à l'écart de tout élément mobile, en particulier les aiguilles. MONOGRAMAS (fig. A) 1. Cosa moviendo el bastidor lentamente por las letras, a una velocidad constante. 2. Para asegurar las puntadas, ponga el selector de puntadas en la puntada recta (6) con el largo deseado y cosa unas puntadas al final de la última letra. BORDADO (fig. B) 1. Remarque el contorno del diseño, moviendo el bastidor de acuerdo con el dibujo. 2. Rellene el dibujo de puntadas adelantando alternativamente del contorno hacia el interior y del interior hacia el exterior hasta que el dibujo quede completamente cubierto de puntadas, teniendo siempre cuidado en mantener las puntadas muy juntas. NOTA: Se pueden realizar puntadas largas al mover el bastidor rápidamente y puntadas cortas al moverlo lentamente. 3. Para asegurar las puntadas, ponga el selector de puntadas en la puntada recta (6) con el largo deseado y cosa unas puntadas rectas al final del dibujo. ATENCIÓN: Mantenga los dedos alejados de las piezas móviles, especialmente de las de agujas. EXECUÇÃO DE MONOGRAMAS (fig. A) 1. Costure movimentando o bastidor lentamente ao longo do desenho das letras, a velocidade constante. 2. Para arrematar a costura, coloque o seletor de pontos na costura reta (6), com o comprimento pretendido, e execute alguns pontos no final da última letra. BORDAR (fig. B) 1. Costure a linha exterior do desenho movimentando o bastidor. 2. Preencha o desenho costurando alternadamente da borda para den- tro e de dentro para a borda do desenho, até estar completamente coberto. Mantenha os pontos de costura bem juntos. NOTA: Podem executar-se pontos compridos movimentando o bastidor rapidamente e pontos curtos, movimentando-o lentamente. 3. Para arremator a costura, coloque o seletor de pontos na costura reta (6), com o comprimento pretendido, e execute alguns pontos no final do desenho. AVISO: Mantenha os dedos fora do trajeto das partes móveis, especialmente das agulhas. A B 41
-
 1
1 -
2
-
3
-
4
-
5
-
6
-
7
-
8
-
9
-
10
-
11
-
12
-
13
-
14
-
15
-
16
-
17
-
18
-
19
-
20
-
21
-
22
-
23
-
24
-
25
-
26
-
27
-
28
-
29
-
30
-
31
-
32
-
33
-
34
-
35
-
36
-
37
-
38
-
39
-
40
-
41
-
42
-
43
-
 44
44 -
 45
45 -
 46
46 -
 47
47 -
 48
48 -
 49
49 -
 50
50 -
 51
51 -
 52
52 -
 53
53 -
 54
54 -
55
-
56
-
57
-
58
-
59
-
60
-
61
-
62
-
63
-
64
-
65
-
66
-
67
 |
 |