Brother International SE-400 Users Manual - English - Page 104
Free-motion quilting
 |
View all Brother International SE-400 manuals
Add to My Manuals
Save this manual to your list of manuals |
Page 104 highlights
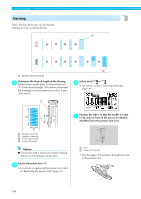
UTILITY STITCHES Free-motion quilting With free-motion quilting, lower the feed dogs (using the drop feed lever) so that the fabric can be moved freely in any direction. When free-motion quilting, use the following instructions with the optional free-motion open toe quilting foot "O" (SA187, F061 (XE1097-001)). CAUTION ● Be sure to use the optional free-motion open toe quilting foot "O" when making free-motion quilting. If the quilting foot (SA129, F005N (XC1948-002)) is used, the needle threader may be damaged. Hold the quilting foot "O" in place with your right c hand, and then tighten the presser foot holder screw using the screwdriver in your left hand. a Presser foot holder screw CAUTION ● Be sure to securely tighten the screw with the screwdriver. otherwise the needle may touch the presser foot, causing it to bend or break. Slide the drop feed lever, located at the rear of d the machine on the base, to (to the left as seen from the rear of the machine). Remove the presser foot and the presser foot a holder. • Refer to "Removing and attaching the presser foot holder" (page 45). Attach free-motion quilting foot "O" by b positioning the pin of the quilting foot above the needle clamp screw and aligning the lower-left of the quilting foot and the presser bar. 1 3 2 a a Drop feed lever (as seen from the rear of the machine) X The feed dogs are lowered. Turn on the sewing machine, and then select a e stitch 3 or 24 . • For details, refer to "Selecting stitching" (page 49). Use both hands to stretch the fabric taut, and f then move the fabric at a consistent pace in order to sew uniform stitches roughly 2.02.5mm (approx. 1/16 - 3/32 inch) in length. Reinforcement stitches are sewn at the beginning and end of sewing. a Pin b Needle clamp screw c Presser bar Note z Make sure that the quilting foot is not slanted. 102 a Stitch After sewing is finished, slide the drop feed g lever to (to the right as seen from the rear of the machine) and turn the handwheel to raise the feed dogs. Memo z The drop feed lever is normally set to the right side.
-
 1
1 -
2
-
3
-
4
-
5
-
6
-
7
-
8
-
9
-
10
-
11
-
12
-
13
-
14
-
15
-
16
-
17
-
18
-
19
-
20
-
21
-
22
-
23
-
24
-
25
-
26
-
27
-
28
-
29
-
30
-
31
-
32
-
33
-
34
-
35
-
36
-
37
-
38
-
39
-
40
-
41
-
42
-
43
-
44
-
45
-
46
-
47
-
48
-
49
-
50
-
51
-
52
-
53
-
54
-
55
-
56
-
57
-
58
-
59
-
60
-
61
-
62
-
63
-
64
-
65
-
66
-
67
-
68
-
69
-
70
-
71
-
72
-
73
-
74
-
75
-
76
-
77
-
78
-
79
-
80
-
81
-
82
-
83
-
84
-
85
-
86
-
87
-
88
-
89
-
90
-
91
-
92
-
93
-
94
-
95
-
96
-
97
-
98
-
 99
99 -
 100
100 -
 101
101 -
 102
102 -
 103
103 -
 104
104 -
 105
105 -
 106
106 -
 107
107 -
 108
108 -
 109
109 -
110
-
111
-
112
-
113
-
114
-
115
-
116
-
117
-
118
-
119
-
120
-
121
-
122
-
123
-
124
-
125
-
126
-
127
-
128
-
129
-
130
-
131
-
132
-
133
-
134
-
135
-
136
-
137
-
138
-
139
-
140
-
141
-
142
-
143
-
144
-
145
-
146
-
147
-
148
-
149
-
150
-
151
-
152
-
153
-
154
-
155
-
156
-
157
-
158
-
159
-
160
-
161
-
162
-
163
-
164
-
165
-
166
-
167
-
168
-
169
-
170
-
171
-
172
 |
 |
