Brother International SE-400 Users Manual - English - Page 76
Overcasting Stitches - sewing machine manual
 |
View all Brother International SE-400 manuals
Add to My Manuals
Save this manual to your list of manuals |
Page 76 highlights
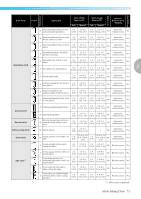
UTILITY STITCHES Overcasting Stitches Sew overcasting stitches along the edges of cut fabric to prevent them from fraying. 15 stitches are available for overcasting. The procedure for sewing overcasting stitch is explained according to the presser foot that is used. Sewing overcasting stitches using overcasting foot "G" Three stitches can be used to sew overcasting with overcasting foot "G". Stitch Name Pattern Application 11 Overcasting 12 stitch 13 Preventing fraying in medium weight and thin fabrics Preventing fraying in thick fabrics and fabrics that fray easily Stitch Width [mm (inch)] Auto Manual Stitch Length [mm (inch)] Auto Manual Presser Foot 3.5 2.0 (1/8) (1/16) 2.5-5.0 (3/32-3/16) 1.0-4.0 (1/16-3/16) G 5.0 2.5 (3/16) (3/32) 3.5-5.0 (1/8-3/16) CAUTION ● Be sure to turn off the main power before replacing the pressor foot. Otherwise, injuries may occur if (Start/stop button) is accidentally pressed and the machine starts sewing. Attach overcasting foot "G". a G Position the fabric with the edge of the fabric c against the guide of the presser foot, and then lower the presser foot lever. • For details, refer to "Replacing the presser foot" (page 43). Select a stitch. b • For details, refer to "Selecting stitching" (page 49). a a Guide Sew with the edge of the fabric against the d presser foot guide. a a Needle drop point 74
-
 1
1 -
2
-
3
-
4
-
5
-
6
-
7
-
8
-
9
-
10
-
11
-
12
-
13
-
14
-
15
-
16
-
17
-
18
-
19
-
20
-
21
-
22
-
23
-
24
-
25
-
26
-
27
-
28
-
29
-
30
-
31
-
32
-
33
-
34
-
35
-
36
-
37
-
38
-
39
-
40
-
41
-
42
-
43
-
44
-
45
-
46
-
47
-
48
-
49
-
50
-
51
-
52
-
53
-
54
-
55
-
56
-
57
-
58
-
59
-
60
-
61
-
62
-
63
-
64
-
65
-
66
-
67
-
68
-
69
-
70
-
 71
71 -
 72
72 -
 73
73 -
 74
74 -
 75
75 -
 76
76 -
 77
77 -
 78
78 -
 79
79 -
 80
80 -
 81
81 -
82
-
83
-
84
-
85
-
86
-
87
-
88
-
89
-
90
-
91
-
92
-
93
-
94
-
95
-
96
-
97
-
98
-
99
-
100
-
101
-
102
-
103
-
104
-
105
-
106
-
107
-
108
-
109
-
110
-
111
-
112
-
113
-
114
-
115
-
116
-
117
-
118
-
119
-
120
-
121
-
122
-
123
-
124
-
125
-
126
-
127
-
128
-
129
-
130
-
131
-
132
-
133
-
134
-
135
-
136
-
137
-
138
-
139
-
140
-
141
-
142
-
143
-
144
-
145
-
146
-
147
-
148
-
149
-
150
-
151
-
152
-
153
-
154
-
155
-
156
-
157
-
158
-
159
-
160
-
161
-
162
-
163
-
164
-
165
-
166
-
167
-
168
-
169
-
170
-
171
-
172
 |
 |
