Brother International SE-400 Users Manual - English - Page 126
Do not put your hands or other objects, near the carriage. It may cause injury. - sewing & embroidery machine with computer connectivity
 |
View all Brother International SE-400 manuals
Add to My Manuals
Save this manual to your list of manuals |
Page 126 highlights
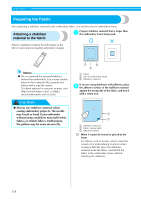
EMBROIDERY Slide the embroidery unit onto the sewing c machine arm. Push it in until it clicks and stops. a X The embroidery unit is attached. Note z Make sure that there is no gap between the embroidery unit and the sewing machine, otherwise the embroidery pattern may not be sewn correctly. Be sure to fully insert the connector into the connection port. z Do not push on the carriage when attaching the embroidery unit to the machine, otherwise damage to the embroidery unit may result. Turn on the sewing machine. d a Carriage CAUTION ● Do not put your hands or other objects near the carriage. It may cause injury. Note z If the machine is initialized with hands or objects near the carriage, the screen may return to the initial display. After removing whatever is near the carriage, turn the power on again. X The screen for selecting the embroidery pattern type is displayed. X The confirmation message is displayed. Be sure that no objects or hands are near the e embroidery unit and press . Memo z Utility stitches cannot be selected when the embroidery unit is attached. z For details on the embroidery patterns, refer to "Selecting Embroidery Patterns" (page 132). X The carriage moves to its initial position. 124
-
 1
1 -
2
-
3
-
4
-
5
-
6
-
7
-
8
-
9
-
10
-
11
-
12
-
13
-
14
-
15
-
16
-
17
-
18
-
19
-
20
-
21
-
22
-
23
-
24
-
25
-
26
-
27
-
28
-
29
-
30
-
31
-
32
-
33
-
34
-
35
-
36
-
37
-
38
-
39
-
40
-
41
-
42
-
43
-
44
-
45
-
46
-
47
-
48
-
49
-
50
-
51
-
52
-
53
-
54
-
55
-
56
-
57
-
58
-
59
-
60
-
61
-
62
-
63
-
64
-
65
-
66
-
67
-
68
-
69
-
70
-
71
-
72
-
73
-
74
-
75
-
76
-
77
-
78
-
79
-
80
-
81
-
82
-
83
-
84
-
85
-
86
-
87
-
88
-
89
-
90
-
91
-
92
-
93
-
94
-
95
-
96
-
97
-
98
-
99
-
100
-
101
-
102
-
103
-
104
-
105
-
106
-
107
-
108
-
109
-
110
-
111
-
112
-
113
-
114
-
115
-
116
-
117
-
118
-
119
-
120
-
 121
121 -
 122
122 -
 123
123 -
 124
124 -
 125
125 -
 126
126 -
 127
127 -
 128
128 -
 129
129 -
 130
130 -
 131
131 -
132
-
133
-
134
-
135
-
136
-
137
-
138
-
139
-
140
-
141
-
142
-
143
-
144
-
145
-
146
-
147
-
148
-
149
-
150
-
151
-
152
-
153
-
154
-
155
-
156
-
157
-
158
-
159
-
160
-
161
-
162
-
163
-
164
-
165
-
166
-
167
-
168
-
169
-
170
-
171
-
172
 |
 |
