Brother International SE-400 Users Manual - English - Page 109
Gently hold the end of the upper thread
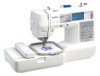 |
View all Brother International SE-400 manuals
Add to My Manuals
Save this manual to your list of manuals |
Page 109 highlights
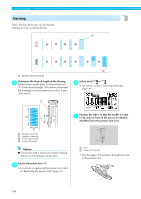
Memo z When lowering the presser foot, do not push in the front of the presser foot, otherwise the darning will not be sewn with the correct size. Gently hold the end of the upper thread in f your left hand, and then start sewing. a a Do not reduce the gap. Pull down the buttonhole lever as far as e possible. X Once sewing is completed, the sewing machine automatically sews reinforcement stitches, then stops. Raise the presser foot lever, remove the fabric, g and then cut the threads. Raise the buttonhole lever to its original 3 h position. Memo z If the fabric does not feed, for example, because it is too thick, increase the stitch length. For details, refer to "Adjusting the stitch length" (page 59). a a Buttonhole lever The buttonhole lever is positioned behind the bracket on the buttonhole foot. a b a Buttonhole lever b Bracket Reinforcement Stitching 107
-
 1
1 -
2
-
3
-
4
-
5
-
6
-
7
-
8
-
9
-
10
-
11
-
12
-
13
-
14
-
15
-
16
-
17
-
18
-
19
-
20
-
21
-
22
-
23
-
24
-
25
-
26
-
27
-
28
-
29
-
30
-
31
-
32
-
33
-
34
-
35
-
36
-
37
-
38
-
39
-
40
-
41
-
42
-
43
-
44
-
45
-
46
-
47
-
48
-
49
-
50
-
51
-
52
-
53
-
54
-
55
-
56
-
57
-
58
-
59
-
60
-
61
-
62
-
63
-
64
-
65
-
66
-
67
-
68
-
69
-
70
-
71
-
72
-
73
-
74
-
75
-
76
-
77
-
78
-
79
-
80
-
81
-
82
-
83
-
84
-
85
-
86
-
87
-
88
-
89
-
90
-
91
-
92
-
93
-
94
-
95
-
96
-
97
-
98
-
99
-
100
-
101
-
102
-
103
-
 104
104 -
 105
105 -
 106
106 -
 107
107 -
 108
108 -
 109
109 -
 110
110 -
 111
111 -
 112
112 -
 113
113 -
 114
114 -
115
-
116
-
117
-
118
-
119
-
120
-
121
-
122
-
123
-
124
-
125
-
126
-
127
-
128
-
129
-
130
-
131
-
132
-
133
-
134
-
135
-
136
-
137
-
138
-
139
-
140
-
141
-
142
-
143
-
144
-
145
-
146
-
147
-
148
-
149
-
150
-
151
-
152
-
153
-
154
-
155
-
156
-
157
-
158
-
159
-
160
-
161
-
162
-
163
-
164
-
165
-
166
-
167
-
168
-
169
-
170
-
171
-
172
 |
 |
