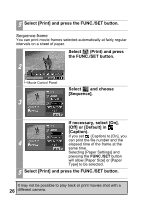
Canon PowerShot A470 Direct Print User Guide - Page 25
Trim the image to specify the, print area.
 |
View all Canon PowerShot A470 manuals
Add to My Manuals
Save this manual to your list of manuals |
Page 25 highlights
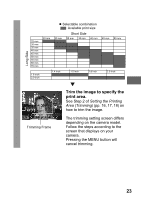
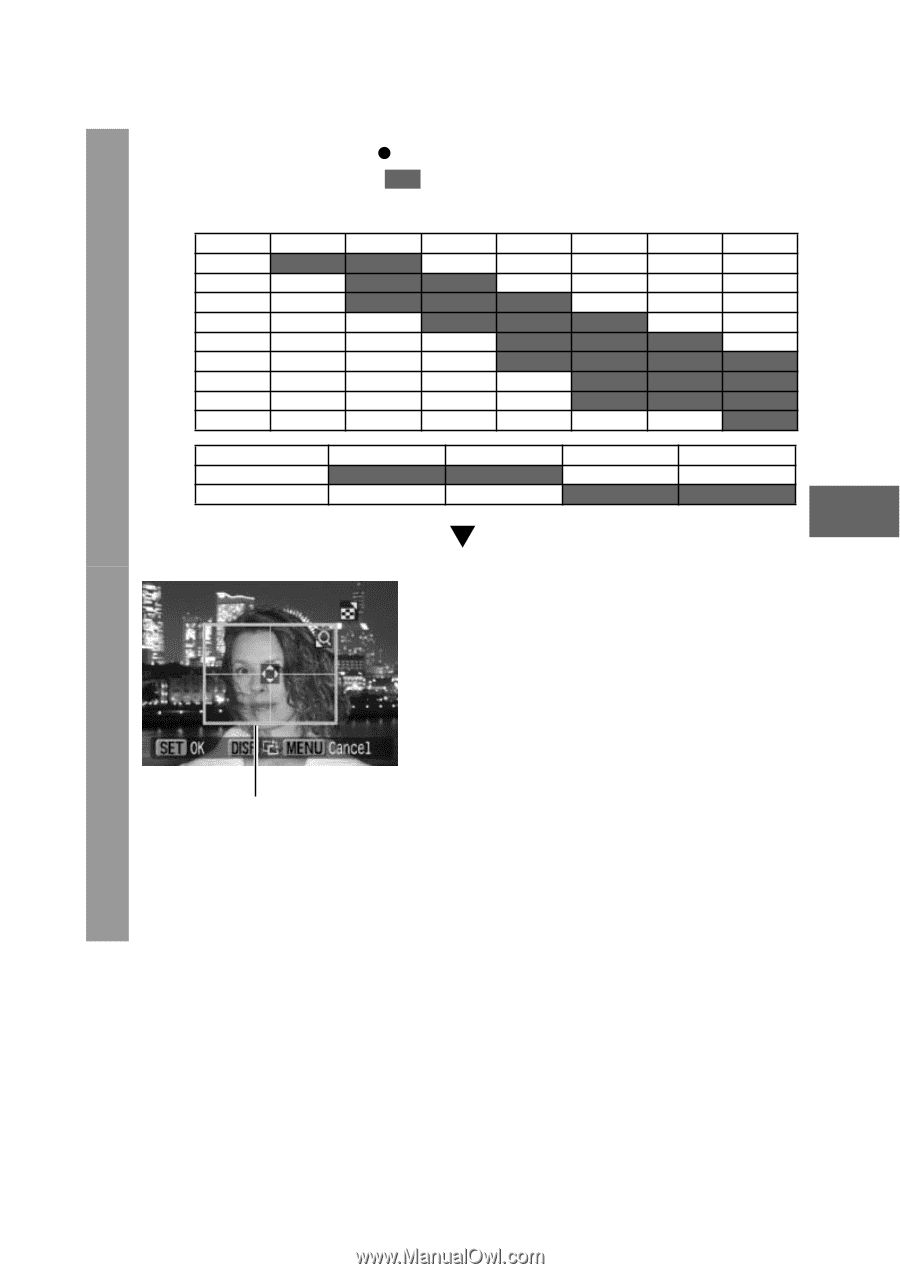
Long Side 25 mm 30 mm 35 mm 40 mm 45 mm 50 mm 55 mm 60 mm 70 mm 20 mm z Selectable combination : Available print size Short Side 25 mm 30 mm 35 mm 40 mm 45 mm 50 mm 1.8 inch 2.0 inch 1.4 inch 1.5 inch 1.8 inch 2.0 inch T Trim the image to specify the print area. See Step 2 of Setting the Printing Area (Trimming) (pp. 16, 17, 18) on how to trim the image. Trimming Frame The trimming setting screen differs depending on the camera model. Follow the steps according to the screen that displays on your camera. Pressing the MENU button will cancel trimming. 23
-
 1
1 -
2
-
3
-
4
-
5
-
6
-
7
-
8
-
9
-
10
-
11
-
12
-
13
-
14
-
15
-
16
-
17
-
18
-
19
-
 20
20 -
 21
21 -
 22
22 -
 23
23 -
 24
24 -
 25
25 -
 26
26 -
 27
27 -
 28
28 -
 29
29 -
 30
30 -
31
-
32
-
33
-
34
-
35
-
36
-
37
-
38
-
39
-
40
-
41
-
42
-
43
-
44
-
45
-
46
-
47
-
48
-
49
-
50
-
51
-
52
-
53
-
54
-
55
-
56
-
57
-
58
-
59
-
60
-
61
-
62
-
63
-
64
-
65
-
66
-
67
-
68
-
69
-
70
-
71
-
72
-
73
-
74
-
75
-
76
-
77
-
78
-
79
-
80
-
81
-
82
 |
 |
23
Trim the image to specify the
print area.
See Step 2 of
Setting the Printing
Area (Trimming)
(pp. 16, 17, 18) on
how to trim the image.
The trimming setting screen differs
depending on the camera model.
Follow the steps according to the
screen that displays on your
camera.
Pressing the MENU button will
cancel trimming.
1.4 inch
1.5 inch
1.8 inch
2.0 inch
1.8 inch
2.0 inch
Selectable combination
: Available print size
20 mm
25 mm
30 mm
35 mm
40 mm
45 mm
50 mm
25 mm
30 mm
35 mm
40 mm
45 mm
50 mm
55 mm
60 mm
70 mm
Short Side
Long Side
Trimming Frame