Canon SX10IS PowerShot SX10 IS Camera User Guide - Page 31
Connecting the camera to a computer., Preparing to download images to the computer.
 |
UPC - 013803100785
View all Canon SX10IS manuals
Add to My Manuals
Save this manual to your list of manuals |
Page 31 highlights
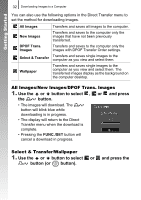
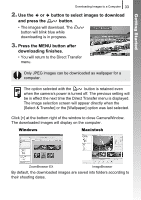
Getting Started Downloading Images to a Computer 29 Macintosh Double-click the icon in the CDROM window. When the installer panel appears, click [Install]. Follow the onscreen instructions to proceed. 2. Connecting the camera to a computer. 1. Connect the supplied interface cable to the computer's USB port and to the camera's DIGITAL terminal. Open the camera's terminal cover and insert the interface cable all the way into the terminal. USB Port DIGITAL Terminal Interface Cable 3. Preparing to download images to the computer. 1. Press the (Playback) button to turn on the camera. Power Lamp • The power lamp will light yellow.
-
 1
1 -
2
-
3
-
4
-
5
-
6
-
7
-
8
-
9
-
10
-
11
-
12
-
13
-
14
-
15
-
16
-
17
-
18
-
19
-
20
-
21
-
22
-
23
-
24
-
25
-
 26
26 -
 27
27 -
 28
28 -
 29
29 -
 30
30 -
 31
31 -
 32
32 -
 33
33 -
 34
34 -
 35
35 -
 36
36 -
37
-
38
-
39
-
40
-
41
-
42
-
43
-
44
-
45
-
46
-
47
-
48
-
49
-
50
-
51
-
52
-
53
-
54
-
55
-
56
-
57
-
58
-
59
-
60
-
61
-
62
-
63
-
64
-
65
-
66
-
67
-
68
-
69
-
70
-
71
-
72
-
73
-
74
-
75
-
76
-
77
-
78
-
79
-
80
-
81
-
82
-
83
-
84
-
85
-
86
-
87
-
88
-
89
-
90
-
91
-
92
-
93
-
94
-
95
-
96
-
97
-
98
-
99
-
100
-
101
-
102
-
103
-
104
-
105
-
106
-
107
-
108
-
109
-
110
-
111
-
112
-
113
-
114
-
115
-
116
-
117
-
118
-
119
-
120
-
121
-
122
-
123
-
124
-
125
-
126
-
127
-
128
-
129
-
130
-
131
-
132
-
133
-
134
-
135
-
136
-
137
-
138
-
139
-
140
-
141
-
142
-
143
-
144
-
145
-
146
-
147
-
148
-
149
-
150
-
151
-
152
-
153
-
154
-
155
-
156
-
157
-
158
-
159
-
160
-
161
-
162
-
163
-
164
-
165
-
166
-
167
-
168
-
169
-
170
-
171
-
172
-
173
-
174
-
175
-
176
-
177
-
178
-
179
-
180
-
181
-
182
-
183
-
184
-
185
-
186
-
187
-
188
-
189
-
190
-
191
-
192
-
193
-
194
-
195
-
196
-
197
-
198
-
199
-
200
-
201
-
202
-
203
-
204
-
205
-
206
-
207
-
208
-
209
-
210
-
211
-
212
-
213
-
214
-
215
-
216
-
217
-
218
-
219
-
220
-
221
-
222
-
223
-
224
-
225
-
226
-
227
-
228
-
229
-
230
-
231
-
232
-
233
-
234
-
235
-
236
-
237
-
238
-
239
-
240
-
241
-
242
-
243
-
244
-
245
-
246
-
247
-
248
-
249
-
250
-
251
-
252
-
253
-
254
-
255
-
256
-
257
-
258
-
259
-
260
-
261
-
262
-
263
-
264
-
265
-
266
-
267
-
268
-
269
-
270
-
271
-
272
-
273
-
274
-
275
-
276
-
277
-
278
-
279
-
280
-
281
-
282
-
283
-
284
-
285
-
286
-
287
-
288
-
289
-
290
-
291
-
292
 |
 |

Downloading Images to a Computer
29
Getting Started
Macintosh
Double-click the
icon in the CD-
ROM window. When the installer panel
appears, click [Install]. Follow the
onscreen instructions to proceed.
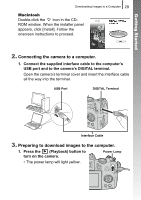
2.
Connecting the camera to a computer.
1.
Connect the supplied interface cable to the computer’s
USB port and to the camera’s DIGITAL terminal.
Open the camera’s terminal cover and insert the interface cable
all the way into the terminal.
3.
Preparing to download images to the computer.
1.
Press the
(Playback) button to
turn on the camera.
• The power lamp will light yellow.
DIGITAL Terminal
USB Port
Interface Cable
Power Lamp