Canon ZR60 ZR70 ZR65 Instruction Manual - Page 27
Turn the selector dial to select [DISPLAY SET UP]
 |
UPC - 490561400607
View all Canon ZR60 manuals
Add to My Manuals
Save this manual to your list of manuals |
Page 27 highlights
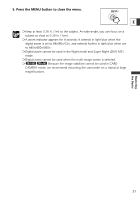
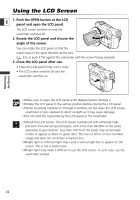
2. Turn the selector dial to select [SYSTEM] and press the selector dial. 3. Turn the selector dial to select [D/TIME SET] and press the selector dial. E The year display starts to flash. 4. Turn the selector dial to select the year, and press the selector dial. • The next part of the display starts flashing. • Set the month, day, hours and minutes in the same way. 5. Press the MENU button to close the menu and to start the clock. MENU Time zone, date and time appear for 4 seconds each time you turn the power on. ❍ To change a part of the date or time, press the selector dial at step 4, and move to the part you wish to change. ❍ The date can be set to any year between 2003 and 2030. Displaying Date and Time during Recording You can display time zone, date and time in the lower left corner of the screen (the time zone disappears after 4 seconds). The 4-second display will no longer appear when you turn the power on. The date and time display will not be superimposed on your recordings. CAMERA PLAY (VCR) CARD CAMERA CARD PLAY (VCR) ( 44) DISPLAY SET UP D/T DISPLAY••OFF 1. Press the MENU button to open the menu. MENU Mastering the Basics 2. Turn the selector dial to select [DISPLAY SET UP] and press the selector dial. 3. Turn the selector dial to select [D/T DISPLAY] and press the selector dial. 4. Turn the selector dial to select [ON]. 5. Press the MENU button to close the menu. MENU 27
-
 1
1 -
2
-
3
-
4
-
5
-
6
-
7
-
8
-
9
-
10
-
11
-
12
-
13
-
14
-
15
-
16
-
17
-
18
-
19
-
20
-
21
-
 22
22 -
 23
23 -
 24
24 -
 25
25 -
 26
26 -
 27
27 -
 28
28 -
 29
29 -
 30
30 -
 31
31 -
 32
32 -
33
-
34
-
35
-
36
-
37
-
38
-
39
-
40
-
41
-
42
-
43
-
44
-
45
-
46
-
47
-
48
-
49
-
50
-
51
-
52
-
53
-
54
-
55
-
56
-
57
-
58
-
59
-
60
-
61
-
62
-
63
-
64
-
65
-
66
-
67
-
68
-
69
-
70
-
71
-
72
-
73
-
74
-
75
-
76
-
77
-
78
-
79
-
80
-
81
-
82
-
83
-
84
-
85
-
86
-
87
-
88
-
89
-
90
-
91
-
92
-
93
-
94
-
95
-
96
-
97
-
98
-
99
-
100
-
101
-
102
-
103
-
104
-
105
-
106
-
107
-
108
-
109
-
110
-
111
-
112
-
113
-
114
-
115
-
116
-
117
-
118
-
119
-
120
-
121
-
122
-
123
-
124
-
125
-
126
-
127
-
128
-
129
-
130
-
131
-
132
-
133
-
134
-
135
-
136
-
137
-
138
-
139
-
140
-
141
-
142
-
143
-
144
-
145
-
146
-
147
-
148
-
149
-
150
-
151
-
152
-
153
-
154
-
155
-
156
-
157
-
158
 |
 |
