Canon imageCLASS D680 imageCLASS D680 Reference Guide - Page 35
Setting the Image Quality, Adjusting the Copy Exposure
 |
View all Canon imageCLASS D680 manuals
Add to My Manuals
Save this manual to your list of manuals |
Page 35 highlights
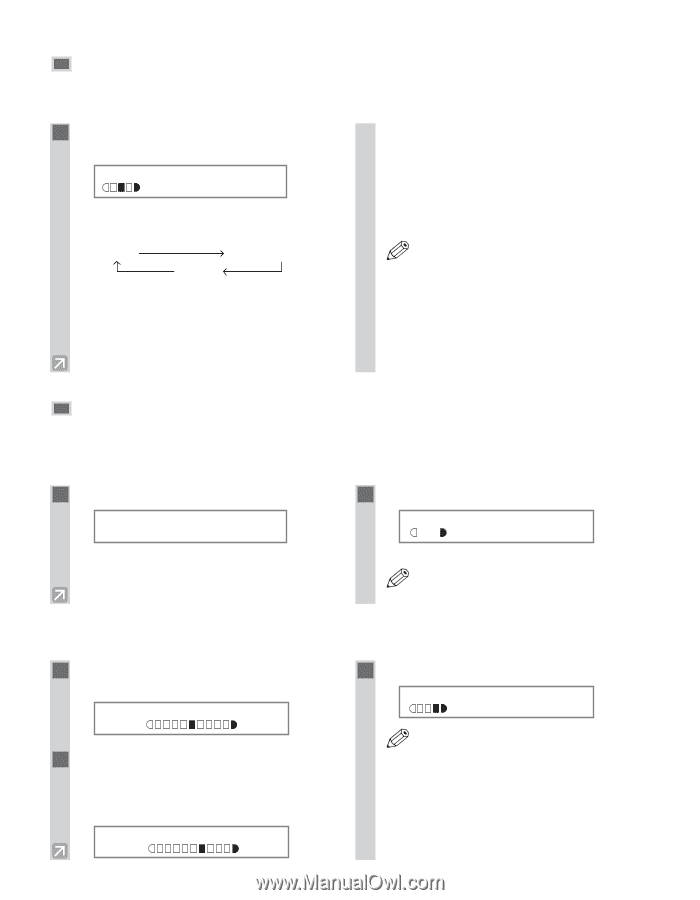
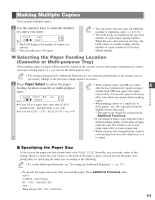
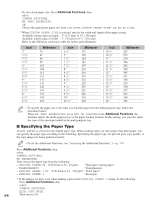
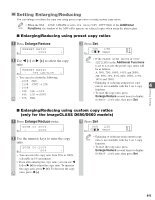
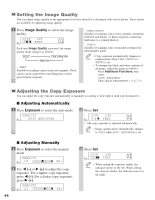
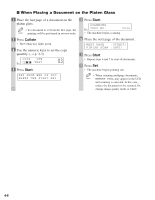
Setting the Image Quality You can adjust image quality to the appropriate level best suited for a document with text or photos. Three modes are available for adjusting image quality. 1 Press Image Quality to select the image quality. 100% LTR Ex: TEXT 01 Each time Image Quality is pressed, the image quality mode changes as follows: TEXT TEXT/PHOTO PHOTO - TEXT Suitable for making copies from text originals. Good copies can be made from even blueprints or faint pencil-drawn originals. - TEXT/PHOTO Suitable for making copies from originals containing both text and photos, or photo originals containing half-tones (i.e. printed photos). - PHOTO Suitable for making copies from photos printed on photographic paper. • Copy exposure automatically changes to NOTE manual mode when TEXT/PHOTO or PHOTO is set. • To sharpen the black and white contrast of an image, adjust the image as follows: Press Additional Functions, then select COPY SETTINGS. Then choose SHARPNESS. (→ p. 7-3) Adjusting the Copy Exposure You can adjust the copy exposure automatically or manually according to how light or dark your document is. I Adjusting Automatically 1 Press Exposure to select the auto mode. DENSITY Ex: AUTO EXPOSURE 2 Press Set. 100% LTR Ex: A T E X T 01 • The copy exposure is adjusted automatically. • Image quality mode automatically changes NOTE to TEXT when AUTO EXPOSURE is set. I Adjusting Manually 1 Press Exposure to select the manual mode. DENSITY Ex: - L T DK+ 2 Use 4 (-) or e (+) to adjust the copy exposure. For a lighter copy exposure, press 4 (-). For a darker copy exposure, press e (+). DENSITY Ex: - L T DK+ 4-6 3 Press Set. 100% LTR Ex: TEXT 01 • When setting the exposure lighter, the NOTE indicator moves to the left. When setting the exposure darker, the indicator moves to the right.
-
 1
1 -
2
-
3
-
4
-
5
-
6
-
7
-
8
-
9
-
10
-
11
-
12
-
13
-
14
-
15
-
16
-
17
-
18
-
19
-
20
-
21
-
22
-
23
-
24
-
25
-
26
-
27
-
28
-
29
-
 30
30 -
 31
31 -
 32
32 -
 33
33 -
 34
34 -
 35
35 -
 36
36 -
 37
37 -
 38
38 -
 39
39 -
 40
40 -
41
-
42
-
43
-
44
-
45
-
46
-
47
-
48
-
49
-
50
-
51
-
52
-
53
-
54
-
55
-
56
-
57
-
58
-
59
-
60
-
61
-
62
-
63
-
64
-
65
-
66
-
67
-
68
-
69
-
70
-
71
-
72
-
73
-
74
-
75
-
76
-
77
-
78
-
79
-
80
-
81
-
82
 |
 |