Compaq Presario 18XL Maintenance & Service Guide Presario 1800/1800T Serie - Page 98
Processor, matches the image shown on the next skip to step
 |
View all Compaq Presario 18XL manuals
Add to My Manuals
Save this manual to your list of manuals |
Page 98 highlights
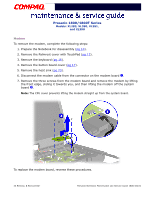
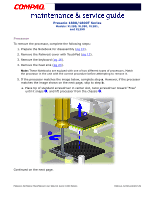
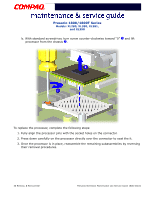
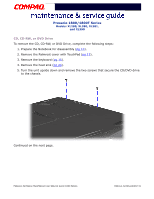
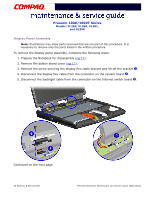
Presario 1800/1800T Series Models: XL280, XL380, XL381, and XL390 Processor To remove the processor, complete the following steps: 1. Prepare the Notebook for disassembly (pg 10). 2. Remove the Palmrest cover with TouchPad (pg 13). 3. Remove the keyboard (pg 16). 4. Remove the heat sink (pg 23). Note: These Notebooks are equiped with one of two different types of processors. Match the processor in the unit with the correct procedure before attempting to remove it. 5. If the processor matches the image below, complete step a. However, if the processor matches the image shown on the next page, skip to step b. a. Place tip of standard screwdriver in center slot, twist screwdriver toward "Free" until it snaps 1, and lift processor from the chassis 2. Continued on the next page. PRESARIO NOTEBOOK MAINTENANCE AND SERVICE GUIDE 1800 SERIES REMOVAL & REPLACEMENT 29
-
 1
1 -
2
-
3
-
4
-
5
-
6
-
7
-
8
-
9
-
10
-
11
-
12
-
13
-
14
-
15
-
16
-
17
-
18
-
19
-
20
-
21
-
22
-
23
-
24
-
25
-
26
-
27
-
28
-
29
-
30
-
31
-
32
-
33
-
34
-
35
-
36
-
37
-
38
-
39
-
40
-
41
-
42
-
43
-
44
-
45
-
46
-
47
-
48
-
49
-
50
-
51
-
52
-
53
-
54
-
55
-
56
-
57
-
58
-
59
-
60
-
61
-
62
-
63
-
64
-
65
-
66
-
67
-
68
-
69
-
70
-
71
-
72
-
73
-
74
-
75
-
76
-
77
-
78
-
79
-
80
-
81
-
82
-
83
-
84
-
85
-
86
-
87
-
88
-
89
-
90
-
91
-
92
-
 93
93 -
 94
94 -
 95
95 -
 96
96 -
 97
97 -
 98
98 -
 99
99 -
 100
100 -
 101
101 -
 102
102 -
 103
103 -
104
-
105
-
106
-
107
-
108
-
109
-
110
-
111
-
112
-
113
-
114
-
115
-
116
-
117
-
118
-
119
-
120
-
121
-
122
-
123
-
124
-
125
-
126
-
127
-
128
-
129
-
130
-
131
-
132
-
133
-
134
 |
 |