Dell Latitude E6400 Service Manual - Page 27
Replacing the Display Assembly E6400 and M2400, Removing the Display Assembly E6400 ATG
 |
View all Dell Latitude E6400 manuals
Add to My Manuals
Save this manual to your list of manuals |
Page 27 highlights
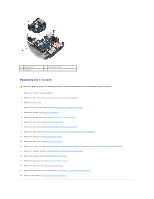
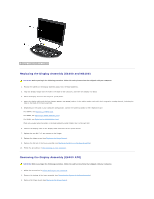
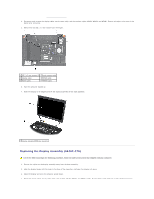
1 display assembly 2 base assembly Replacing the Display Assembly (E6400 and M2400) CAUTION: Before you begin the following procedure, follow the safety instructions that shipped with your computer. 1. Position the cables on the display assembly away from the base assembly. 2. Align the display hinges with the holes in the base of the computer, and lower the display into place. 3. Close the display and turn the computer upside down. 4. Route the display cable and wireless (WLAN, WWAN, and WPAN) cables. Fit the cables under each tab in their respective routing channel, including the tabs on the back of the base assembly. 5. Depending on the cards in your computer configuration, connect the antenna cables to their respective card: For WWAN, see Replacing a WWAN Card. For WPAN, see Replacing a WPAN (UWB/BT) Card. For WLAN, see Replacing the WLAN/WiMax Card. Place any unused antenna cables in the base assembly cable holders next to the card slot. 6. Connect the display cable to the display cable connector on the system board. 7. Replace the two M2.5 x 5-mm screws on the hinges. 8. Replace the hinge covers (see Replacing the Hinge Covers). 9. Replace the bottom of the base assembly (see Replacing the Bottom of the Base Assembly). 10. Follow the procedures in After Working on Your Computer. Removing the Display Assembly (E6400 ATG) CAUTION: Before you begin the following procedure, follow the safety instructions that shipped with your computer. 1. Follow the instructions in Before Working on Your Computer. 2. Remove the bottom of the base assembly (see Removing the Bottom of the Base Assembly). 3. Remove the hinge covers (see Removing the Hinge Covers).
-
 1
1 -
2
-
3
-
4
-
5
-
6
-
7
-
8
-
9
-
10
-
11
-
12
-
13
-
14
-
15
-
16
-
17
-
18
-
19
-
20
-
21
-
 22
22 -
 23
23 -
 24
24 -
 25
25 -
 26
26 -
 27
27 -
 28
28 -
 29
29 -
 30
30 -
 31
31 -
 32
32 -
33
-
34
-
35
-
36
-
37
-
38
-
39
-
40
-
41
-
42
-
43
-
44
-
45
-
46
-
47
-
48
-
49
-
50
-
51
-
52
-
53
-
54
-
55
-
56
-
57
-
58
-
59
-
60
-
61
-
62
-
63
-
64
-
65
-
66
-
67
-
68
-
69
-
70
-
71
-
72
-
73
-
74
-
75
-
76
-
77
-
78
-
79
-
80
-
81
-
82
-
83
-
84
-
85
-
86
-
87
-
88
-
89
-
90
-
91
-
92
-
93
-
94
-
95
-
96
-
97
-
98
-
99
 |
 |
