Dell Latitude E6400 Service Manual - Page 53
pin on bezel bracket
 |
View all Dell Latitude E6400 manuals
Add to My Manuals
Save this manual to your list of manuals |
Page 53 highlights
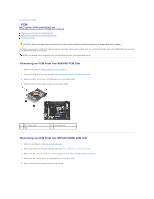
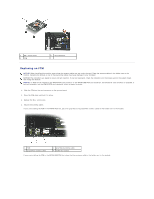
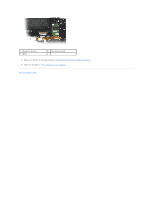
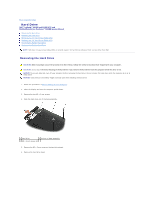
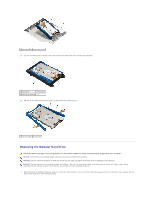
1 hard drive 2 bottom of base assembly 3 M3 x 3-mm screws (2) 5. Remove the M3 x 3-mm screw on the hard drive bezel. 6. Remove the hard drive bezel. 1 hard drive bezel 2 pin on bezel bracket 3 hard drive 4 M3 x 3-mm screw 7. Remove the two M2.5 x 5-mm screws from the cover of the hard drive carrier. 8. Lift the cover up at an angle and slide the tabs on the cover out from the carrier. 1 M2.5 x 5-mm screws (2) 2 cover 3 tabs (2) 4 hard drive carrier 9. Lift the hard drive up an angle and slide it out from the connector on the hard drive carrier.
-
 1
1 -
2
-
3
-
4
-
5
-
6
-
7
-
8
-
9
-
10
-
11
-
12
-
13
-
14
-
15
-
16
-
17
-
18
-
19
-
20
-
21
-
22
-
23
-
24
-
25
-
26
-
27
-
28
-
29
-
30
-
31
-
32
-
33
-
34
-
35
-
36
-
37
-
38
-
39
-
40
-
41
-
42
-
43
-
44
-
45
-
46
-
47
-
 48
48 -
 49
49 -
 50
50 -
 51
51 -
 52
52 -
 53
53 -
 54
54 -
 55
55 -
 56
56 -
 57
57 -
 58
58 -
59
-
60
-
61
-
62
-
63
-
64
-
65
-
66
-
67
-
68
-
69
-
70
-
71
-
72
-
73
-
74
-
75
-
76
-
77
-
78
-
79
-
80
-
81
-
82
-
83
-
84
-
85
-
86
-
87
-
88
-
89
-
90
-
91
-
92
-
93
-
94
-
95
-
96
-
97
-
98
-
99
 |
 |

5.
Remove the M3 x 3-mm screw on the hard drive bezel.
6.
Remove the hard drive bezel.
7.
Remove the two M2.5 x 5-mm screws from the cover of the hard drive carrier.
8.
Lift the cover up at an angle and slide the tabs on the cover out from the carrier.
9.
Lift the hard drive up an angle and slide it out from the connector on the hard drive carrier.
1
hard drive
2
bottom of base assembly
3
M3 x 3-mm screws (2)
1
hard drive bezel
2
pin on bezel bracket
3
hard drive
4
M3 x 3-mm screw
1
M2.5 x 5-mm screws (2)
2
cover
3
tabs (2)
4
hard drive carrier