Dell Latitude E6400 Service Manual - Page 54
Replacing the 1.8 Hard Drive E6400 ATG
 |
View all Dell Latitude E6400 manuals
Add to My Manuals
Save this manual to your list of manuals |
Page 54 highlights
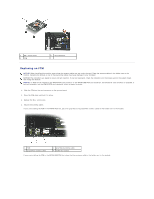
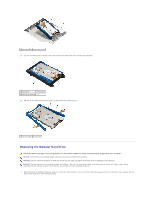
1 hard drive 2 hard drive carrier 3 connector 10. Pull out on the sides of the blue bumper to remove it from the hard drive. 1 hard drive 2 blue bumper Replacing the 1.8" Hard Drive (E6400 ATG) CAUTION: Before you begin any of the procedures in this section, follow the safety instructions that shipped with your computer. NOTICE: Hard drives are extremely fragile. Exercise care when handling the hard drive. NOTICE: Use firm and even pressure to slide the hard drive into place. Excessive force may result in damage to the connector. NOTICE: The top and bottom of the blue bumper are different. The top is flat with slight ridges, and the bottom has protruding ridges. When replacing the blue bumper around the hard drive, ensure that the top is installed facing up, otherwise the cover will not completely close on the hard drive carrier. 1. With the top of the bumper facing up, place the end of the blue bumper on the end of the hard drive opposite from the connector, then enclose the two sides of the hard drive with the blue bumper. 1 blue bumper 2 hard drive 3 connector 4 top of blue bumper 2. Place the hard drive into the carrier at an angle.
-
 1
1 -
2
-
3
-
4
-
5
-
6
-
7
-
8
-
9
-
10
-
11
-
12
-
13
-
14
-
15
-
16
-
17
-
18
-
19
-
20
-
21
-
22
-
23
-
24
-
25
-
26
-
27
-
28
-
29
-
30
-
31
-
32
-
33
-
34
-
35
-
36
-
37
-
38
-
39
-
40
-
41
-
42
-
43
-
44
-
45
-
46
-
47
-
48
-
 49
49 -
 50
50 -
 51
51 -
 52
52 -
 53
53 -
 54
54 -
 55
55 -
 56
56 -
 57
57 -
 58
58 -
 59
59 -
60
-
61
-
62
-
63
-
64
-
65
-
66
-
67
-
68
-
69
-
70
-
71
-
72
-
73
-
74
-
75
-
76
-
77
-
78
-
79
-
80
-
81
-
82
-
83
-
84
-
85
-
86
-
87
-
88
-
89
-
90
-
91
-
92
-
93
-
94
-
95
-
96
-
97
-
98
-
99
 |
 |
