Dell Latitude E6400 Service Manual - Page 55
Removing the Modular Hard Drive
 |
View all Dell Latitude E6400 manuals
Add to My Manuals
Save this manual to your list of manuals |
Page 55 highlights
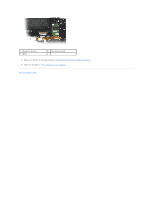
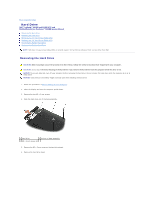
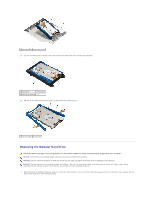
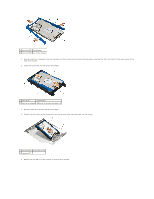
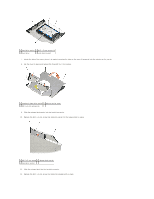
3. Connect the hard drive to the connector in the carrier. 1 hard drive 2 hard drive carrier 3 connector 4. Slide the tabs on the cover under the lip on the hard drive carrier. 5. Replace the two M2.5 x 5-mm screws. 1 M2.5 x 5-mm screws 2 cover 3 lip on hard drive carrier (2) 4 tabs (2) 6. Place the pin on one end of the bezel into the hole on the hard drive. 7. On the other end of the bezel, replace the M3 x 3-mm screw that secures the hard drive bezel to the hard drive. 8. Slide the hard drive into the hard drive bay. 9. Replace the two M3 x 3-mm screws that secure the hard drive to the base assembly. 10. Follow the procedures in After Working on Your Computer. 11. Install the operating system, drivers, and utilities for your computer, as needed. For more information, see the Setup and Quick Reference Guide that shipped with your computer at support.dell.com. Removing the Modular Hard Drive CAUTION: Before you begin any of the procedures in this section, follow the safety instructions that shipped with your computer. CAUTION: Do not touch the metal housing of the hard drive if you remove the hard drive from the computer while the drive is hot.
-
 1
1 -
2
-
3
-
4
-
5
-
6
-
7
-
8
-
9
-
10
-
11
-
12
-
13
-
14
-
15
-
16
-
17
-
18
-
19
-
20
-
21
-
22
-
23
-
24
-
25
-
26
-
27
-
28
-
29
-
30
-
31
-
32
-
33
-
34
-
35
-
36
-
37
-
38
-
39
-
40
-
41
-
42
-
43
-
44
-
45
-
46
-
47
-
48
-
49
-
 50
50 -
 51
51 -
 52
52 -
 53
53 -
 54
54 -
 55
55 -
 56
56 -
 57
57 -
 58
58 -
 59
59 -
 60
60 -
61
-
62
-
63
-
64
-
65
-
66
-
67
-
68
-
69
-
70
-
71
-
72
-
73
-
74
-
75
-
76
-
77
-
78
-
79
-
80
-
81
-
82
-
83
-
84
-
85
-
86
-
87
-
88
-
89
-
90
-
91
-
92
-
93
-
94
-
95
-
96
-
97
-
98
-
99
 |
 |
