Dell XPS 730 H2C Service Manual
Dell XPS 730 H2C Manual
 |
View all Dell XPS 730 H2C manuals
Add to My Manuals
Save this manual to your list of manuals |
Dell XPS 730 H2C manual content summary:
- Dell XPS 730 H2C | Service Manual - Page 1
Dell™ XPS™ 730/730X Service Manual Technical Overview Before You Begin Replacing the Computer Stand Replacing the Computer Cover Replacing the Theater Lighting Unit Replacing Memory Module(s) Replacing a PCI/PCI Express Card Replacing Drives Model DCDO Replacing the Heat Sink Assembly Replacing - Dell XPS 730 H2C | Service Manual - Page 2
Back to Contents Page Before You Begin Dell™ XPS™ 730/730X Service Manual Technical Specifications Recommended Tools Turning Off Your Computer Safety Instructions This chapter provides procedures for removing and installing the components in your computer. Unless otherwise noted, each procedure - Dell XPS 730 H2C | Service Manual - Page 3
CAUTION: To disconnect a network cable, first unplug the cable from your computer and then unplug the cable from the network device. 3. Disconnect all telephone or network cables from the computer. 4. Disconnect your computer and all attached devices from their electrical outlets. 5. Press and hold - Dell XPS 730 H2C | Service Manual - Page 4
Back to Contents Page Replacing a PCI/PCI Express Card Dell™ XPS™ 730/730X Service Manual Removing a PCI Express Graphics Card From a Multi Graphics Card Configuration Installing Graphics Cards for Multi Graphics Card Replacing the PCI and PCI Express Cards WARNING: Before working inside your - Dell XPS 730 H2C | Service Manual - Page 5
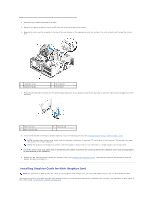
connected through the chassis wall. 1 retention screw 3 alignment guide 2 card retainer 4 fan bracket 7. Press the empty card-slot opening. If you are replacing the card, see Installing Graphics Cards for additional parts that can be ordered from Dell. This section pertains to using dual and - Dell XPS 730 H2C | Service Manual - Page 6
Dell support website at support.dell.com. 1. Follow the procedures in Before You Begin. 2. Remove the computer cover (see Replacing on configuring them, making internal connections, or otherwise customizing them the card is full length, insert the card guide into the alignment slot on the fan bracket - Dell XPS 730 H2C | Service Manual - Page 7
; however, the card is required for troubleshooting purposes. If you remove the card, store it in a safe and secure location. 1. Follow the procedures in Before You Begin. 2. Remove the computer cover (see Replacing the Computer Cover). 3. Disconnect any cables connected to the card. 4. If the card - Dell XPS 730 H2C | Service Manual - Page 8
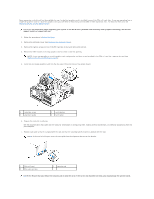
card is full length, press the securing tab on the end of the alignment guides on the fan bracket. 1 PCIe x16 card 3 PCIe x16 card slot 2 filler bracket in the empty card-slot opening. If you are replacing the card, see Replacing a PCI/PCI Express Card. NOTE: Installing filler brackets over - Dell XPS 730 H2C | Service Manual - Page 9
filler bracket or existing card (see Replacing the PCI and PCI Express Cards) to create a card-slot opening. 15. Prepare the card for installation. See the documentation that came with the card for information on configuring the card, making internal connections, or otherwise customizing it for your - Dell XPS 730 H2C | Service Manual - Page 10
in degraded graphics performance. 18. Connect any cables that should be attached each card or filler bracket fits around the alignment guide. 19. Rotate the graphics card bridge back into snap it into place. 21. Replace the computer cover (see Replacing the Computer Cover), reconnect the computer - Dell XPS 730 H2C | Service Manual - Page 11
Page Replacing the Battery Dell™ XPS™ 730/730X Service Manual WARNING: Before working inside your computer, read the safety information that shipped with your computer. For additional safety best practices information, see the Regulatory Compliance Homepage at www.dell.com/regulatory_compliance - Dell XPS 730 H2C | Service Manual - Page 12
Replacing the Computer Cover Dell™ XPS™ 730/730X Service Manual WARNING: Before working inside your computer, read the safety information that shipped with your computer. For additional safety best practices information, see the Regulatory Compliance Homepage at www.dell exists to support the system - Dell XPS 730 H2C | Service Manual - Page 13
Back to Contents Page Replacing the Computer Stand Dell™ XPS™ 730/730X Service Manual WARNING: Your computer is heavy and can be difficult to maneuver. Seek assistance before attempting to lift, move, or tilt the computer and always lift - Dell XPS 730 H2C | Service Manual - Page 14
Back to Contents Page Replacing the Heat Sink Assembly Dell™ XPS™ 730/730X Service Manual Replacing the Air Cooled Heat Sink Assembly Replacing the Liquid Cooling Heat Sink Assembly WARNING: Before working inside your computer, read the safety information that shipped with your computer. For - Dell XPS 730 H2C | Service Manual - Page 15
, then tighten the six screws to secure the assembly. 8. Connect the liquid cooling cable to the H2C connector on the Master Control Board (see Master Control Board). 9. Close the computer cover (see Replacing the Computer Cover). 10. Connect your computer and devices to electrical outlets, and turn - Dell XPS 730 H2C | Service Manual - Page 16
Back to Contents Page - Dell XPS 730 H2C | Service Manual - Page 17
Back to Contents Page Replacing Drives Dell™ XPS™ 730/730X Service Manual Replacing a Hard Drive Replacing the Drive Panel Replacing a Floppy Drive (XPS 730 Only) Replacing a Media Card Reader WARNING: Before working inside your computer, read the safety information that shipped with your computer. - Dell XPS 730 H2C | Service Manual - Page 18
installing does not have the hard drive bracket attached, use your original hard drive bracket; snap the bracket onto the new drive. 3.5" hard drive: Removal: Replacement: - Dell XPS 730 H2C | Service Manual - Page 19
1 hard drive 2 hard drive bracket 2.5" hard drive: Removal: 1 hard drive cage 3 hard drive bracket Replacement: 2 hard drive 1 hard drive 3 hard drive cage 2 hard drive bracket 6. Verify that the hard drive bay is empty and unobstructed. 7. Slide the hard drive into - Dell XPS 730 H2C | Service Manual - Page 20
1 hard drive 2 hard drive bay CAUTION: Ensure that all connectors are properly cabled and firmly seated. 8. Connect the power cable to the hard drive. 9. Connect the hard drive data cable to the hard drive. Dell XPS 730: 1 power cable Dell XPS 730X: 2 data cable - Dell XPS 730 H2C | Service Manual - Page 21
1 power cable 2 data cable 10. Replace the computer cover (see Replacing the Computer Cover). 11. Connect the computer and devices to electrical outlets, and turn them on. See the documentation that came with the drive for instructions on installing any software required for drive operation. - Dell XPS 730 H2C | Service Manual - Page 22
tabs 2 drive panel 7. Rotate the drive panel toward the computer until it snaps into place on the drive panel. 8. Replace the computer cover (see Replacing the Computer Cover). Replacing a Floppy Drive (XPS 730 Only) 1. Follow the procedures in Before You Begin. 2. Remove the computer cover (see - Dell XPS 730 H2C | Service Manual - Page 23
fold cables out of the way to avoid blocking airflow between the fan and cooling vents. 10. Replace the drive panel (see Replacing the Drive Panel). 11. Replace the computer cover (see Replacing the Computer Cover). 12. Connect your computer and devices to their electrical outlets, and turn them on. - Dell XPS 730 H2C | Service Manual - Page 24
See the documentation that came with the drive for instructions on installing any software required for drive operation. 13. Enter system setup (see System Setup), and select the appropriate Diskette Drive option. Replacing an Optical Drive 1. Follow the procedures in Before You Begin. 2. Remove the - Dell XPS 730 H2C | Service Manual - Page 25
and cooling vents. 11. Replace the drive panel (see Replacing the Drive Panel). 12. Replace the computer cover (see Replacing the Computer Cover). 13. Connect your computer and devices to their electrical outlets, and turn them on. See the documentation that came with the drive for instructions on - Dell XPS 730 H2C | Service Manual - Page 26
a Media Card Reader 1. Follow the procedures in Before You Begin. 2. Remove the computer cover (see Replacing the Computer Cover). 3. Remove the drive panel (see Replacing the Drive Panel). 4. Disconnect the cable from the back of the Media Card Reader. 1 media card reader cable 5. Slide - Dell XPS 730 H2C | Service Manual - Page 27
and cooling vents. 10. Replace the drive panel (see Replacing the Drive Panel). 11. Replace the computer cover (see Replacing the Computer Cover). 12. Connect your computer and devices to their electrical outlets, and turn them on. See the documentation that came with the drive for instructions on - Dell XPS 730 H2C | Service Manual - Page 28
Replacing Fans Dell™ XPS™ 730/730X Service Manual WARNING: Before working inside your computer, read the safety information that shipped with your computer. For additional safety best practices information, see the Regulatory Compliance Homepage at www.dell slot fan assembly, connect the fan cable to - Dell XPS 730 H2C | Service Manual - Page 29
fan shroud with the hinge guides on the chassis. 6. Gently rotate the processor fan shroud towards the fan, and then tighten the two captive screws. 7. Connect the fan cable to the rear fan connector on the LED circuit board at the back of the chassis. 8. Replace the processor fan shroud on - Dell XPS 730 H2C | Service Manual - Page 30
between the hard drive bays until it snaps into place. 7. Connect the fan cable to the FAN_HDD connector on the Master Control Board (see Master Control Board). 8. Replace the computer cover (see Replacing the Computer Cover). 9. Connect your computer and devices to electrical outlets, and then turn - Dell XPS 730 H2C | Service Manual - Page 31
to Contents Page Replacing the Master Control Board Dell™ XPS™ 730/730X Service Manual WARNING: Before working inside your computer, read the safety information that shipped with your computer. For additional safety best practices information, see the Regulatory Compliance Homepage at www.dell.com - Dell XPS 730 H2C | Service Manual - Page 32
Back to Contents Page Replacing Memory Module(s) Dell™ XPS™ 730/730X Service Manual WARNING: Before working inside your computer, read the safety information that shipped with your computer. For additional safety best practices information, see the Regulatory Compliance Homepage at www.dell.com/ - Dell XPS 730 H2C | Service Manual - Page 33
. If you insert the module correctly, the securing clips snap into the cutouts at each end of the module. 9. Replace the computer cover (see Replacing the Computer Cover). 10. Connect your computer and devices to electrical outlets, and then turn them on. If the message appears stating that memory - Dell XPS 730 H2C | Service Manual - Page 34
to Contents Page Replacing the Power Supply Dell™ XPS™ 730/730X Service Manual WARNING: Before working inside your computer, read the safety information that shipped with your computer. For additional safety best practices information, see the Regulatory Compliance Homepage on www.dell.com at the - Dell XPS 730 H2C | Service Manual - Page 35
the Hard Drive Fan). 17. Reconnect each of the DC power cables that were previously connected, carefully rerouting them as you found them. 18. Replace the computer cover (see Replacing the Computer Cover). 19. Connect your computer and devices to electrical outlets, and then turn them on. Back to - Dell XPS 730 H2C | Service Manual - Page 36
Back to Contents Page Replacing the Processor Dell™ XPS™ 730/730X Service Manual Removing the Processor Installing the Processor WARNING: Before working inside your computer, read the safety information that shipped with your computer. For additional safety best - Dell XPS 730 H2C | Service Manual - Page 37
the Heat Sink Assembly). CAUTION: Ensure that the processor fan and heat sink assembly is correctly seated and secure. 18. Replace the computer cover (seeReplacing the Computer Cover). 19. Connect your computer and devices to electrical outlets, and then turn them on. Back to Contents Page - Dell XPS 730 H2C | Service Manual - Page 38
- Dell XPS 730 H2C | Service Manual - Page 39
Back to Contents Page Replacing the System Board Dell™ XPS™ 730/730X Service Manual WARNING: Before working inside your computer, read the safety information that shipped with your computer. For additional safety best practices information, see the Regulatory Compliance Homepage at www.dell.com/ - Dell XPS 730 H2C | Service Manual - Page 40
any additional components that you removed from the system board. 14. Reconnect all cables to the system board. 15. Replace the computer cover (see Replacing the Computer Cover). 16. Connect your computer and devices to electrical outlets, and then turn them on. 17. Flash the system BIOS, as needed - Dell XPS 730 H2C | Service Manual - Page 41
Back to Contents Page System Setup Dell™ XPS™ 730/730X Service Manual Overview Entering System Setup System Setup Options-Dell™ XPS™ 730 System Setup Options-Dell XPS 730X Boot Sequence Clearing CMOS Settings Overview Use System Setup to: l change the system configuration information after you add, - Dell XPS 730 H2C | Service Manual - Page 42
, Discard Changes and Exit, Load Optimal Defaults, and Discard Changes. System Setup Options-Dell XPS 730X System Information Product Name BIOS Version Input Service tag Service Tag Asset Tag Memory Installed XPS 730X. Displays the BIOS version number and date information. Allows you to input the - Dell XPS 730 H2C | Service Manual - Page 43
when the load on the processor is reduced. Limits the max value the processor standard CPUID function will support. If enabled, the processor clock speed and core voltage are adjusted dynamically based on the processor load. Integrated Devices USB Functions HD Audio Controller Onboard IEEE1394 - Dell XPS 730 H2C | Service Manual - Page 44
(QPI) frequency. Allows you to force a DDR3 frequency slower than the detected frequency. Allows you to adjust the Uncore Ratio. Sets the ratio between CPU Core Clock and the FSB Frequency. Allows you to change the supervisor password. Allows you to change the user password. You cannot use the user - Dell XPS 730 H2C | Service Manual - Page 45
a USB device, connect the USB device to a USB connector. 2. Turn on (or restart) your computer. 3. When the DELL logo appears, press Replacing the Computer Cover). 5. Locate the Reset CMOS jumpers on the system board (see System Board Components). 6. Remove jumper from pins 2 and 3. Dell™ XPS™ 730 - Dell XPS 730 H2C | Service Manual - Page 46
Dell™ XPS™ 730X 7. Place the jumper on pins 1 and 2 and wait for 5 seconds. 8. Move the jumper back onto pins 2 and 3. 9. Close the computer cover (see Replacing the Computer Cover). 10. Connect your computer and devices to electrical outlets, and then turn them on. Back to Contents Page - Dell XPS 730 H2C | Service Manual - Page 47
Back to Contents Page Technical Overview Dell™ XPS™ 730/730X Service Manual Inside View of Your Computer System Board Components Master Control Board WARNING: Before working inside your computer, read the safety information that shipped with your - Dell XPS 730 H2C | Service Manual - Page 48
) 22 PCIe x16 (Generation 2) slot 2 (PCIe x16_2) 24 PCIe x16 (Generation 1) slot 3 (PCIe x16_3) 26 PCIe x16 (Generation 2) slot 1 (PCIe x16_1) 28 internal eSATA header Dell XPS 730X - Dell XPS 730 H2C | Service Manual - Page 49
right LED IO header (BOT_RT_LED) 6 power button board header (CON_PWR_BTN) 8 hard drive fan (FAN_HDD) 10 internal USB headers (USB_FLEXBAY 1-2) 12 USB input header (USB_MB) 14 H2C liquid cooling header (H2C) - Dell XPS 730 H2C | Service Manual - Page 50
header (MB_IO_HDR) 15 rear IO LED connector (CONN_REAR) Back to Contents Page 16 front CPU fan header (FAN_CPU_FRONT) - Dell XPS 730 H2C | Service Manual - Page 51
Contents Page Replacing the Theater Lighting Unit Dell™ XPS™ 730/730X Service Manual Replacing the Batteries Replacing the Theater 6. Replace the computer cover (see Replacing the Computer Cover). 7. Connect your computer and devices to electrical outlets, and then turn them on. Replacing the - Dell XPS 730 H2C | Service Manual - Page 52
lighting card to the chassis and lift the card out of the slot. 5. Replace the theater lighting card in its slot and tighten the screw. 6. Replace the computer cover (see Replacing the Computer Cover). 7. Connect your computer and devices to electrical outlets, and then turn them on. Back to
-
 1
1 -
 2
2 -
 3
3 -
 4
4 -
 5
5 -
 6
6 -
 7
7 -
8
-
9
-
10
-
11
-
12
-
13
-
14
-
15
-
16
-
17
-
18
-
19
-
20
-
21
-
22
-
23
-
24
-
25
-
26
-
27
-
28
-
29
-
30
-
31
-
32
-
33
-
34
-
35
-
36
-
37
-
38
-
39
-
40
-
41
-
42
-
43
-
44
-
45
-
46
-
47
-
48
-
49
-
50
-
51
-
52
 |
 |

Dell™ XPS™ 730/730X Service Manual
Model DCDO
Notes, Cautions, and Warnings
Information in this document is subject to change without notice.
© 2008 Dell Inc. All rights reserved.
Reproduction of these materials in any manner whatsoever without the written permission of Dell Inc. is strictly forbidden.
Trademarks used in this text:
Dell
, the
DELL
logo, and XPS are trademarks of Dell Inc.;
Microsoft
and
Windows,
are either trademarks or registered trademarks of Microsoft
Corporation in the United States and/or other countries.
Other trademarks and trade names may be used in this document to refer to either the entities claiming the marks and names or their products. Dell Inc. disclaims any
proprietary interest in trademarks and trade names other than its own.
November 2008
Rev. A00
Technical Overview
Before You Begin
Replacing the Computer Stand
Replacing the Computer Cover
Replacing the Theater Lighting Unit
Replacing Memory Module(s)
Replacing a PCI/PCI Express Card
Replacing Drives
Replacing the Heat Sink Assembly
Replacing the Processor
Replacing Fans
Replacing the Master Control Board
Replacing the System Board
Replacing the Power Supply
Replacing the Battery
System Setup
NOTE:
A NOTE indicates important information that helps you make better use of your computer.
CAUTION:
A CAUTION indicates potential damage to hardware or loss of data if instructions are not followed.
WARNING:
A WARNING indicates a potential for property damage, personal injury, or death.