Dell XPS 730 H2C Service Manual - Page 28
Replacing Fans
 |
View all Dell XPS 730 H2C manuals
Add to My Manuals
Save this manual to your list of manuals |
Page 28 highlights
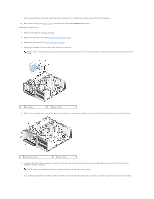
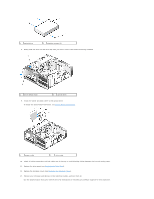
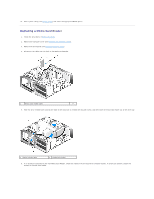
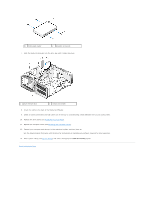
Back to Contents Page Replacing Fans Dell™ XPS™ 730/730X Service Manual WARNING: Before working inside your computer, read the safety information that shipped with your computer. For additional safety best practices information, see the Regulatory Compliance Homepage at www.dell.com/regulatory_compliance. WARNING: To guard against likelihood of electric shock, laceration by moving fan blades or other unexpected injuries, always unplug your computer from the electrical outlet before removing the cover. Removing the Card Slot and Processor Fan Shrouds 1. Follow the procedures in Before You Begin. 2. Remove the computer cover (see Replacing the Computer Cover). 3. Remove the captive screws on top of the shroud you are removing and lift the shroud out of the chassis. Replacing the Card Slot Fan Assembly 1. Remove the card slot fan shroud (see Removing the Card Slot and Processor Fan Shrouds). 2. Remove any full-length expansion cards (see Replacing the PCI and PCI Express Cards). 3. Disconnect the fan cable from the FAN_CAGE connector on the system board. 4. Remove the front and back screws on the base of the fan cage. 5. Pull the fan cage to towards the rear of the chassis to disengage the cage tabs. 6. Lift the cage off the chassis. 1 cage housing 3 screws (2) 2 fan cage 7. To install the card slot fan assembly, connect the fan cable to the FAN_CAGE connector on the system board (see Master Control Board). 8. Align the fan cage tabs with the slots in the chassis. Insert the tabs and push the cage towards the front of the chassis. 9. Screw in the fan retention screws on the front and back of the fan cage.
-
 1
1 -
2
-
3
-
4
-
5
-
6
-
7
-
8
-
9
-
10
-
11
-
12
-
13
-
14
-
15
-
16
-
17
-
18
-
19
-
20
-
21
-
22
-
 23
23 -
 24
24 -
 25
25 -
 26
26 -
 27
27 -
 28
28 -
 29
29 -
 30
30 -
 31
31 -
 32
32 -
 33
33 -
34
-
35
-
36
-
37
-
38
-
39
-
40
-
41
-
42
-
43
-
44
-
45
-
46
-
47
-
48
-
49
-
50
-
51
-
52
 |
 |