Dell XPS 730 H2C Service Manual - Page 15
Replacing the Liquid Cooling Heat Sink Assembly - overheating
 |
View all Dell XPS 730 H2C manuals
Add to My Manuals
Save this manual to your list of manuals |
Page 15 highlights
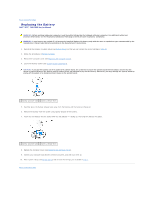
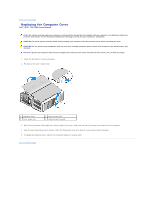
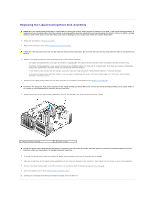
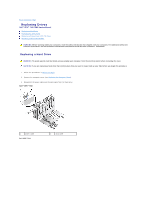
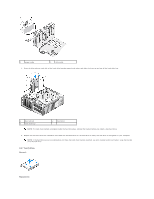
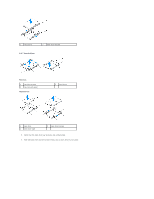
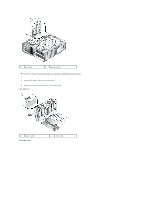
Replacing the Liquid Cooling Heat Sink Assembly WARNING: The liquid cooling assembly is responsible for cooling the system board chipset in addition to the CPU. If the liquid cooling assembly is replaced with an assembly other than the original, a cooling solution must be installed to avoid overheating the chipset. Failure to install a cooling solution, either third- party or Dell provided, may result in damage to your system and render the system inoperable. 1. Follow the procedures in Before You Begin. 2. Remove the computer cover (see Replacing the Computer Cover). WARNING: The processor heat sink can get very hot during normal operation. Be sure that the heat sink has had sufficient time to cool before you touch it. 3. Observe the following cautions when working with the liquid cooling assembly. l The liquid cooling assembly is not user serviceable or upgradeable. All required service should be done by qualified service personnel only. l The liquid cooling assembly in your system contains a non-refillable coolant. In the event of a coolant leak, shut down your system immediately. Unplug your system from the power outlet and contact Dell Technical Support. l In the event of skin contact with the coolant, wash your skin with soap and water. Seek medical attention if irritation develops. l In the event of eye contact with the coolant, rinse your eyes immediately with water, with your eyelids open, for 15 minutes. Seek medical attention if irritation persists. 4. Disconnect the liquid cooling cable from the H2C connector on the Master Control Board (see Master Control Board). CAUTION: The processor heat sink is attached to the liquid cooling assembly. When you remove the liquid cooling assembly, lay it upside down or on its side to avoid damaging the heatsink thermal interface. 5. Loosen the screws on the liquid cooling assembly, then lift the assembly out of the computer and set it aside. 1 liquid cooling assembly 2 captive screws CAUTION: Ensure that adequate thermal grease is applied to the top of the processor. Thermal grease is critical for ensuring adequate thermal bonding, which is a requirement for optimal processor operation. 6. To install the liquid cooling heat sink assembly, apply thermal grease to the top of the processor as needed. 7. Align the screw holes on the liquid cooling assembly with the holes on the base of the computer, then tighten the six screws to secure the assembly. 8. Connect the liquid cooling cable to the H2C connector on the Master Control Board (see Master Control Board). 9. Close the computer cover (see Replacing the Computer Cover). 10. Connect your computer and devices to electrical outlets, and turn them on.
-
 1
1 -
2
-
3
-
4
-
5
-
6
-
7
-
8
-
9
-
 10
10 -
 11
11 -
 12
12 -
 13
13 -
 14
14 -
 15
15 -
 16
16 -
 17
17 -
 18
18 -
 19
19 -
 20
20 -
21
-
22
-
23
-
24
-
25
-
26
-
27
-
28
-
29
-
30
-
31
-
32
-
33
-
34
-
35
-
36
-
37
-
38
-
39
-
40
-
41
-
42
-
43
-
44
-
45
-
46
-
47
-
48
-
49
-
50
-
51
-
52
 |
 |