Dell XPS 730 H2C Service Manual - Page 34
Replacing the Power Supply
 |
View all Dell XPS 730 H2C manuals
Add to My Manuals
Save this manual to your list of manuals |
Page 34 highlights
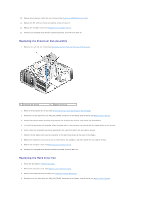
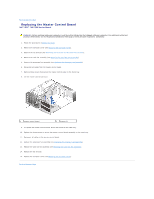
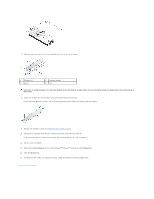
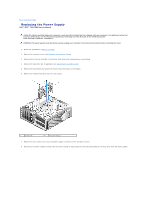
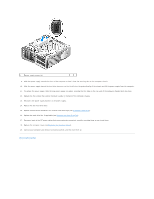
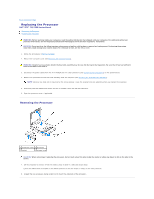
Back to Contents Page Replacing the Power Supply Dell™ XPS™ 730/730X Service Manual WARNING: Before working inside your computer, read the safety information that shipped with your computer. For additional safety best practices information, see the Regulatory Compliance Homepage on www.dell.com at the following location: www.dell.com/regulatory_compliance. WARNING: To guard against electrical shock, always unplug your computer from the electrical outlet before removing the cover. 1. Follow the procedures in Before You Begin. 2. Remove the computer cover (see Replacing the Computer Cover). 3. Remove all hard drives installed in the interior hard drive bays (see Replacing a Hard Drive). 4. Remove the hard drive fan, if applicable (see Replacing the Hard Drive Fan). 5. Remove the two screws that attach the forward hard drive bay to the chassis. 6. Remove the forward hard drive bay from the chassis. 1 screws (4) 2 hard drive bays 7. Remove the four screws that attach the power supply to the back of the computer chassis. 8. Disconnect the power supply harness from the power supply by depressing the two tabs and pulling the harness away from the power supply.
-
 1
1 -
2
-
3
-
4
-
5
-
6
-
7
-
8
-
9
-
10
-
11
-
12
-
13
-
14
-
15
-
16
-
17
-
18
-
19
-
20
-
21
-
22
-
23
-
24
-
25
-
26
-
27
-
28
-
 29
29 -
 30
30 -
 31
31 -
 32
32 -
 33
33 -
 34
34 -
 35
35 -
 36
36 -
 37
37 -
 38
38 -
 39
39 -
40
-
41
-
42
-
43
-
44
-
45
-
46
-
47
-
48
-
49
-
50
-
51
-
52
 |
 |